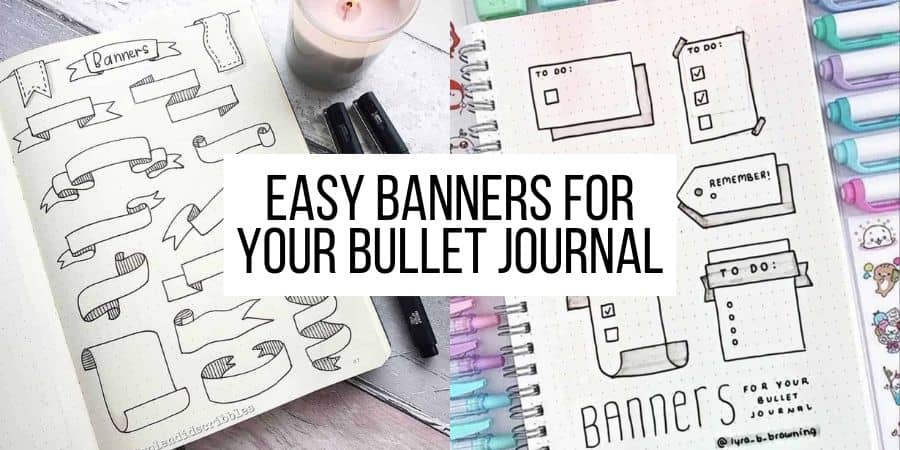
Easy & Creative Bullet Journal Banners
Hey Planning Masher!
Today we are learning how to draw banners with these 15+ Bullet Journal banner ideas and tutorials.
Banners are such a fun way to add creativity and design to your Bullet Journal pages.
They’re also pretty easy to draw (as you’ll learn below), so they’re perfect for beginners. When I first started, banners were the main tools I used when creating my spreads.
In this post, I’ll give you 9 step-by-step banner tutorials, a doodle with me YouTube video with more banners, and tons of Bullet Journal banners inspirations from other creators.
So whether you’re a complete beginner and want to learn how to draw banners or a seasoned Bullet Journalist searching for some more ideas – you’re in the right place!
This post may contain affiliate links. They will be of no extra expense for you, but I receive a small credit. Please see my Disclosure for more details. Thank you for supporting Masha Plans!
How To Use Banners
The first question is very simple – how would you use banners in your Bullet Journal?
Banners are usually used to highlight the headers on your pages, which in term serves one purpose – to organize the content.
We’ll go through some banner inspirations today, but if you’re looking for header ideas, check my post with 21 Simple Bullet Journal Headers.
But back to our point, here is how you can use banners in your Bullet Journal:
- Page titles. Every page in your Bullet Journal starts with a title, and if you use a banner it’ll look more interesting and easier to get what the page is about at first glance.
- To add decor. If you’re not that artistic but want to add some fun and creativity – using banners can be a great choice!
If you are interested in developing your creativity and being more artistic in your Bullet Journal, be sure to check out these posts:
Beginner’s Guide To Brush Lettering
How To Bring Your Bullet Journal To The Next Level
- For daily/weekly spreads. When you have weekly or daily spreads, you want to have a very clear understanding what date it is and where you should write your tasks. A banner can be a good addon to these pages.
- To fill out empty space. Do you have a weird empty spot on your page? Just add a banner there for decoration! Color it in a fun way, add an interesting pattern or just use it to add a little quote. Which brings us to….
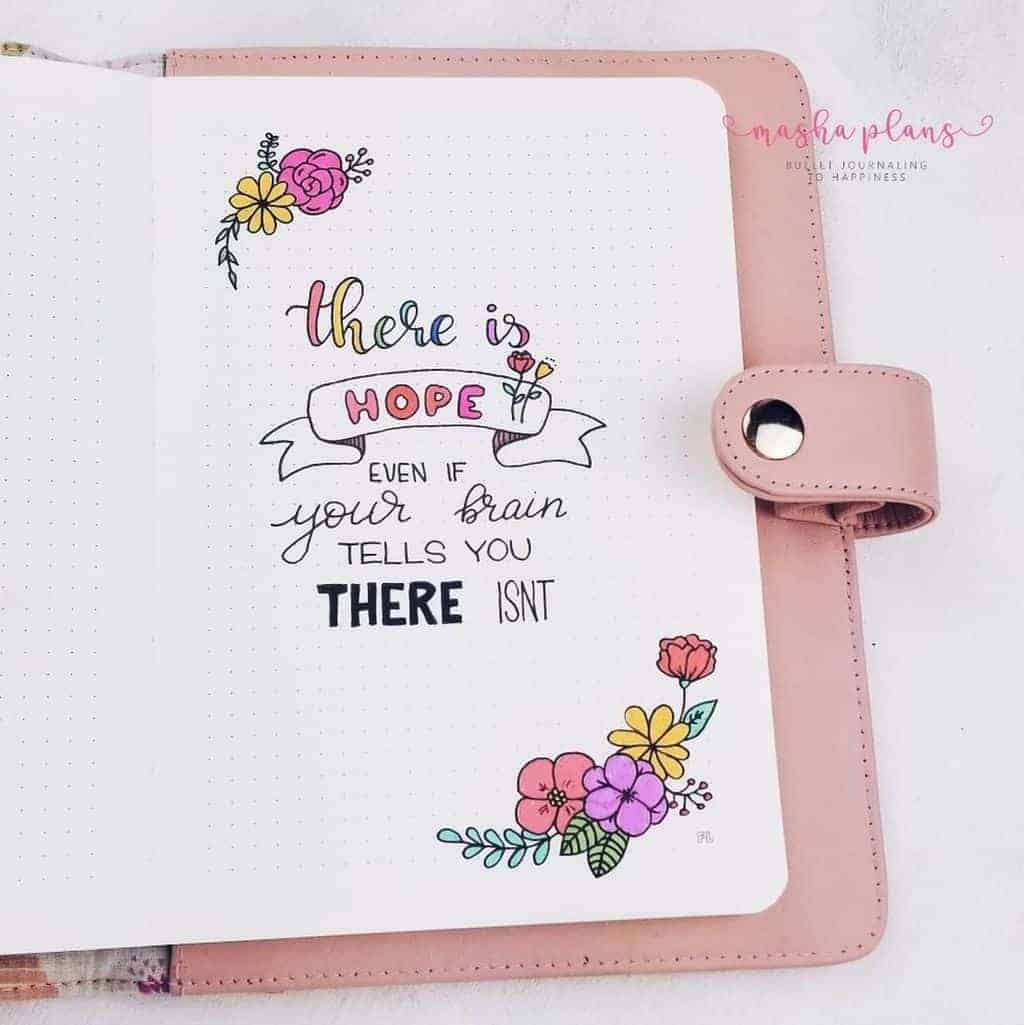
- Quote pages. When you create a quote page, you can use more than just fun lettering styles. Adding different banners can be a fun way to spice up your quote pages.
- They are also great for note-taking. If you’re using something like sketchnoting to process information, banners can be a great way to enhance your notes.
Speaking of, if you’re interested be sure to check my post How To Create Quote Paged In Your Bullet Journal.
But enough of Masha Plans content promo, let’s talk about my favorite – stationery!
Stationery
Here are some of my favorite supplies to use when I set down to work on my banners.
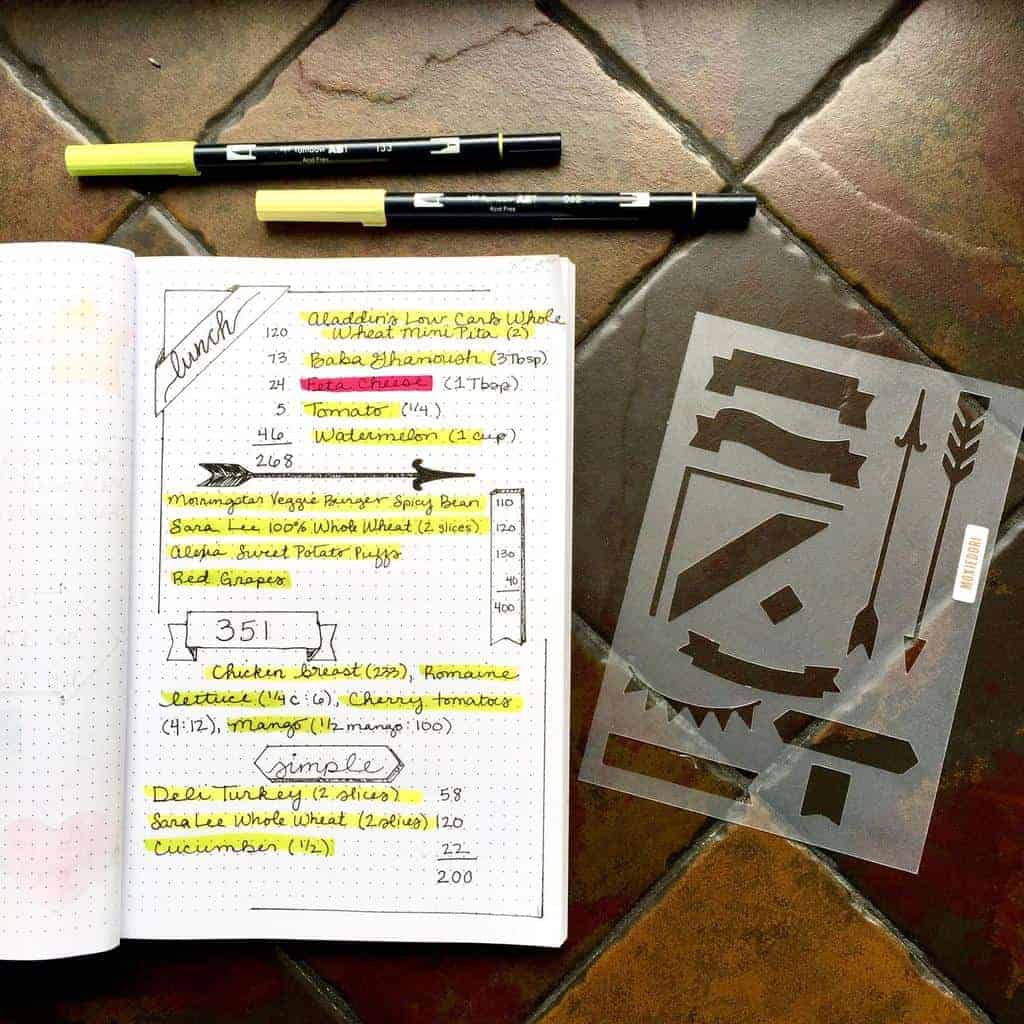
First, this is a must – good fineliners. They create these great reach black lines that are perfect for banners. There’re many greats on the market right now, but my favorites are Faber Castell Pitt Artist Pens.

- PITT artist pens contain pigmented India ink that is both archival and acid free
- Perfect for drawing on the go!
- Convenient wallet keeps all your drawing tools together
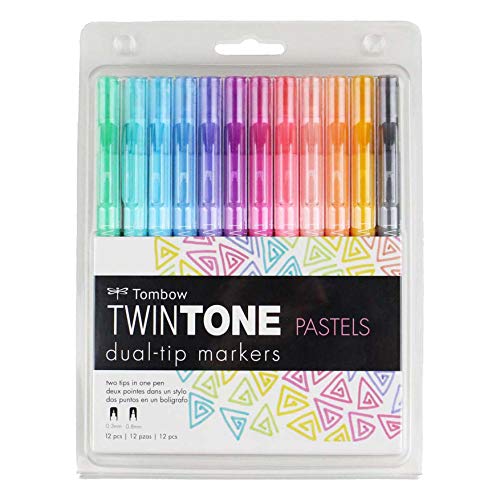
Coloring is optional for banners, but if you do – I prefer using bright colors to make the banners stand out even more! You know that my favorite coloring pens are Zebra Mildliners.

- Versatile creative tool! With a broad chisel tip at one end and fine bullet point at the other, these creative markers are great for highlighting, hand lettering and creative expression
- Bring your bullet journal or Bible study to life! Zebra Pen Mildliner Highlighters have a unique, mild color that makes any creative work a little more snazzy in the office, art department or studio
- Layer ink for extra creativity! Translucent, water-resistant ink in soft colors layers beautifully and won’t bleed through the page; Double ended marker-highlighters are perfect for coloring books
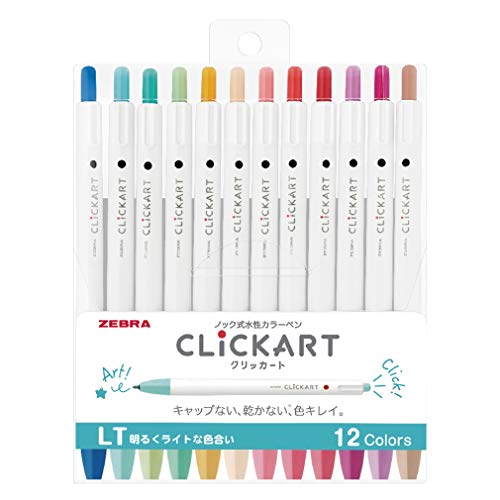
Finally, you might want to use colors to outline the banners, instead of a fineliner. My favorites for this are Tombow Twin Tone markers and Zebra Clickart Marker Pens.
Another awesome thing about banners is that they can easily be created with stencils! Here are some awesome stencils from Amazon that will allow you to create stunning banners in seconds.
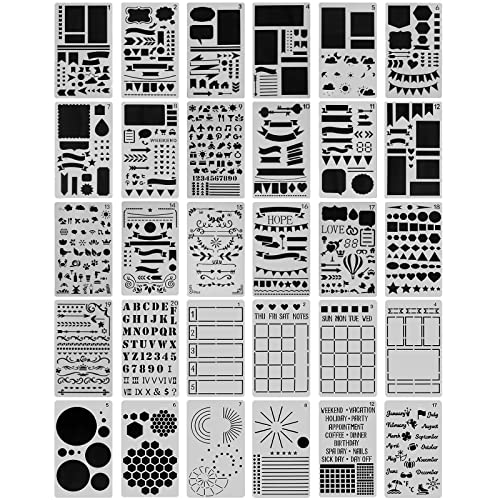
- Journal Stencils Reusable: Our bujo stencils easy to clean with warm soapy water and dry, washable and reusable.
- Fashion Design Notebook Stencils: 30 different scrapbook stencils are designed for you to create your perfect daily or personality graffiti.
- Planner Stencil Material: Made of high quality Eco-friendly PET, Not only cleanable, but also flexible and sturdy, you can use these journal templates for a long time without worrying about it being broken.

- Planner or bullet journal stencil set consists of 12 pcs of A VARIETY OF PATTERNS, LAYOUTS & SYMBOLS
- Our stencils for bullet journaling are MULTIPURPOSE & good for visual planning, scrapbooking etc
- Bullet dot journal stencil supplies kick your journaling up a notch making YOUR INFO PERFECTLY ARRANGED

- FUN CREATION- 20 Pcs style bullet journal stencils including various shapes and icons, which are designed for you to create your perfect daily or personality graffiti.
- WORK BETTER WITH PENS- the shapes are suitable for most pens such as fine point marker, ballpoint, brush pen, bullet pen, watercolour pen, colored pencils, pencil ect.
- PERFECT SIZE- stencils are 4x7 inches. Fit inside of most A5 Organizer/Notebook like Leuchtturm and Moleskine. You can also attach your stencil inside your journal with Washi tape.Convenient for carry.
Another great place to shop for stencils is Etsy, and I have some from Moxie Dori and OopsaDaisyUK.
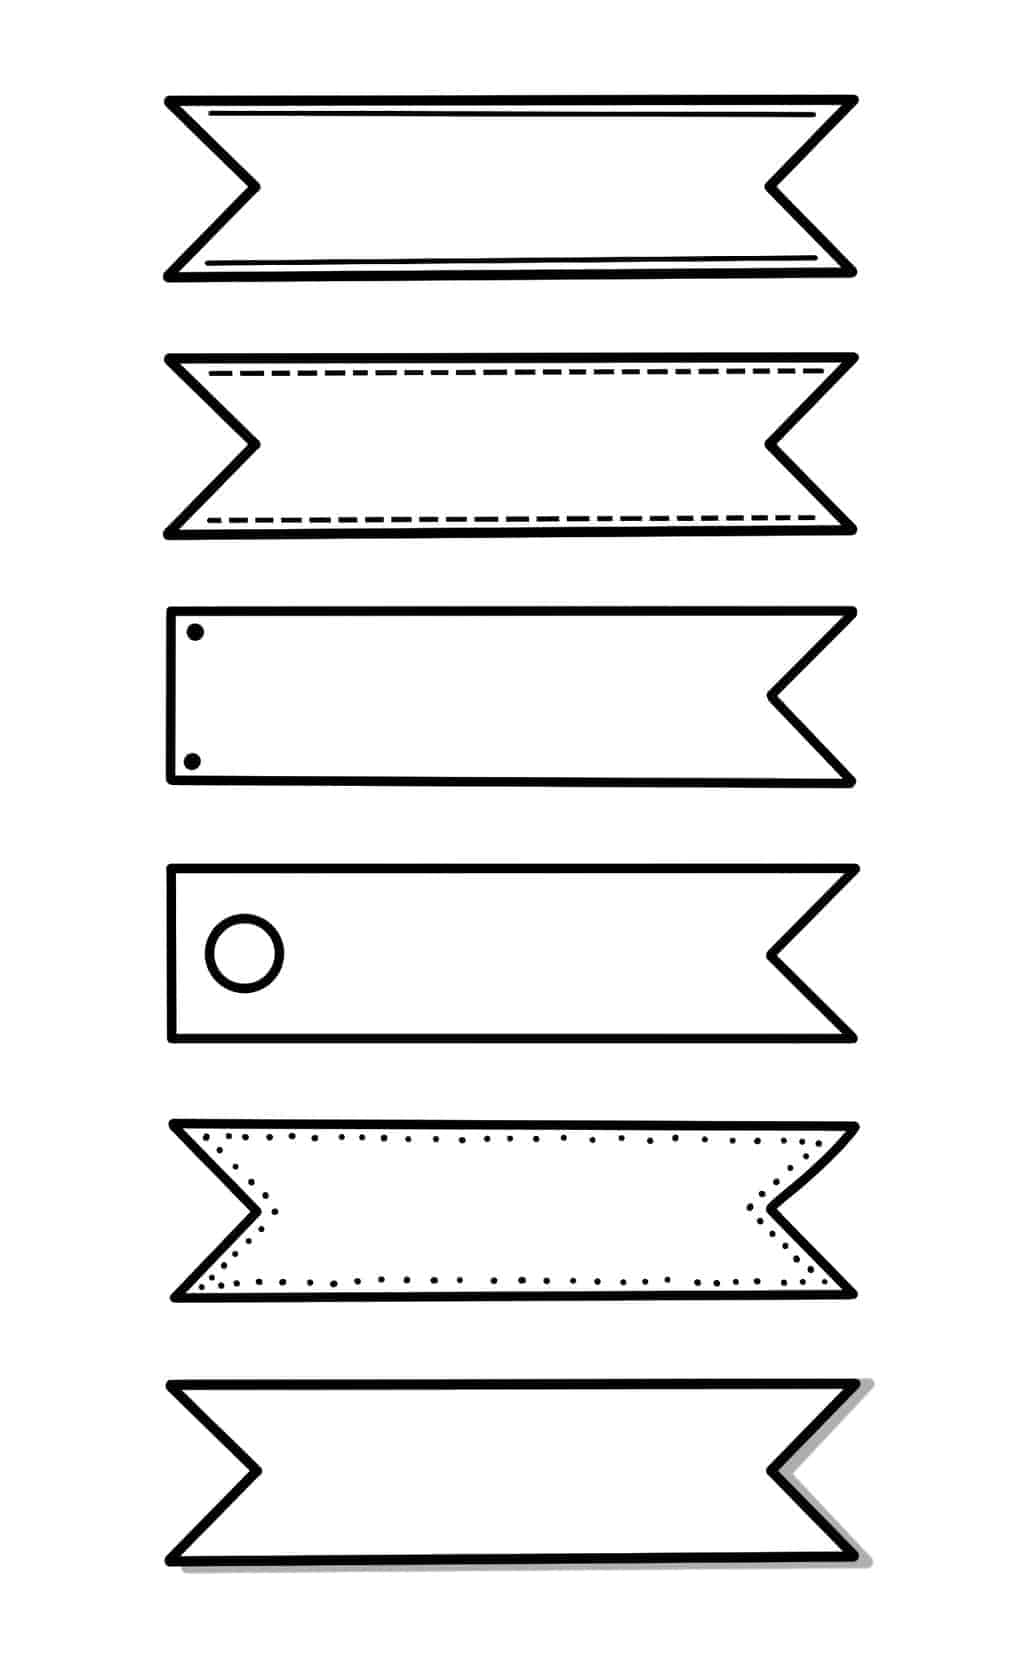
Step By Step Simple Banners
Here are some basic easy banners you can start with. Once you get comfortable with these, it’ll be much easier to play around and create some that are unique to your style.
Basic banner
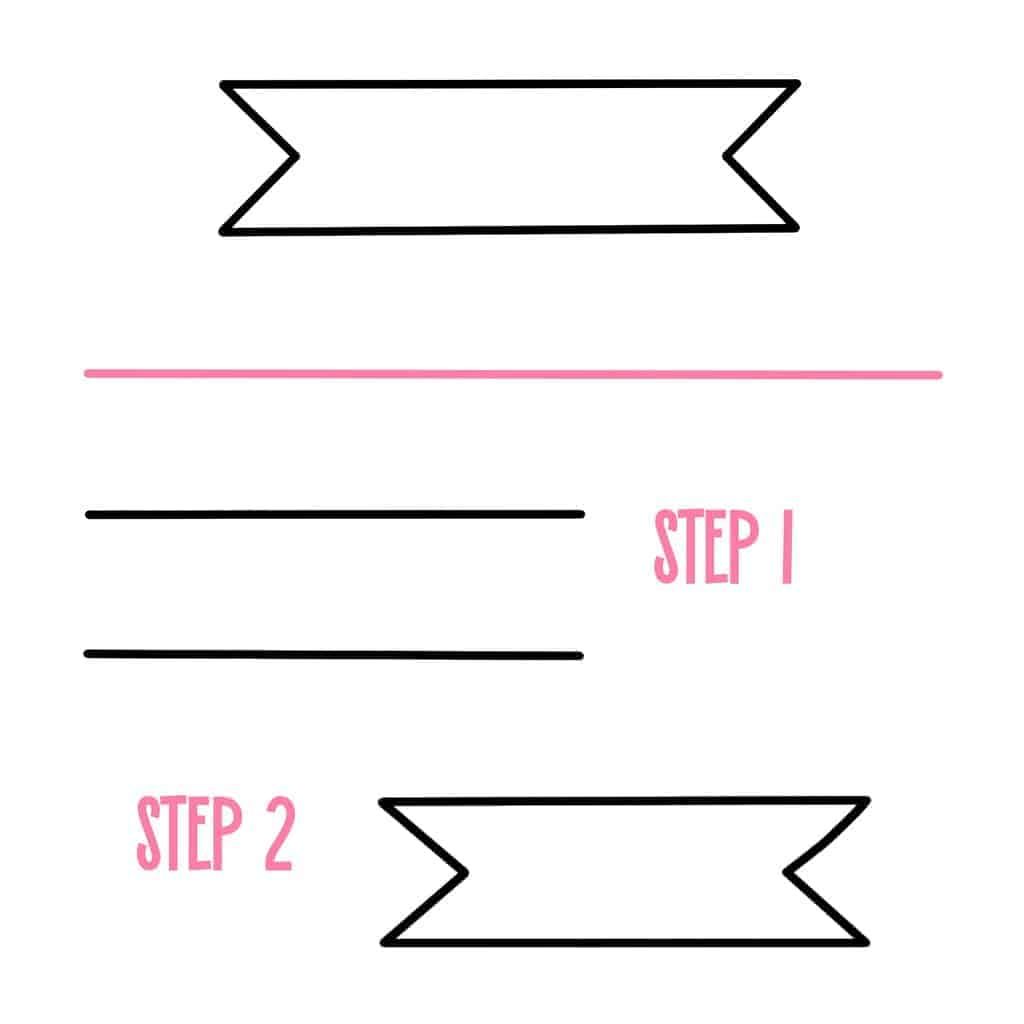
This one is as simple as they come. Start from two parallel lines and make them as long as needed for whatever work you’ll want to add there.
Then on both sides create inverter arrowhead shapes. Or create it just on one side, or point the arrowhead out.
There are really so many ways you can play around with this banner; below are some variations to get your creativity going.
Single fold banner
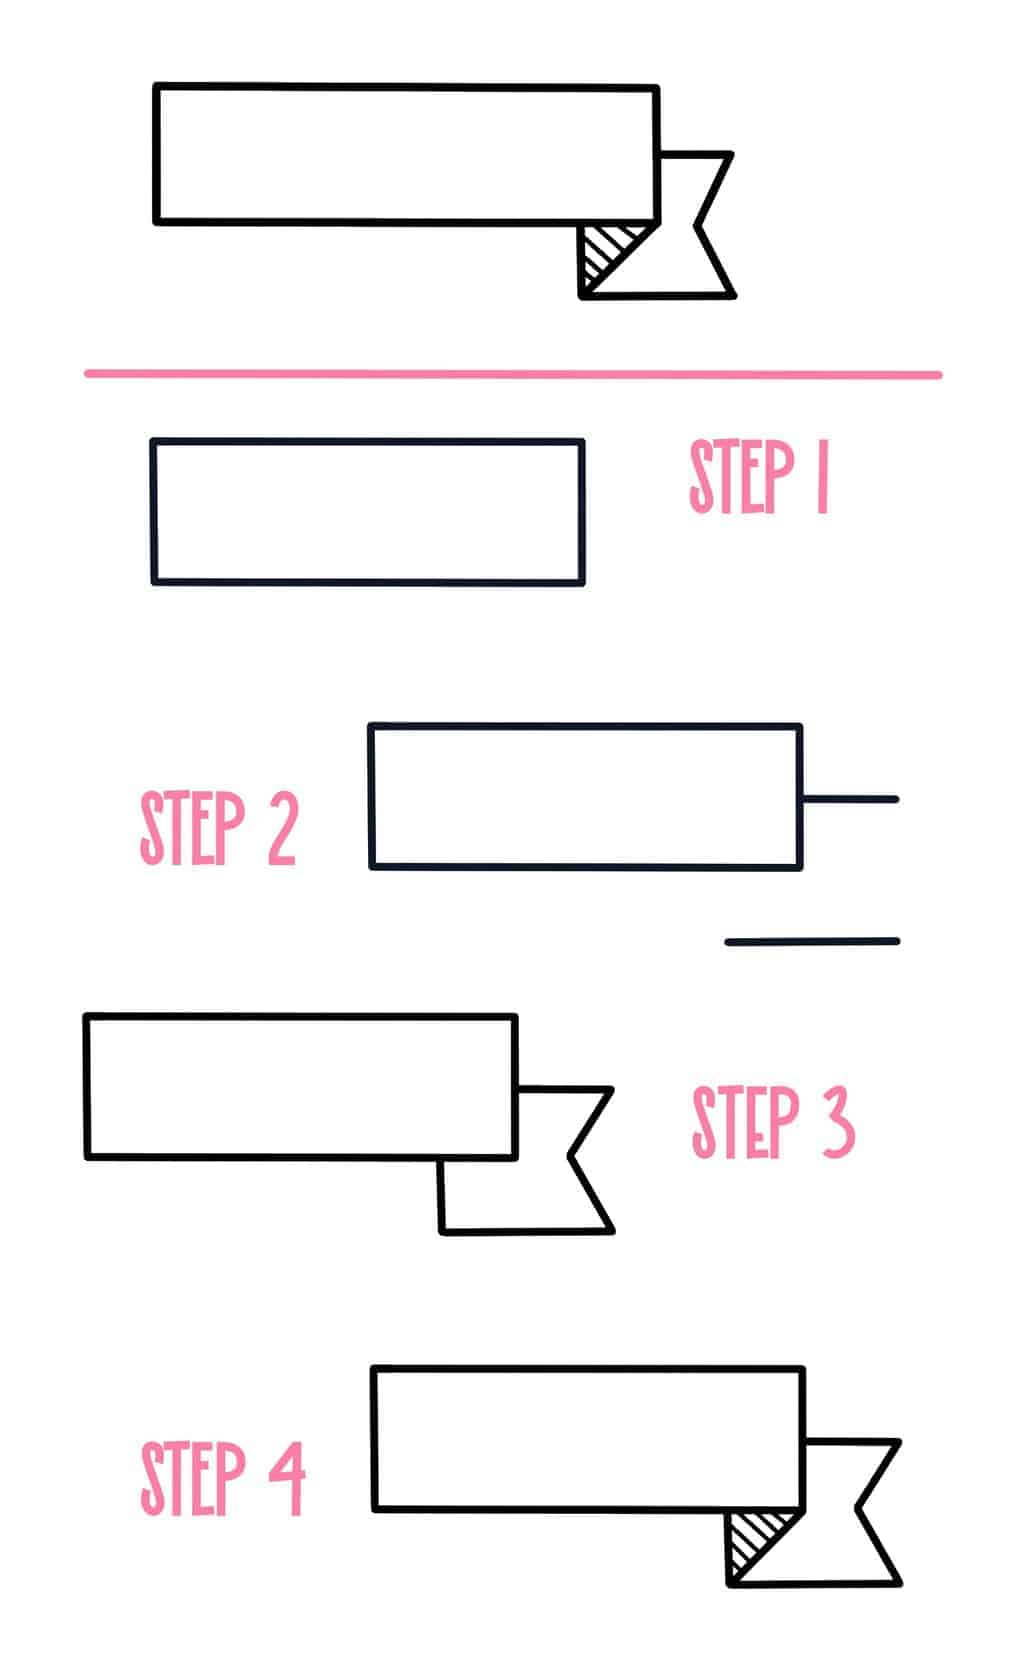
Once you learn the single fold, you’ll be able to create as many folds as you wish.
Start with a rectangle for your header. As always – make sure it’s big enough. What helps me a lot is writing my word in pencil first; that way, I will definitely have the correct size banner.
Then choose one side of the rectangle and add a line coming out of its side. Then add a parallel line under the rectangle. It should be a bit longer than the line coming from the side, and make sure the space between the two lines is as wide as a rectangle.
Connect the outer side with an inward-looking arrowhead.
Finally to create a fold for the banner, draw a diagonal line from the lower-left corner of the lower banner section to the lowest corner of the bigger banner.
You can play around with the design of the flop – add some lined there or color it completely black.
Once you learn how to create this one flop you’ll be able to play around – create flops on each side, turn them below, and under the main banner – whatever looks best for you.

Multiple fold banner
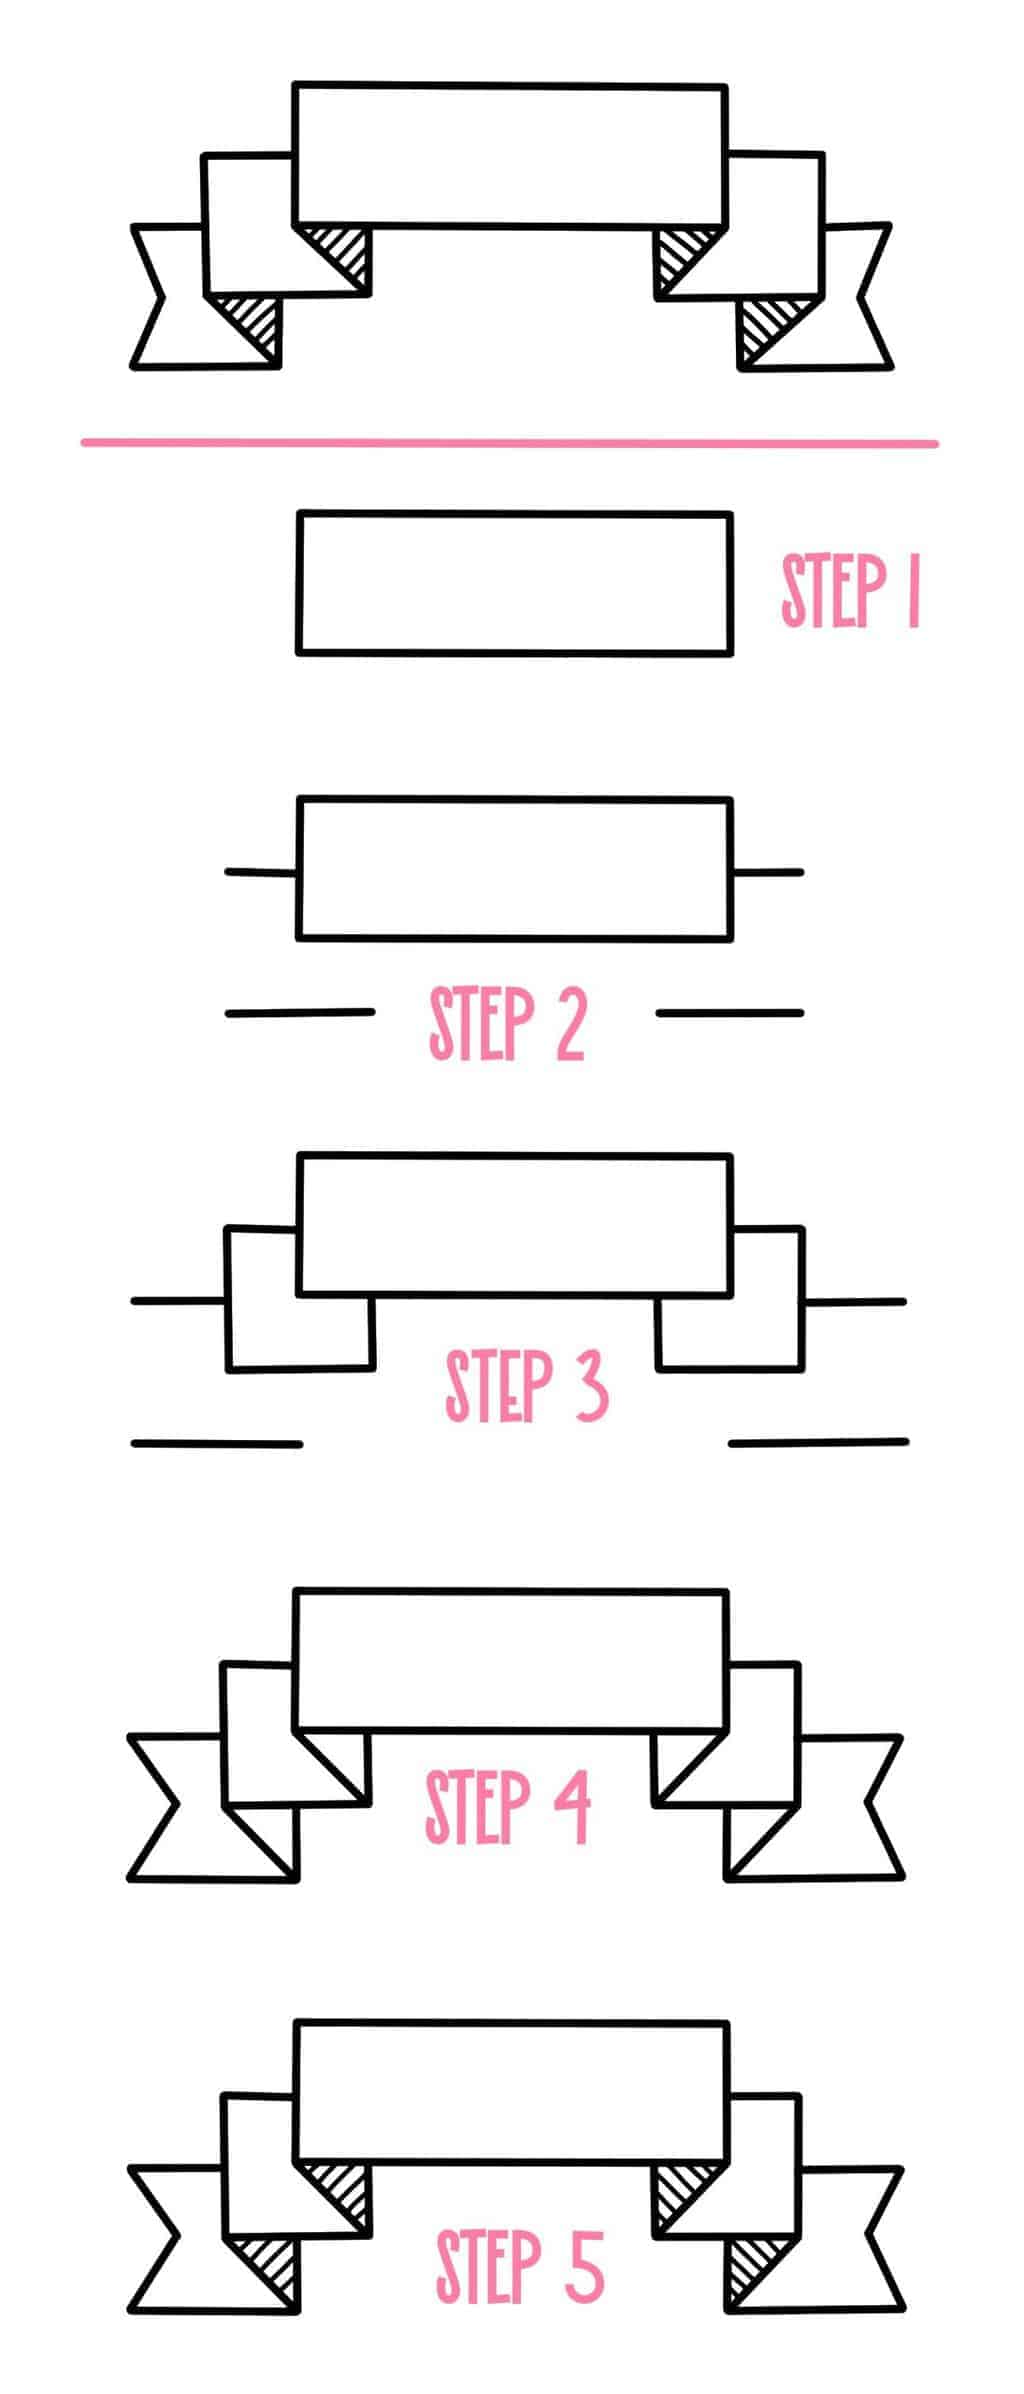
A way to make your banners different is to add more dimension to them with multiple folds.
This banner looks so dimensional and fun, and it’s really easy to create it, especially after you mastered the basic banner.
Start from the main rectangle. Then add flops like in the basic banner – draw two parallel lines, one shorter and coming from the side, another under the big rectangle, and a bit longer.
Just make sure you connect them not with an inverted arrowhead but with just a vertical line. Do create flops though – connect the corners with a diagonal line.
Next – follow the same process but coming out of the flop you just created. Be sure this one has inward-looking arrowhead endings.
When creating flops always make sure your flops are as wide as your main rectangle. Usually, when I create those in my Bullet Journal, I make them two squared wide – it’s a good size for header and it’s easy to make sure all elements are the same size.
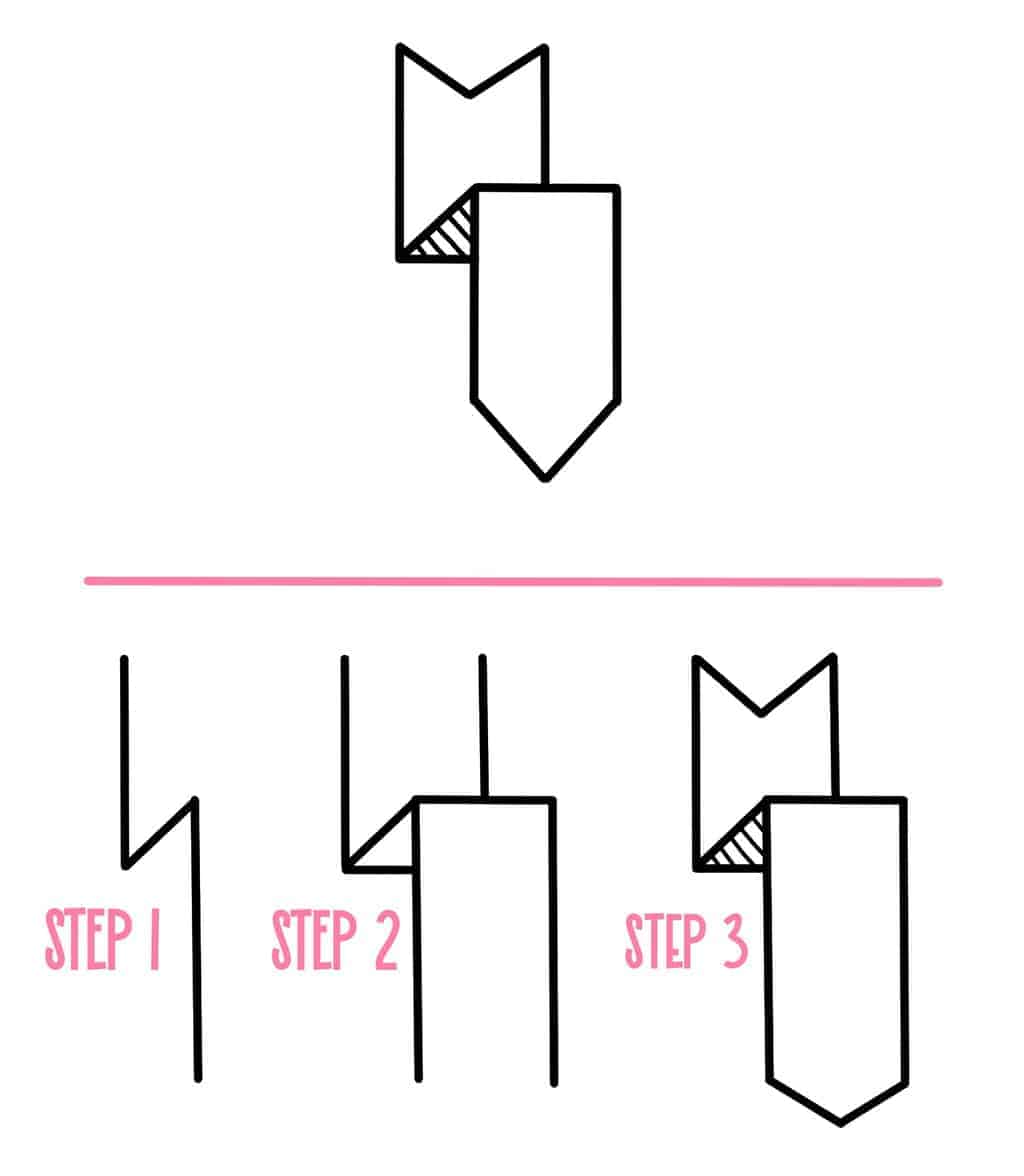
Wrapped banner
This is a fun banner to use for your quotes, and it’s a bit more difficult than the previous ones, but don’t worry; I’ll walk you through each step.
Start by creating two rectangles, one under another, and I like having the upper one a bit longer than the bottom one.
Then create flops as we did before. One on the left side of a bigger rectangle and one on the right side of a smaller one.
Now to connect them – use a pencil first! Connect the top right corner of the larger rectangle with the top left corner of a smaller one. Then add a line between the bottom right corner of the larger one and the bottom left of the smaller ones.
It had to be in pencil first because only lines that are in a space between the banners should be visible. So use a pen over those and erase the pencil.
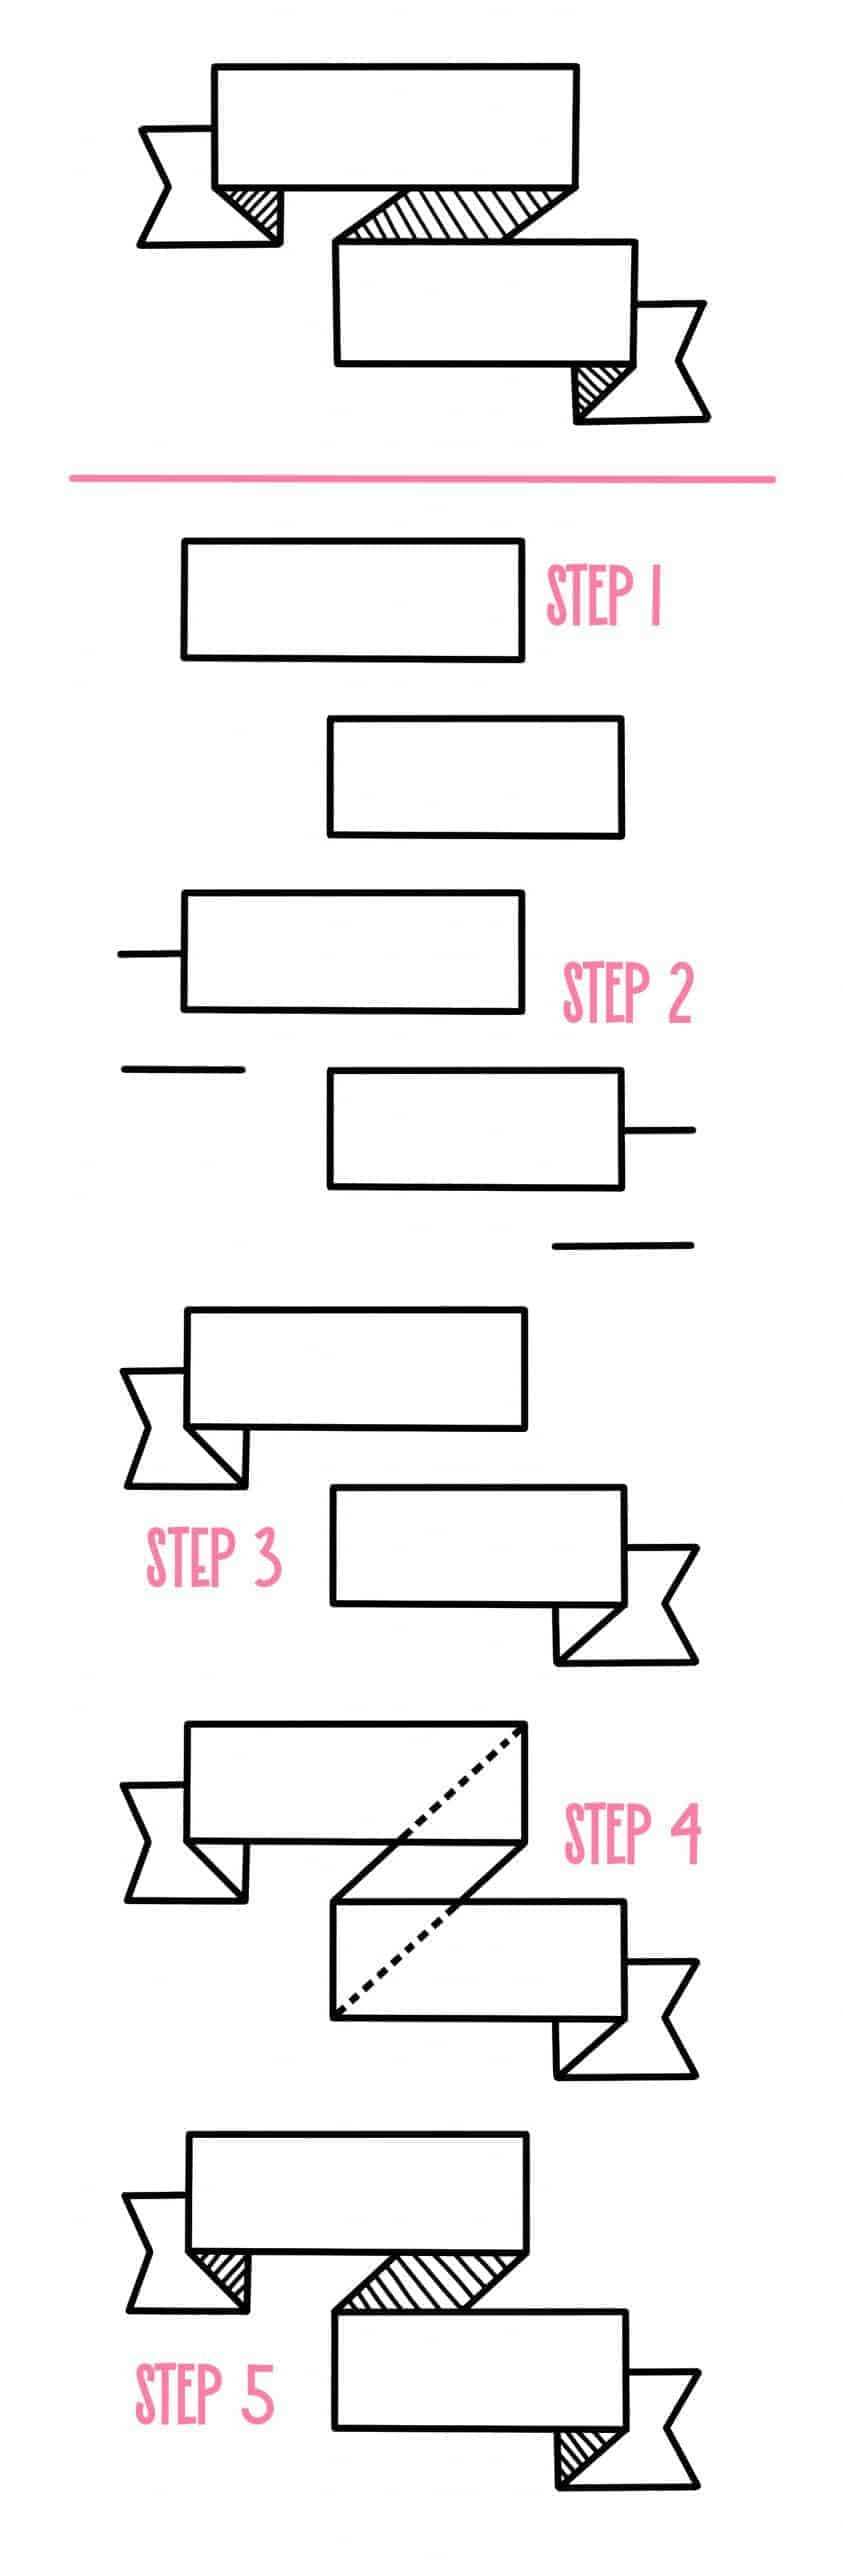
Two-face horizontal banner
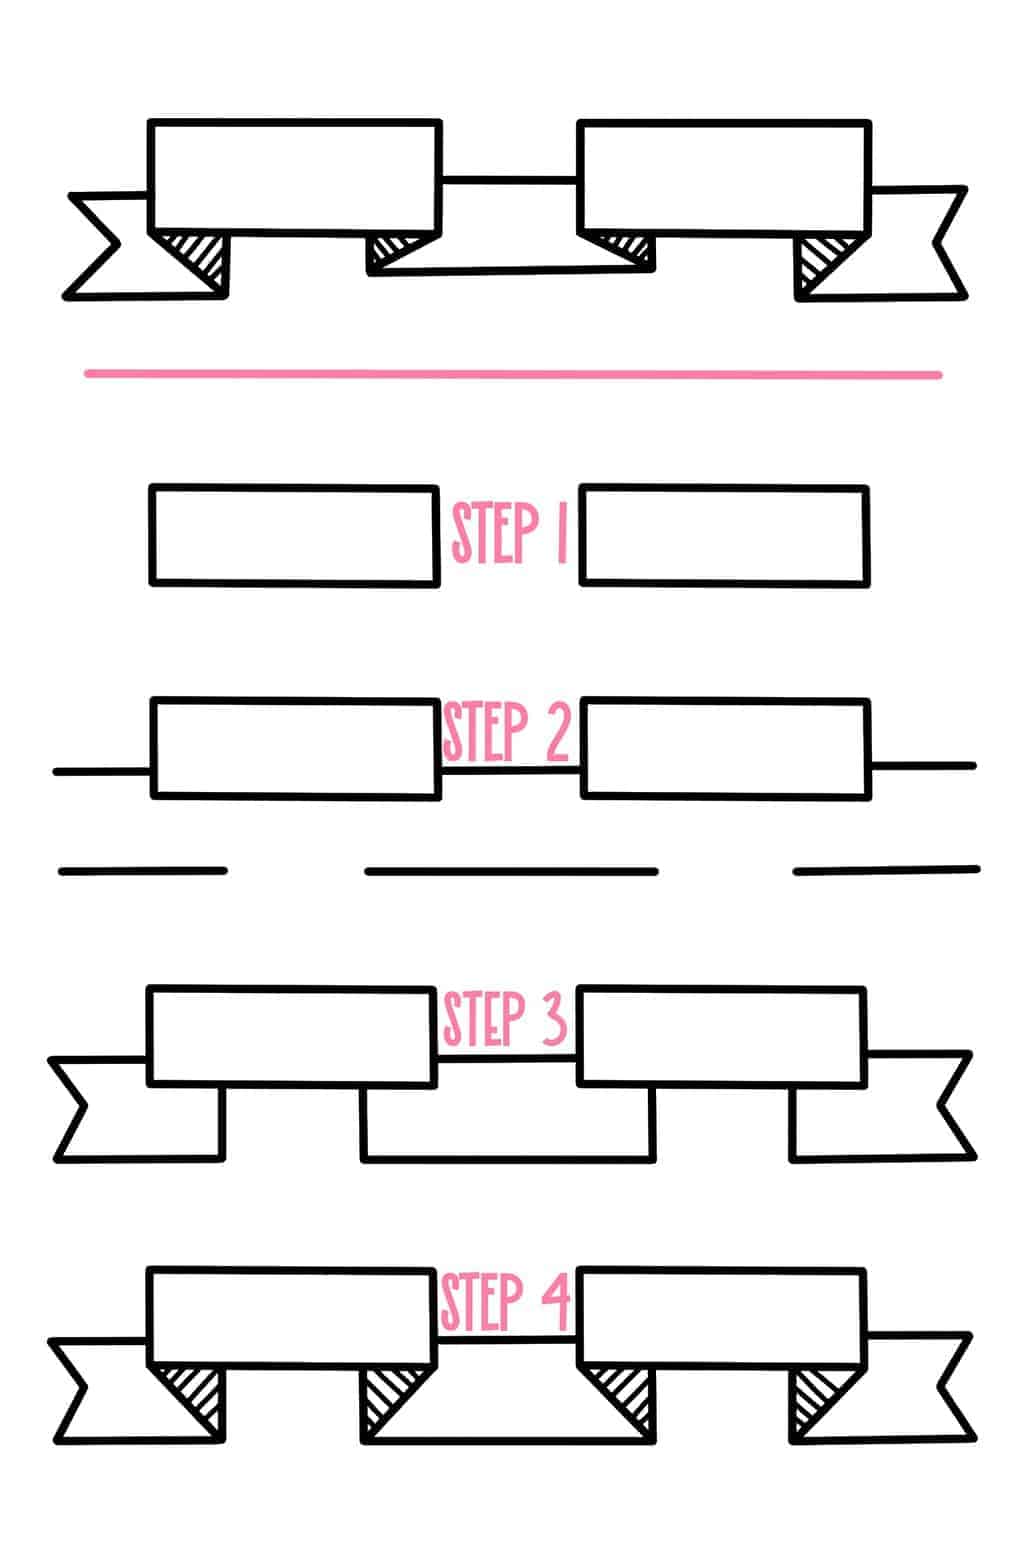
This is probably the most difficult one, but again, it’s all based on basic fold drawings, so by now, you should be a total pro in it.
Start from two big rectangles; these are your big frontal words.
Then follow our well-established tutorial and create folds on the sides, one on the left side of the left rectangle and one on the right side of the right rectangle.
Here we just create one fold but feel free to add dimension and create extra folds as we did in a multiple fold banner.
Next step – creating the center. About halfway through your rectangles, draw a horizontal line that connects them both.
Then add a parallel horizontal line under the rectangles; it should be a bit longer. Remember that the space between these two lines should be as big as your main two rectangles.
Final step – adding the folds themselves. Connect the corners and color the dark part, or just add lines, however you want to create shade.
Rounded banner

You probably noticed how all these banners look pretty squary. Well, it doesn’t have to be that way!
You can absolutely make them more rounded.
Your first option is to create a banner, as we learned before in pencil, and then round the corners as you outline it with a pen.
Another way is this little tutorial. Start from a curved line with curved flops on the sides. This is the top of your banner.
Then add a curved line at the bottom, but without the flops. Then connect this line to the top element with small vertical lines.
Also, create the shadowed parts by connecting the curves with the main line.
Final touch – add a small horizontal line coming out of the main rectangle and add inward falling arrowheads to the ends of your flops.
I hope this wasn’t too confusing of an explanation, be sure to refer to the image above for better understanding.
Downward facing banner
I almost wrote downward-facing dogs and have been doing too much yoga. It’s my favorite way to move dat butt a bit during the quarantine. Not that it helps much, I’ve see the kilos adding up every week hahahha T_T
This might be connected to 1 am lemon bites… Now that I know I have two weeks before leaving the USA, I’m desperately trying to catch up on all my eating.
Ok back to banners, sorry I got too carried away with all the food experiences I’m having in the USA.
A downward banner is very simple and can be used as a filler or maybe as a daily header.
Start from a lighting-shaped line. Then add a line parallel to the longer part of the lightning and add straight lines to connect the two vertical lines and create a fold.
Final step – add arrowhead shapes to the end of the banner.
Parchment style banner
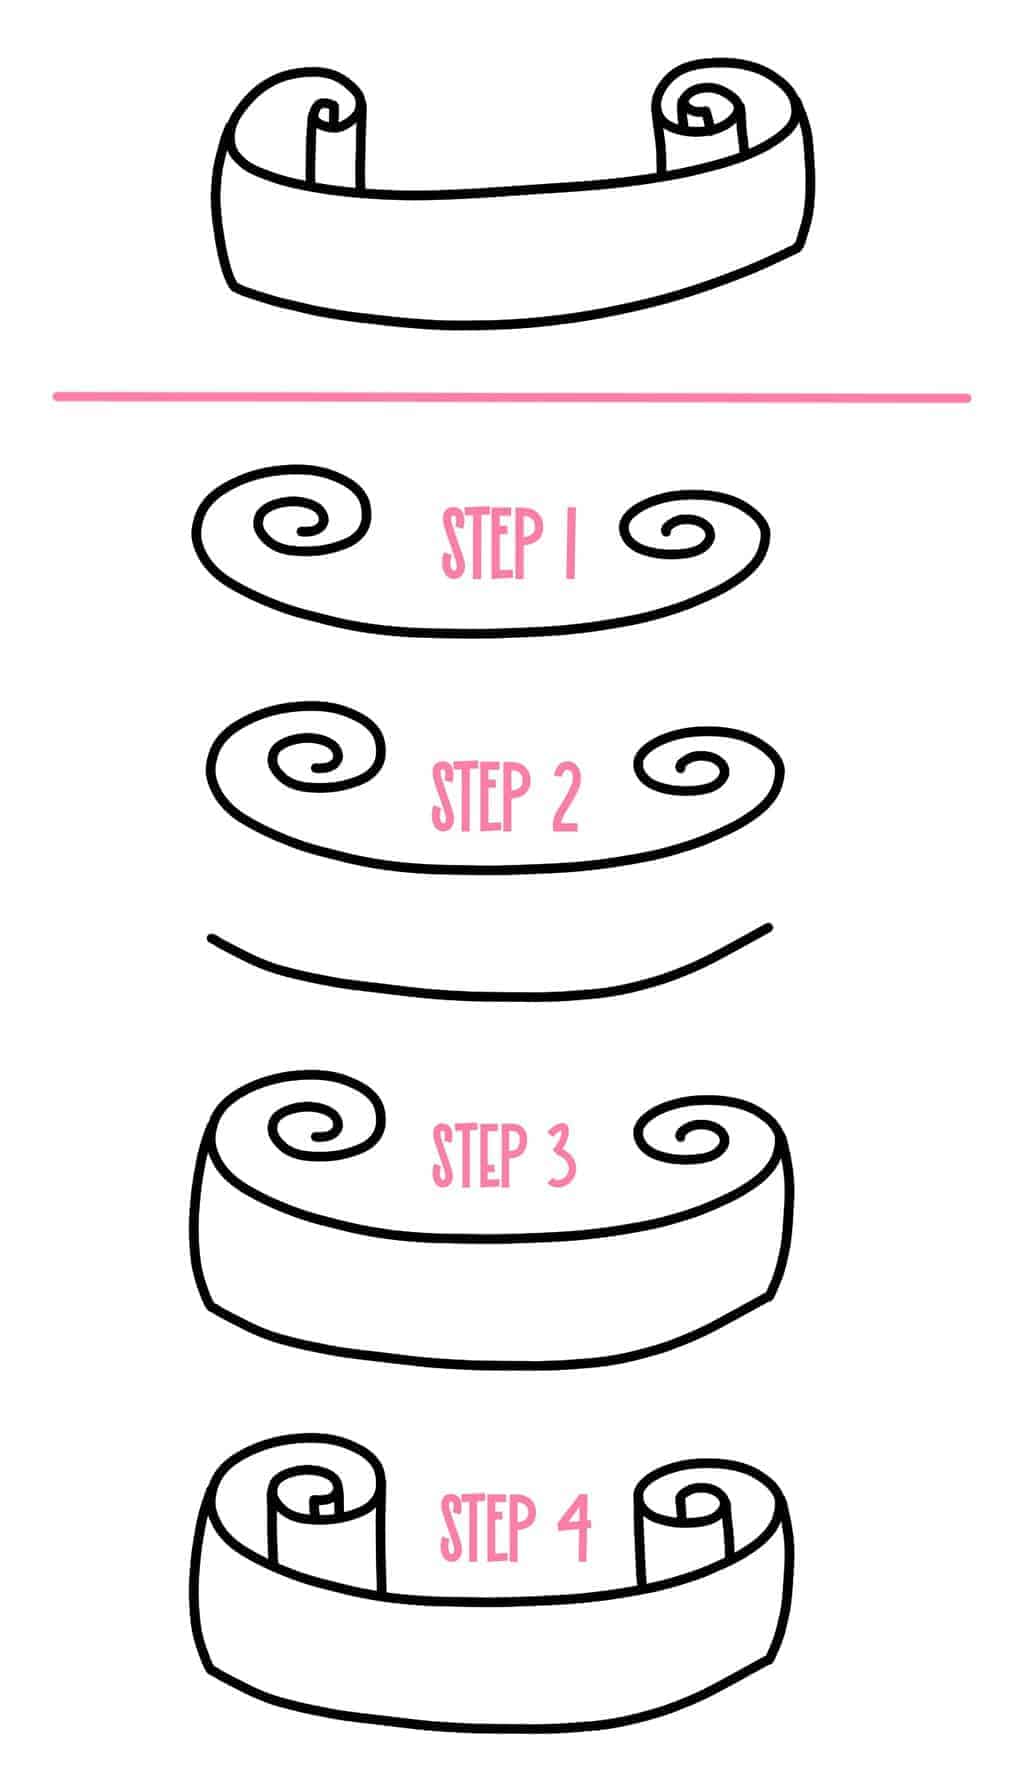
I love this, especially if you’re doing a Harry Potter theme. The word itself makes me think of magic and spells.
It’s also pretty easy to draw. Create a curved line with some extra swirls on the sides. The top of your banner is done.
Next step – curve another line parallel to it,
Finally, add vertical lines down to connect the two lines and create the curves of the parchment.
Frag banners
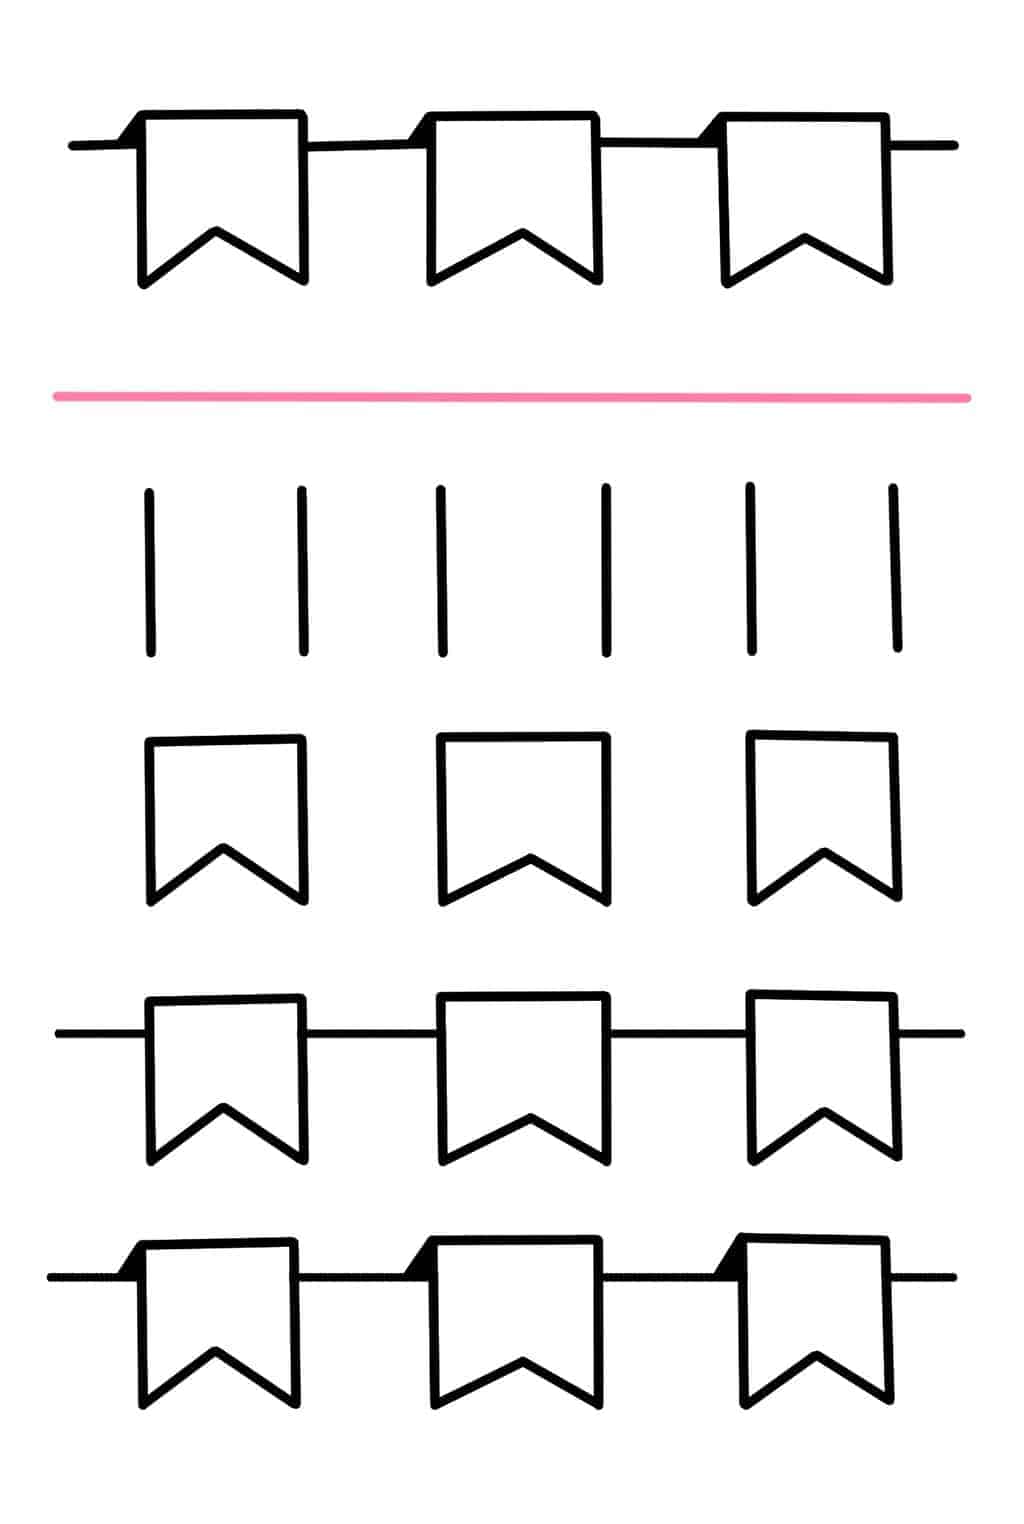
Final banners are very simple flags. You can use one flag for one letter if you decide to go with this banner.
Start by drawing several squares, but make sure one side is an arrow shape facing in.
For this step use a pencil first and create a line crossing all the squares. Draw this line a bit under the top of your squares, just a few millimeters.
When using a pen just outline the parts that are outside of the squares
Finally, create flops – from the top left corners of your squares to draw an angled line down. Fill out this little triangle with black ink or maybe just some lines.
The main reason why you’d use banners in your Bullet Journal is to enhance your headers, so let me just say if you need some header inspiration, be sure to check my post 90+ Bullet Journal Header and Title Ideas.
Banner Video
I had to create a video with doodling some of these and many more banners, so be sure to watch it and get some fun ideas!
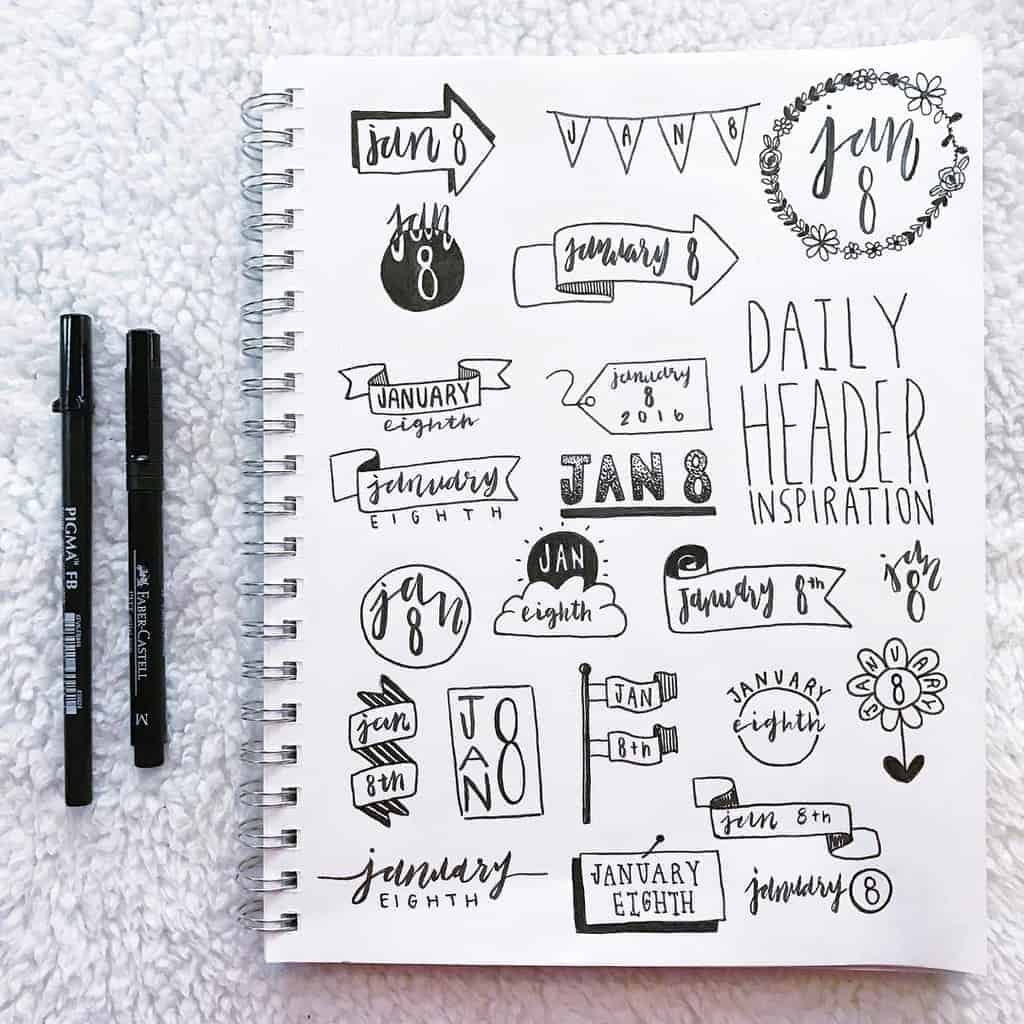
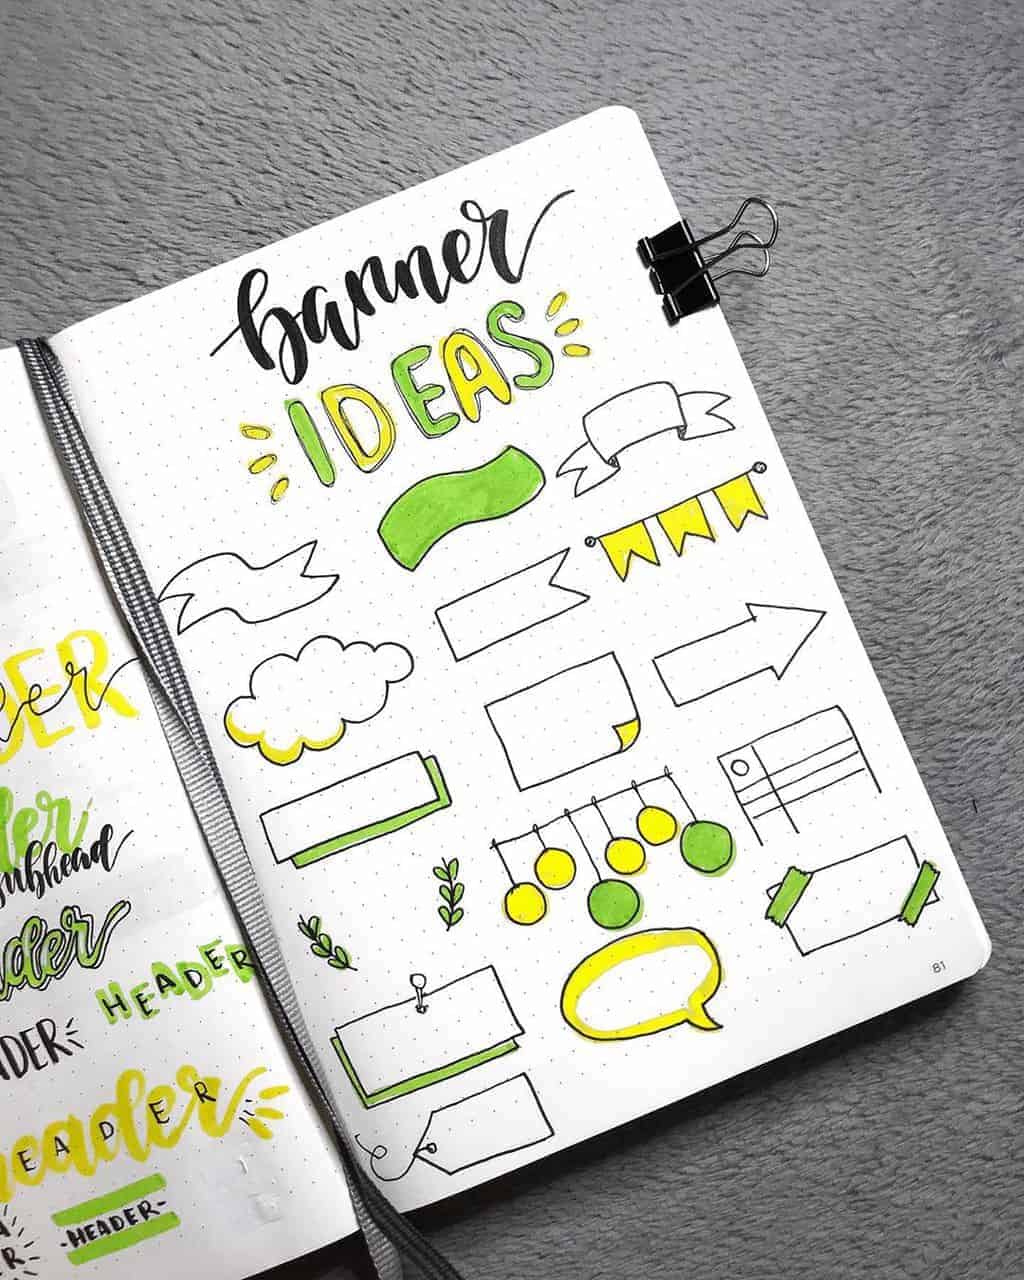
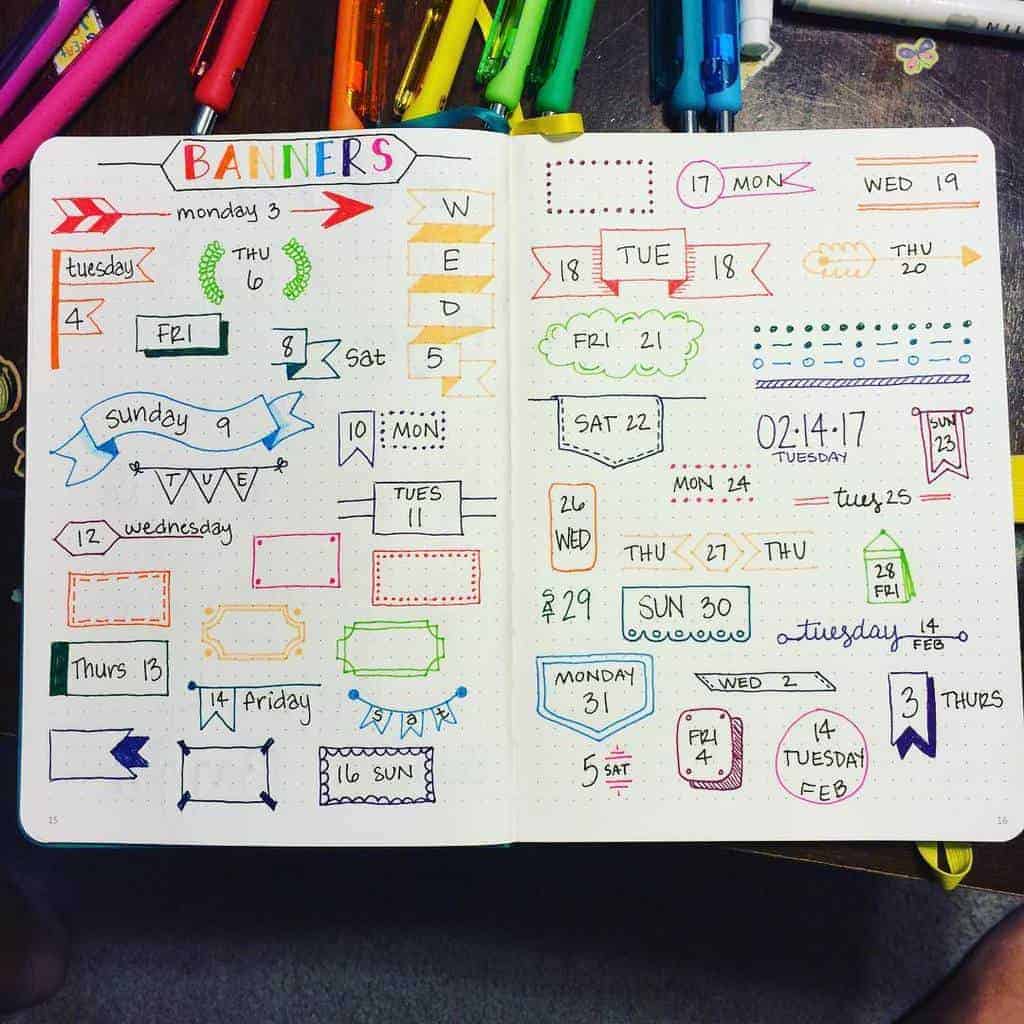
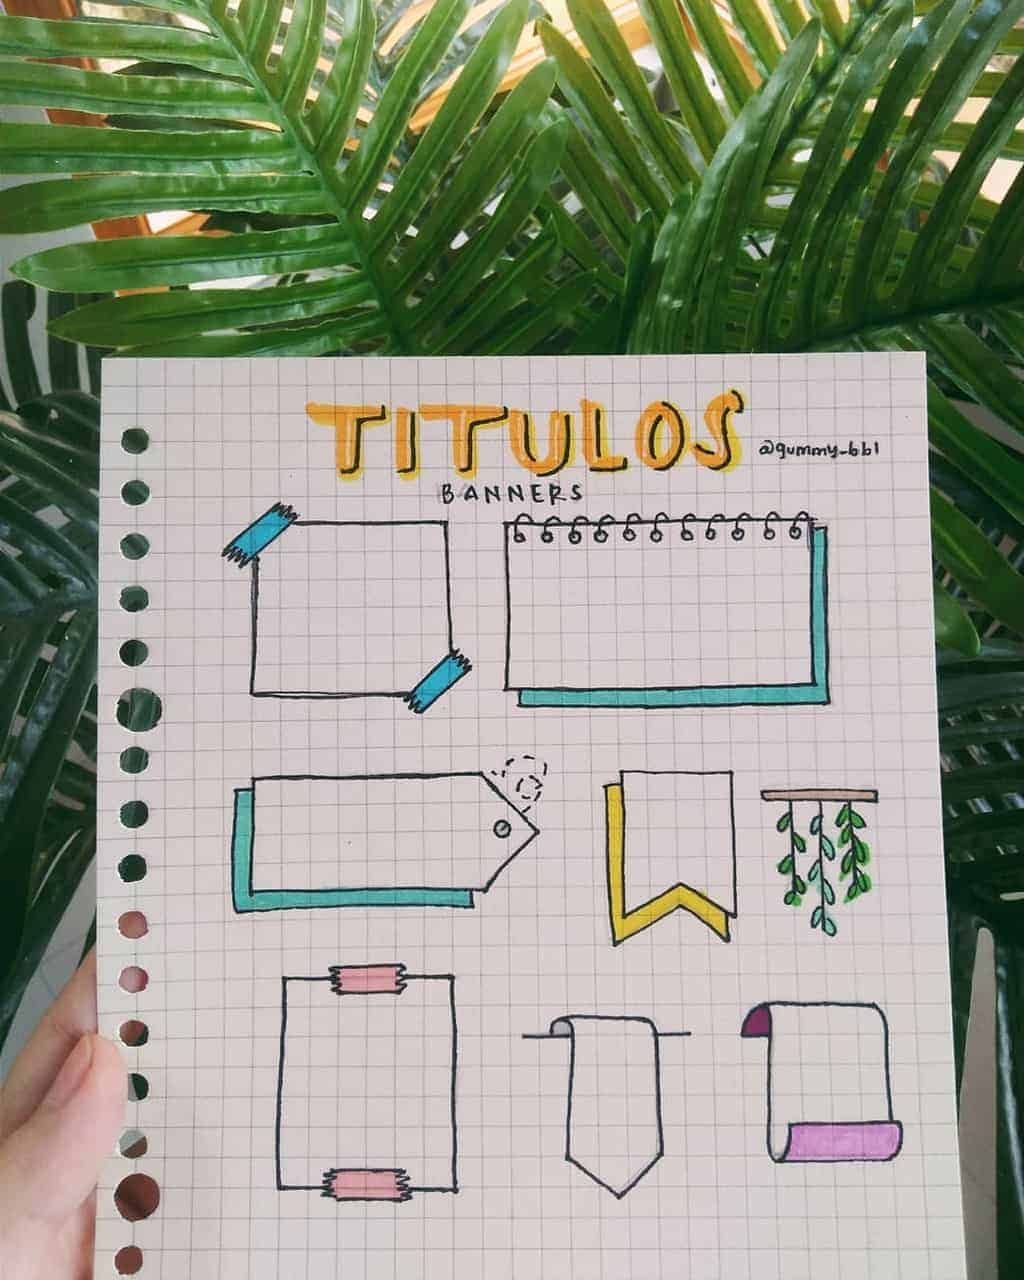
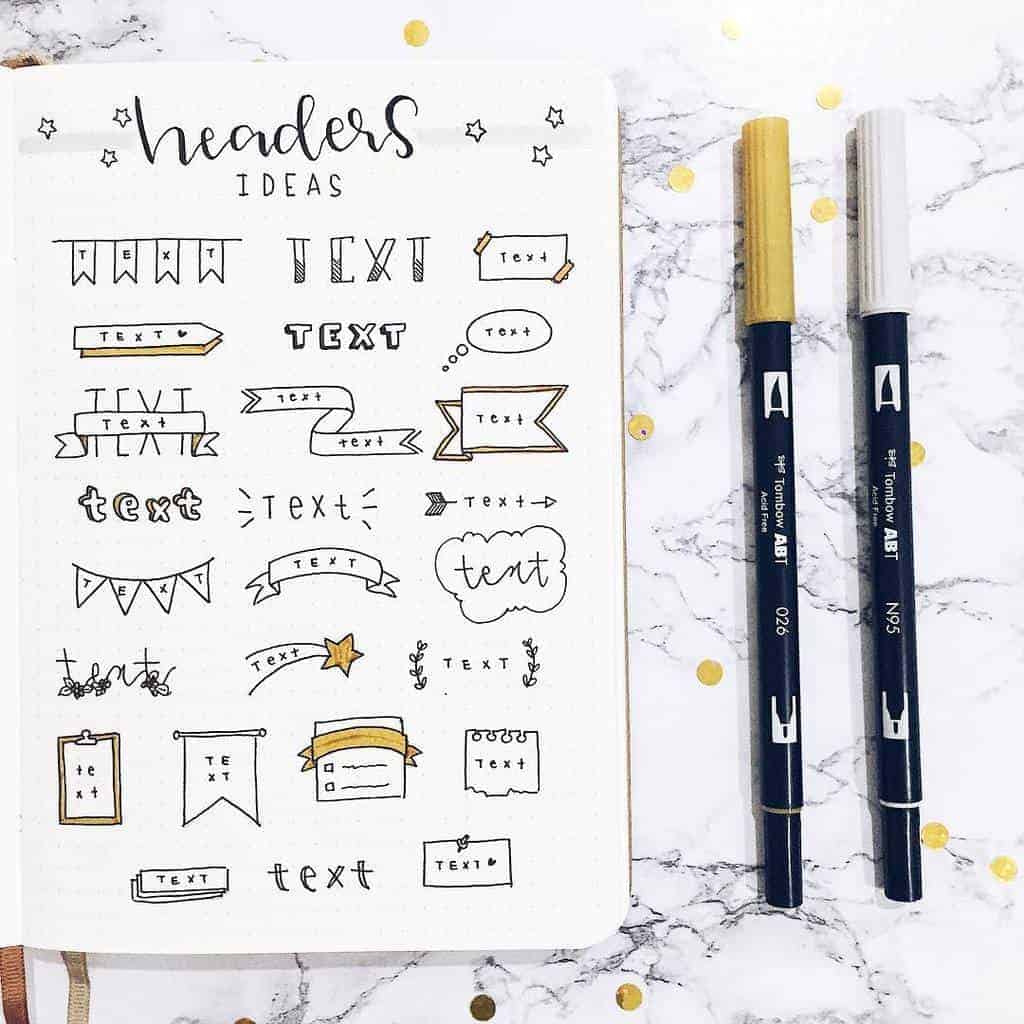
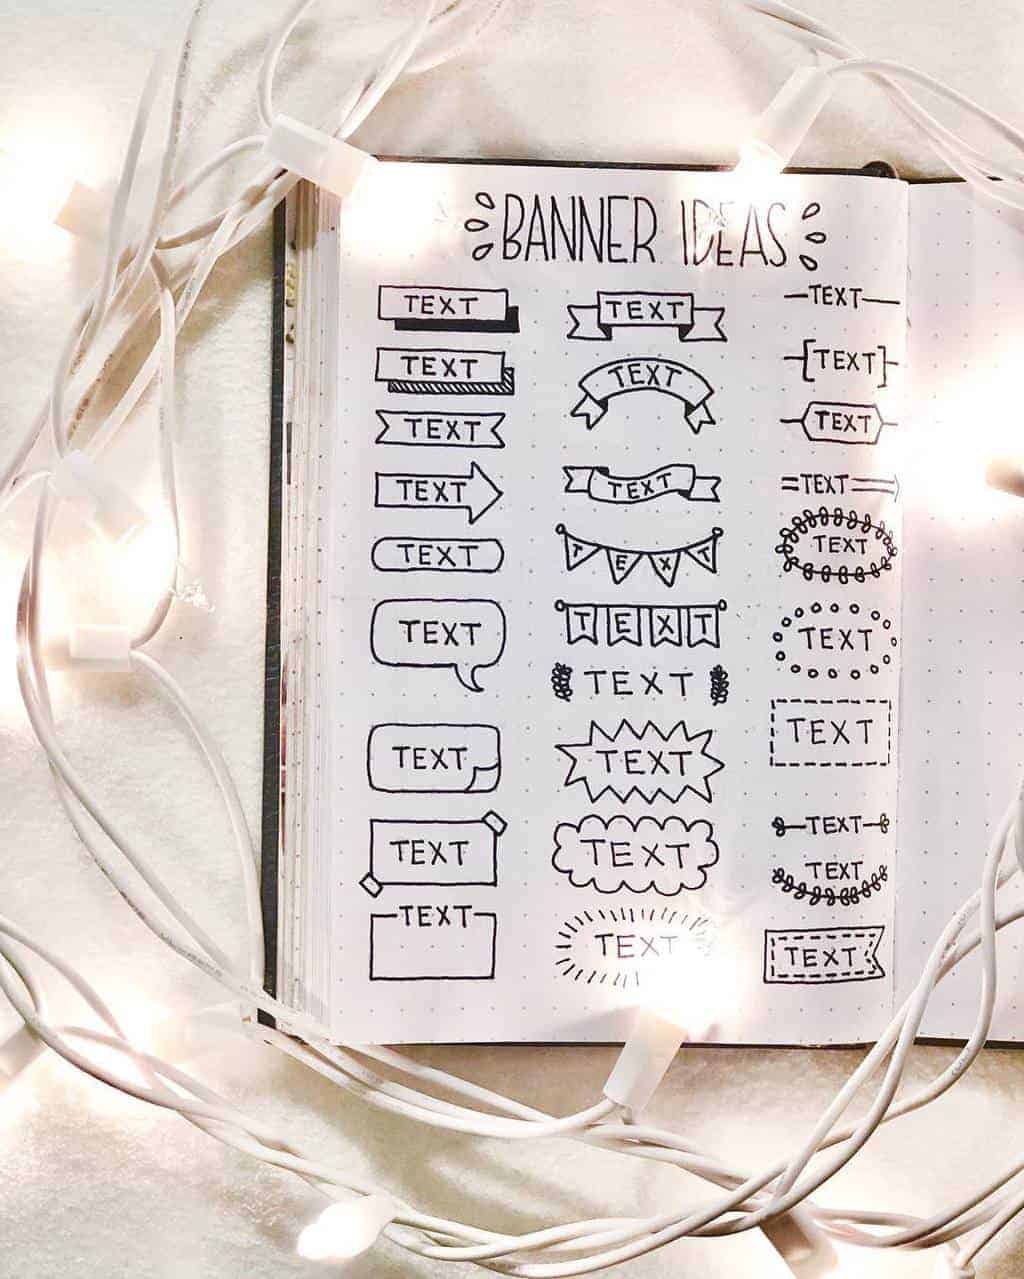
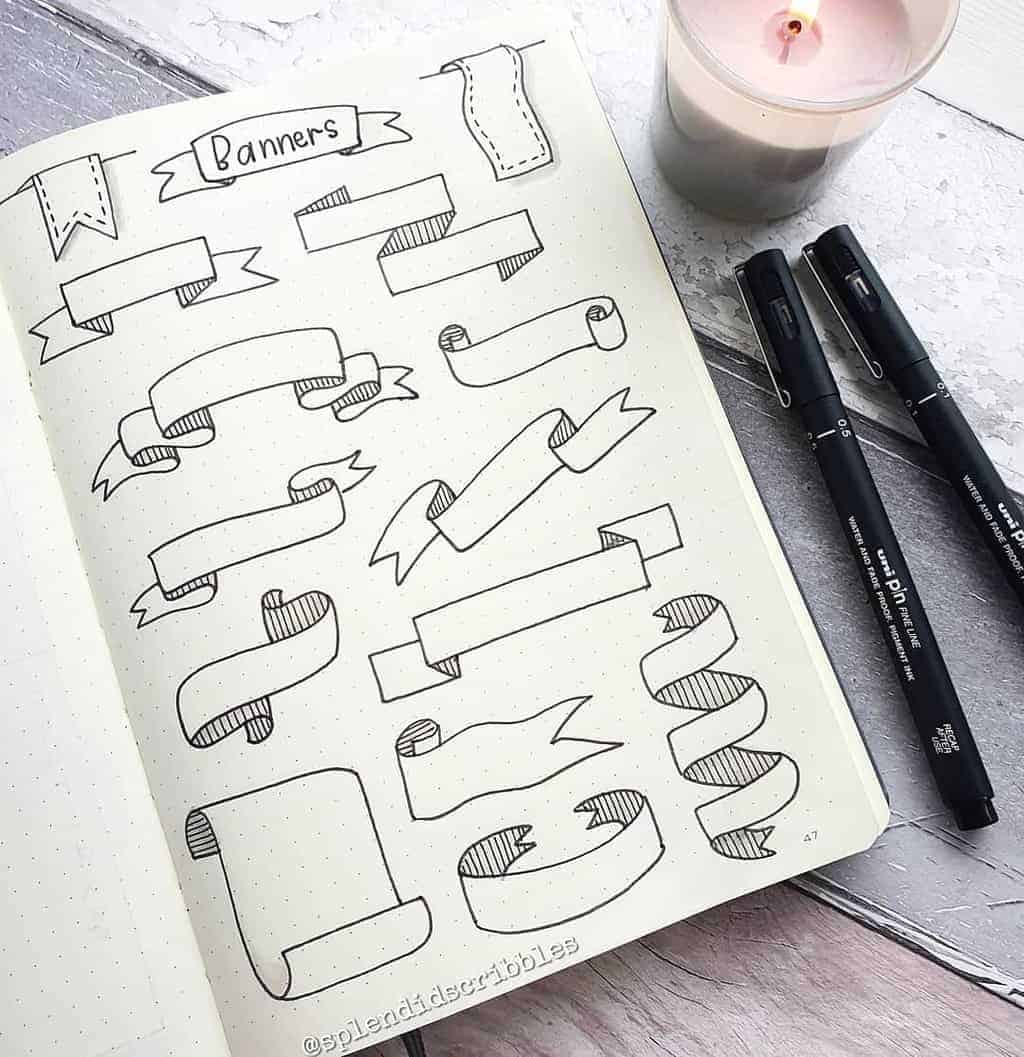
Bullet Journal Banner Ideas
Finally, I wanted to collect banner ideas for you from tons of other creators on Instagram, hope you find them inspiring.
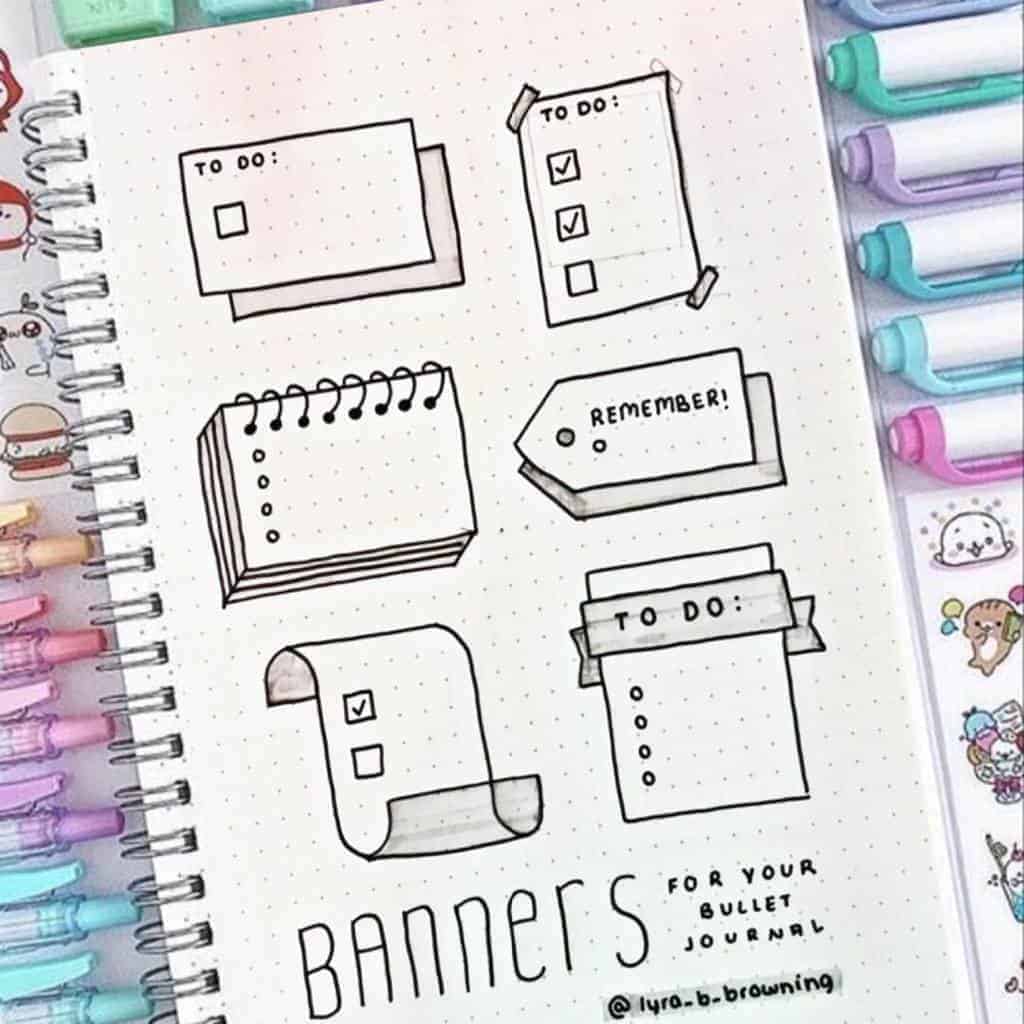
These lovely banners can work for more than just headers -these can make lovely daily boxes for your weekly spreads, for example.
If you want to make it more fun you can always just play with color and use some colored markers where the creator used grey.
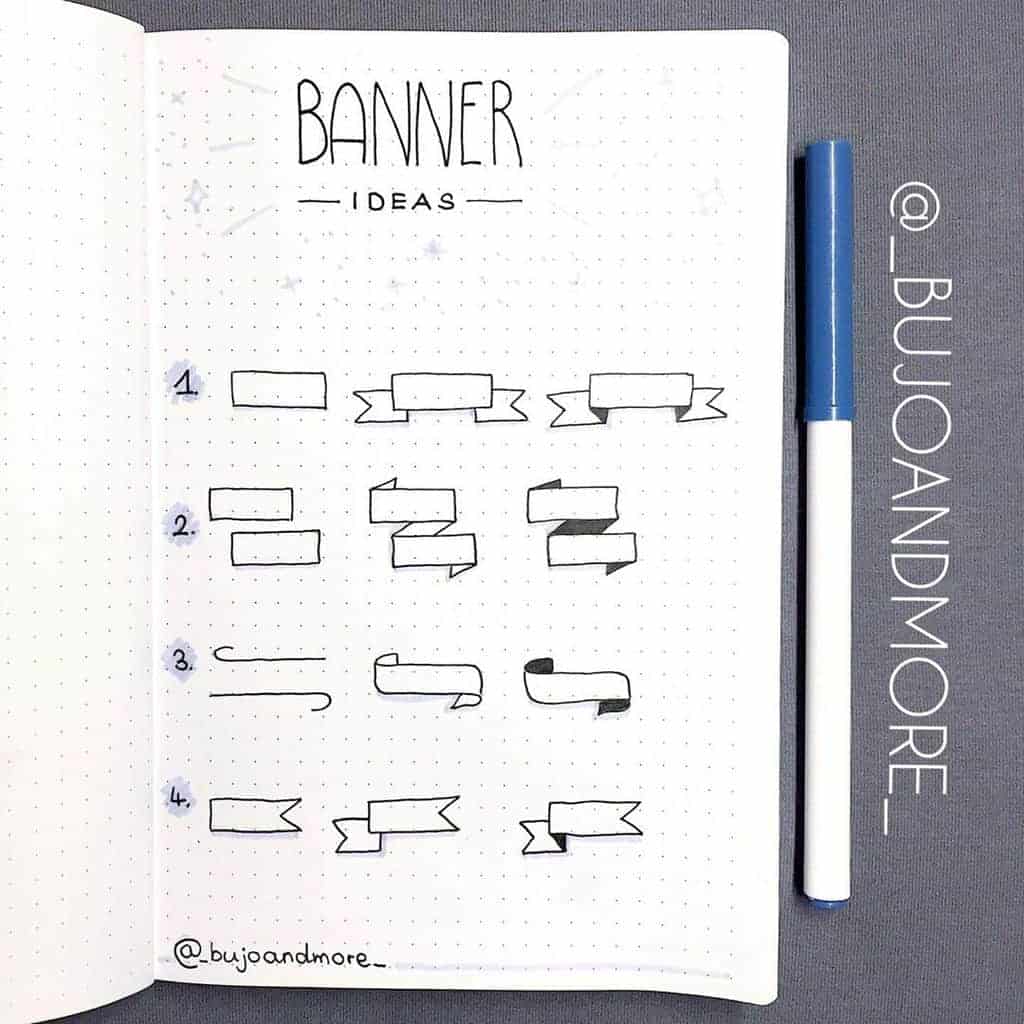
These are the same banners we’ve talked about, but I always find that people see things differently.
So maybe this step-by-step spread will be more helpful for you than my images.
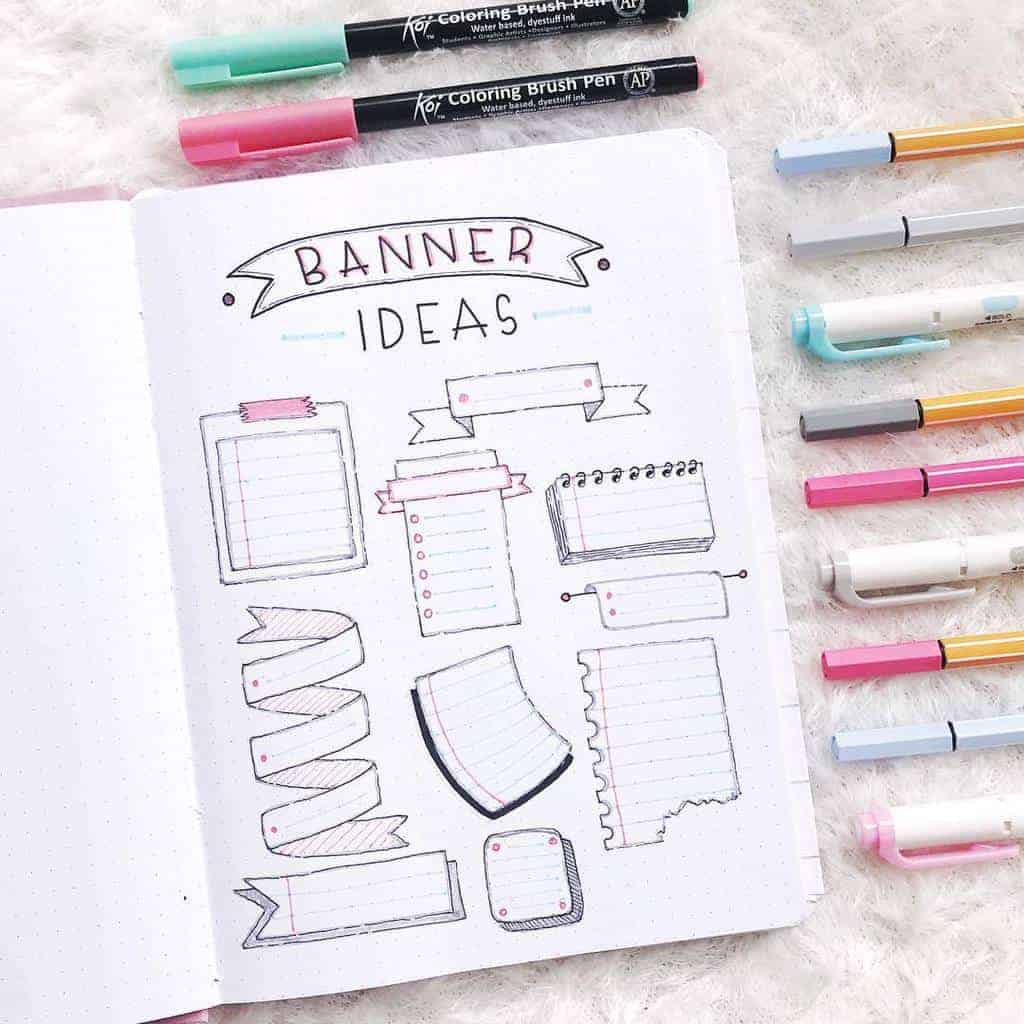
Absolutely adorable banners and I really love the vintage feel to them.
Plus I’m always impartial to anything colorful. It’s just two colors and they are pretty subtle, but I still love it.
I know I’ve just said that I have a soft spot for color, but this one looks just as stunning.
I think it’s because there is more black, so you can better feel the contrast with the white.
A lot of these are the same as the ones above, but how much different and more fun it looks with the colors!
Yellow and green are not my favorites, but here they match so well.
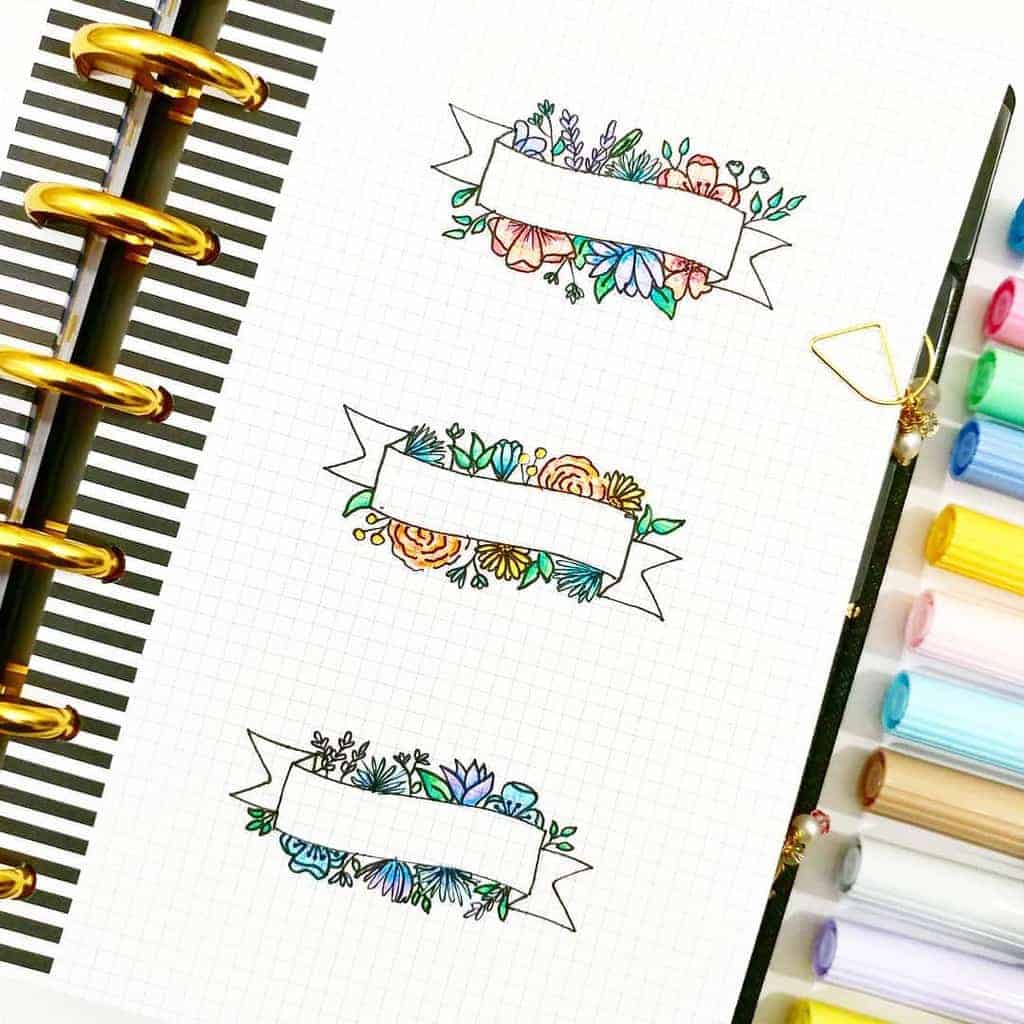
This is a great example of how adding a few decorations, like flowers, can improve your banners.
And if you’re worried you don’t really know how to doodle flowers, check my post How To Doodle Flowers.
So many amazing ideas to elevate your headers.
These will look so amazing on any weekly spread, including very minimalist ones.
Color can make such a difference. Just try out drawing your banners with colored pens like these ones and you’ll see them looking so different.
I also really love the stitching shadow on some of the banners, such a cool way to make the banners stand out.
These are very simple, but it doesn’t mean they are bad. They are classic and would look amazing on any page.
Again I’m loving the little color accents.
Apart from banners, these have some fun title ideas as well.
I love the orange color used for accents here, but don’t you feel like it would look even more stunning with gold instead?
Do you often use banners in your Bullet Journal? Which ones are your go-to? Let us know in the comments.
I hope this post was interesting; if you find it so, please share! If you enjoy my content and want to show your appreciation, please consider supporting me with a cup of coffee.
And remember: Keep Bullet Journaling, and Don’t Be A Blob.


