17 Easy Bullet Journal Font Ideas

Bullet Journal lettering is a fun way to personalize your pages and make your journal truly your own.
From bold block letters to delicate cursive, the right font can set the tone for your spreads and bring your ideas to life. In this post, I’ve gathered some of my favorite monthly easy font ideas that you can try out in your Bullet Journal.
These styles are simple to recreate, even if you’re not a pro artist, and they’ll add a unique flair to your layouts. Let’s explore these inspiring fonts to elevate your journaling game!

I often find that the best way to make your pages a little is to create some fun headers. This can be easily achieved if you have a set of interesting fonts to explore.
And don’t worry, beautiful don’ts are not complicated; they can be super easy for you to draw, even if you don’t think of yourself as creative.
In this post, I gathered several easy font ideas that I created myself. And trust me, if I could draw these, so can you!
Before we explore these fonts I made together, I wanted to mention that at the end of this post, you’ll find several FREE printables to help you practice all kinds of lettering and take your writing to the next level.
Let’s dive in!
This post may contain affiliate links. They will be of no extra expense for you, but I receive a small credit. Please see my Disclosure for more details. Thank you for supporting Masha Plans!
Stationery Recommendations
There are so many supplies to choose from, and I’m sure you want to pick the ones you’ll love using the most.
So here are a few of my favorites, especially for creating different fonts:
- Sakura Pigma Micron – these are some of the best fineliners, perfect for creating all types of elements in your Bullet Journal. Their black archival ink will make all your headers look sharp.
- Tombow Fude Brush Pens – my favorite small tip brush pens will allow you to create the most intricate headers, especially with smaller elements. Plus, of course, you can use them for brush lettering.
- Crayola Super Tips – these are some of the best markers out there, since they come in so many colors and are pretty affordable.
- Tombow Dual Brush Pens -if you’re looking for something extra, these brush pens are it! They have tons of colors and double tips, so you can use a brush tip for lettering and a marker tip for adding smaller elements.


Now, with supplies ready, let’s get into some fun fonts!
Easy Bullet Journal Font Ideas
The key to a good font is to have an idea, and in this post, I’ll share with youplenty of ideas. You can combine and modify them however you want, so you can create a unique font of your own.
For this post, I created an alphabet for each font idea, so you can easily recreate them and write any type of header on your pages.
Ok, let’s dive into the different fonts I created and see which ones would inspire you and your creative layouts.
Simple Print Font
Let’s start from something simple – a basic print font. This one is very easy, and as you’ll see at the bottom of the page I created, you can find several different versions on how you can customize this font to make it fit.

Serif Bullet Journal Font
The serif font is very similar to the simple print fonts, but at the bottom of each letter, there is a little line.
For convenience, I added here both capital and small letters of the alphabet.

Skinny Caps Font
One of the ways to customize your lettering can be by playing with the thickness and size of your letters. In this example, I created letters that are thin and tall, and they are only capital letters.
As you can see, if you play around with colors, you can get even more different variations.

I also added a little quirky font there as well. This one is just about making the letters a bit uneven. I don’t think you can see it in the usual black lines, but the details in color really make it clear why this font is different.
Block Letters
Block letters are some of the easiest to draw. All these are hand-drawn, but you can also easily use a ruler for these letters if you want to make them extra even.
There are many different techniques you can use for drawing these letters. What I prefer is to write a letter in a normal way and then build it up, making sure the thickness stays the same throughout. This is why I say I draw these fonts and not write, and this is why it is so useful to do it in pencil first.

As you can see at the bottom, I also added different ways you can modify or style this font. Because the letters are pretty big, you really get so much space to play with colors and patterns.
And if you want a shortcut to this lettering style, I would recommend getting these stencils. I have it myself, and it really is a lifesaver to always get equally even straight letters.
Bubble Font
Bubble font is so much fun, and you can get very creative with it! I will definitely try to make a post with just different bubble font ideas, but here I just created a basic one so you understand the concept.
Basically, this is very similar to your block font, but you make the letters chunky rather than straight. I find that the chunkier the letters azre the cuter they look.

At the bottom, I also added different ways you can style and transform these letters. You can also definitely play around with how you connect them.
Flower Letters
In this lettering font, I decided to combine letters with little doodles. You can use any idea you like, but I chose florals – they are beautiful, easy to draw, and they are some of the most popular decorative elements for your Bullet Journal.
Choose a letter style you want (or copy the one I used), then add little floral doodles on top of the letters. This is also a style that would benefit from you doing it with a pencil first to ensure everything is positioned exactly the way you want it to.

At the bottom, I also added a few other variations – you can draw a clock letter entirely from floral doodles, or use these little flowers to decorate your brush lettering.
Pink Disney Like Font
I don’t think this is exactly like the Disney font, but I definitely was inspired by it when creating this one.
The key here is to make the letters thick but not too thick, and I find that it is much easier to achieve if you color the letters rather than keep them hollow. However, for this example, I wanted to show you how two options would look so you can choose.
Either way, start with a pencil!

Dotted Font
This font is time-consuming, I’m not going to lie. But it is also fun, and it can be so very calming to do all the stippling.
The idea is simple – sketch the letter in pencil and then use the stippling technique to shape the letter, with dots being very close and then spacing out as they go out.

I haven’t once used this font since I created this page, but I think it would look very interesting and fitting on minimalist-style pages, so I might try it when I want to go all black and white.
Colorful 90s Font
I call this font that way because I think the color combination I chose is very reminiscent of the style we had in the 90s.
But yes, this is definitely one of my favorite fonts, and I had so much fun creating it. Plus, it’s actually super simple to replicate.
Here are the main rules: do small block letters, but keep the edges a bit rounded, and avoid any empty space inside the letters. And that’s it!

Of course, you can choose any color combination you like, and this font will look completely different. But if you want the same one, I used my Zebra Mildliners.
Billboard Font
I love this font! The only drawback for me is that these letters have to be pretty big, so it won’t work on smaller headers like the ones you have in your weekly spreads.
Nonetheless, it is easy to create – you do your basic block letters, then you round the corners, and finally you add this little offset shadow line to each letter.

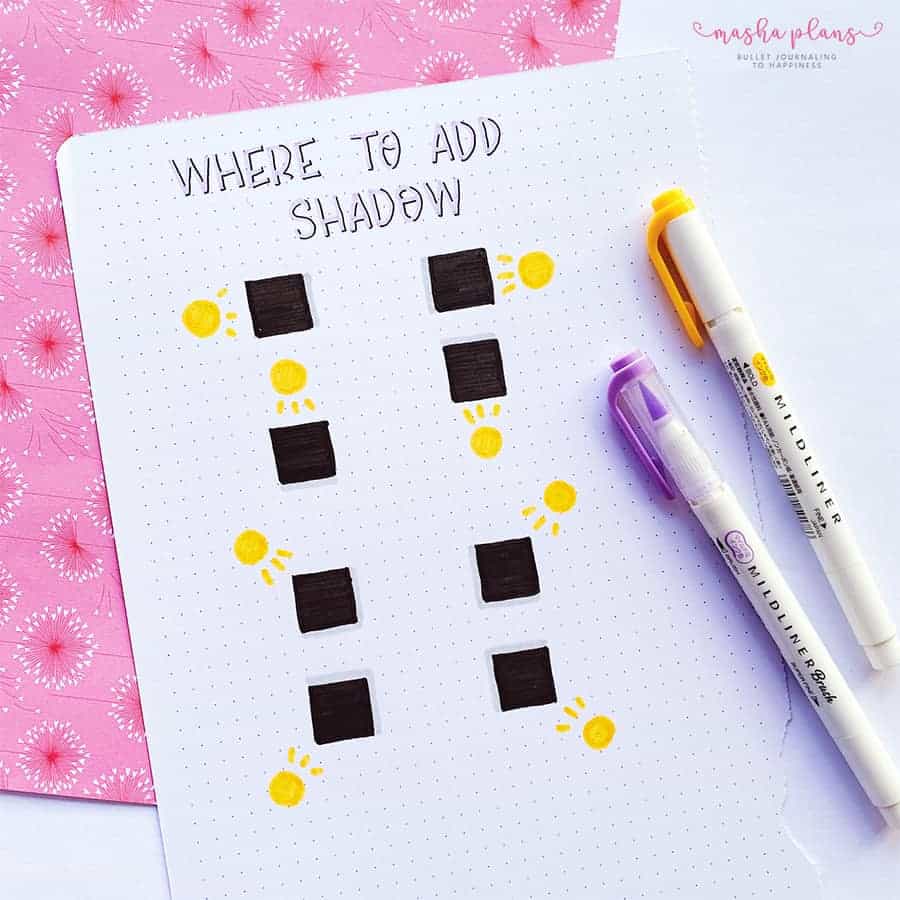
For the shadow, as you can see, I always create it to go on the right and bottom side of each letter. But if you want to do it differently – go for it!
Offset Font
This font was created absolutely by accident for me, mostly because I am very uneven with my lines, so I was hoping to make something that would not make it so obvious how shaky everything is.
The idea here is pretty simple: you draw each letter twice, once the outline and once in color. But you try not to just fill out the letter with color, so the two letters are a bit offset.
The main characteristic of this font is its uneven, jumping feel. It’s a feature, not a bug!

Shadow Font
First of all, yes, I know I forgot to add “W” in the list of letters, but you can actually see how to create “W” in the name of the font.
Now, this one is a bit more difficult. You have to draw a letter (in pencil) and then add a shadow on the right and bottom sides of your letter. And as a final step, you erase the pencil!

I mentioned the shadow effect already a few times, so here is a little cheat image I created to help you understand better what I mean when I say adding a shadow and how to come up with the best placement.
Fun Bullet Journal Font
This font is a little bit chaotic, as you can see. It has some serifs, but it’s also very rounded. All letters are uneven; some are capital, and some are small letters.
This is exactly the style I wanted, and I hope you’ll enjoy creating little dissonance and chaos in your Bullet Journal with this font.

And because it is just one line type of font, it is actually pretty easy to use it even in smaller headers.
Outlined Colorful Font
As you can see, the further we go, the less creative I get with the names of the fonts.
I think this font almost has two different ideas. The first one is the inside font, the colorful letters. This is basically block letters, but you keep the line thickness low, so they look a bit more deinty, and you can actually make them much smaller than your usual block letters.
Another letter is the outline I added to all the letters. Honestly, this is just something I’ve been playing with, and I thought it kind of looks cool. But yes – you can use this idea in two ways – with or without an outline!

Colorful Font Idea
This particular font reminds me of a circus for some reason. Maybe it is because I made all the letters a bit wonky, with sides being uneven on purpose.
The main idea is very similar to the 90’s font we did before, but this time all letters are capital letters.

Pink Lettering Font
This font almost looks like brush lettering, but it is not! Even though in this particular situation, I did use a brush pen. But let me break it down for you.
You start with using a darker colored marker to write a letter, and then you use a lighter colored marker to add shade to the letter. You can look up all our previous conversations about shades and how to add them.
As you can see here, I added a shade on the right and bottom part of each letter.

The key here is to have your lighter color thicker, not just a line. I found that it is easy to achieve with a brush pen, but you can also use a highlighter or a marker like Crayola Super Tips.
My Favorite Font
Yes, I got so tired of naming my fonts that this one is just named my favorite. Also, because I use it ALL the time. To the point that I have to force myself to come up with something else just to have variety.
It’s pretty easy to create, and here is how I do it. You start by drawing your usual block letters, but I like them a bit wider. And afterwards, you round the shark edges.
After that, you pick the side of where the shadow will be and add thickness there, following the shape of your letter. As a final step, you fill out that empty space with some lines.

This is also where you get to see how convenient it is to have a dot grid – it allows you to easily ensure that all your letters have the same size, and that creates a unified effect to your lettering pieces.
I have plenty more ideas that you can check below, but for this post, let’s keep it at that.
Free Lettering Resources
Are you looking for some worksheets and brush stroke practice sheets for all types of lettering and mastering new fonts? I’ve got you covered with these exclusive freebies.
Simply sign up in the form below, and once you confirm your subscription, the freebies will be on the way to your inbox.
More Resources
As I mentioned before, there are plenty more interesting fonts and lettering styles you can use in your Bullet Journal.
Here are a few blog posts for you to check out next:
- Easy Fonts To Draw In Your Bullet Journal
- Free Faux Calligraphy Practice Sheets
- 7 Easy Ways To Enhance Your Brush Lettering
>>> Which one of these fonts will you be using in your Bullet Journal? Share with us in the comments!
Hope this post was interesting. If you find it so, please share! If you enjoy my content and want to show your appreciation, please consider supporting me with a cup of coffee.
And remember: Keep Journaling, and Don’t Be A Blob!


