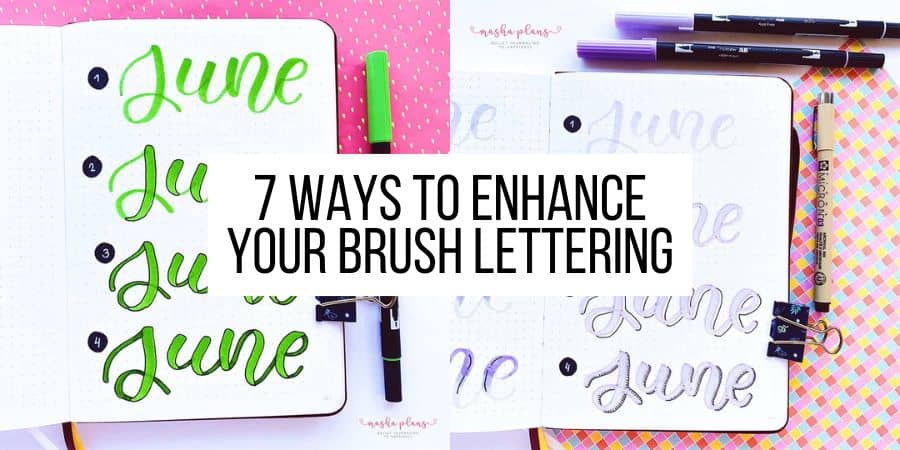
7 Easy Ways To Enhance Your Brush Lettering
Are you looking for a way to make your Bullet Journal lettering stand out even more? You’re in the right place.
After reading this post, you’ll learn seven simple techniques to add more character and pazazz to your calligraphy.
Brush lettering is a fun way to add beautiful effects to your Bullet Journal pages.
Pretty often, just having pretty lettering is enough to decorate your page. But what if you wanted more?
Well, this is precisely what we’ll be doing today. You will learn that just a few simple lines and color contrasts can make a huge difference and make your lettering stand out.
And if, generally, you’re not confident with your brush lettering, you can always check my post Brush Lettering For Beginners to learn how to improve.
Let’s get into it then!
This post may contain affiliate links. They will be of no extra expense for you, but I will receive a small credit. Please see my Disclosure for more details. Thank you for supporting Masha Plans!
Brush Lettering Supplies
Just a quick word about the supplies.
It might seem a bit intimidating because I always use so many supplies, but you don’t need that much.
Here is what you need for all of these ideas:
- Brush pens. Here I used Tombow Dual Brush Pens, which are great for brush lettering and come in a vast amount of colors.
- Fineliner. Or actually, any black pen would do. My preference for lettering is these ones.
- White gel peIt’st’s a great way to add effect to your lettering and fix your Bullet Journal mistakes. My favorite is this Sakura one.
And that’s! Not too crazy, right?
Let’s start with our lettering then.
7 Ways To Enhance Your Brush Lettering
The easiest way to do that is by adding shadow. But for this, you’ll need to check my post Creative Ways To Add Shadow To Your Brush Lettering.
In this post, you’ll learn some other tricks.
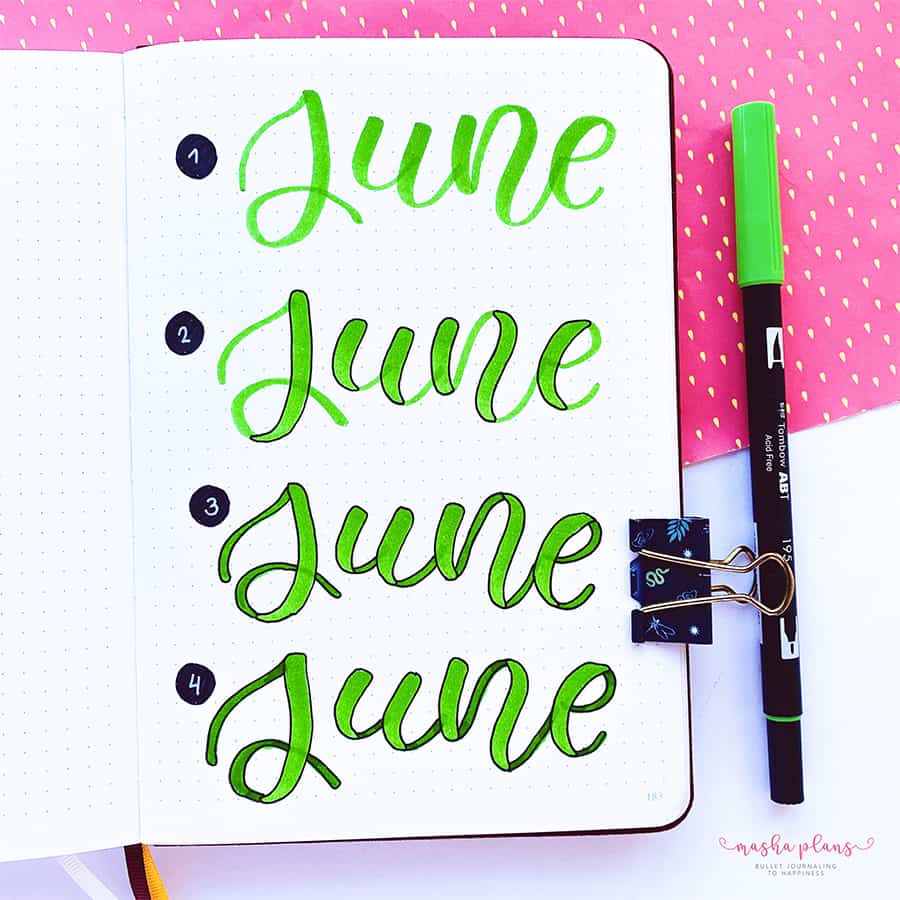
Oh, and all those examples are for the word June because it’s my birthday month, so I thought it would be fun to use it.
Ombre Effect
For this, you’ll need two brush pens in matching colors, with one preferably in a lighter color.
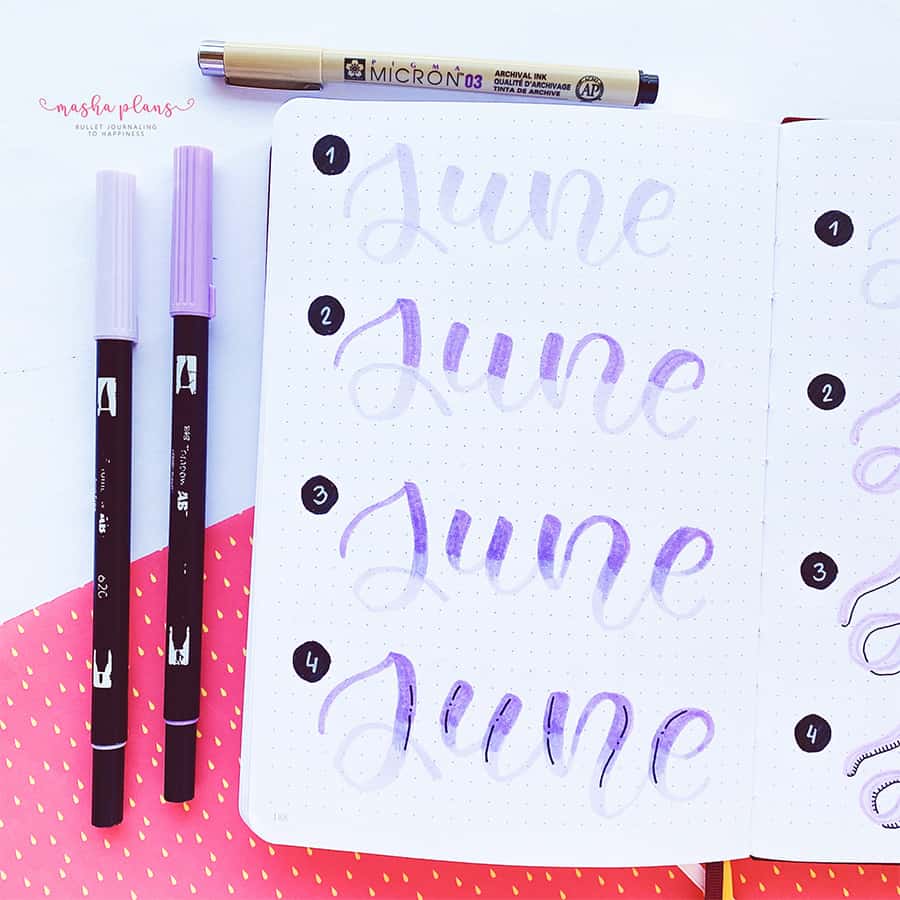
You start by writing the word with a lighter color.
Next step – you use your darker color to fill in the top half of all letters.
Finally, you use the lighter color pen again to blend in the colors.
I also added those black lines to decorate the letters, but you can skip this step if you want to.
Multicolor
For this effect, you can use as many colors as you want; in this example, I went for threI’mI’m also using here a light shade of grey to write the word first, but you can write it in pencil first as well; no need to buy a whole new brush pen just for that.
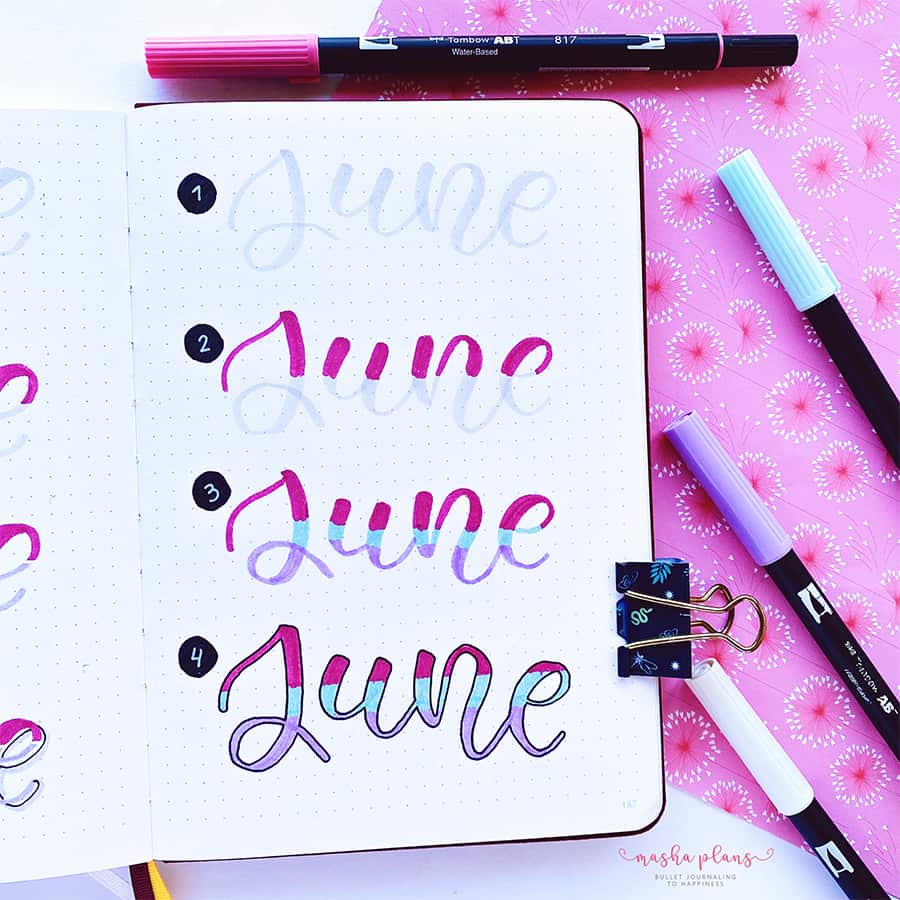
To begin with, you letter the word with a light color or in pencil. The idea is that you have the outline of the letters, and you know where to color.
After that, it’s all about filling out the letters with color. Here I used a ruler to try to keep all the colors on the same level, but you could also use washi tape for that.
For the final step – outline the letters with a black fineliner. It will make them look more defined and hide any missteps you might’ve made while coloring.
Outline and Shadow
You’ll need two pens for this one, one being a darker shade of the same color.
This is why I love Tombows; they have a marker tip and a brush tip, and you can quickly achieve this effect.
Start with writing the word in a lighter color, and then use a darker shade to outline the letters.
You could stop at this, but I think it looks better if you also add a shadow.
Create an offset line for the shadow and then fill it with other tiny lines.
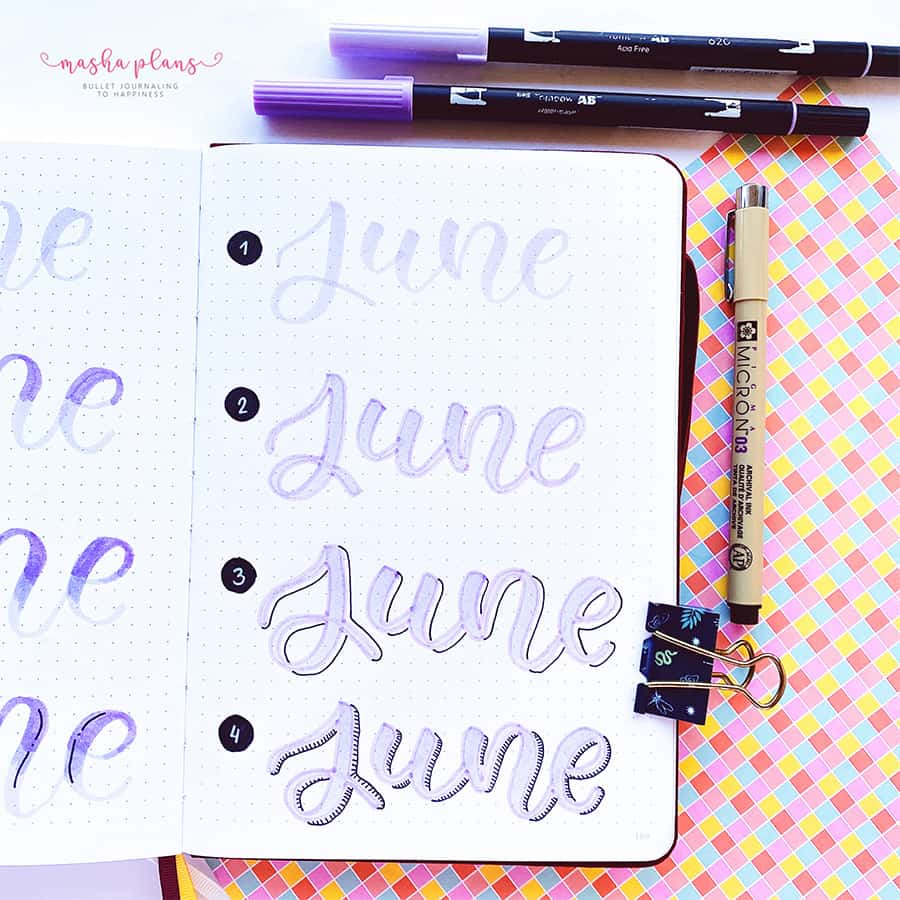
Outlined Letters
A very simple effect, and all you need for this is one brush pen and one fineliner.
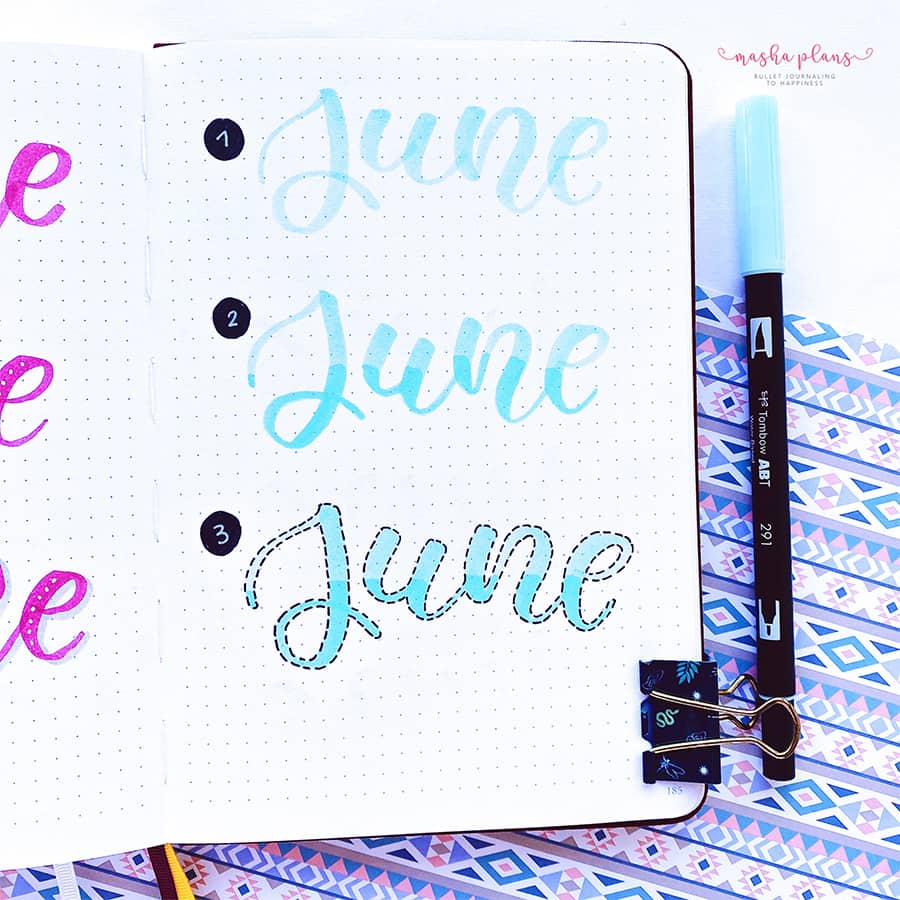
First – write your word.
The next step is to add a bit of an ombre effect, but this time you add one more layer of the same color instead of using a different one.
Finally, outline the letters, but instead of a complete line, use a dotted line.
Two Colored Brush Lettering
This one is a bit extra, but the effect is worth iIt’st’s probably my favorite one from all these.
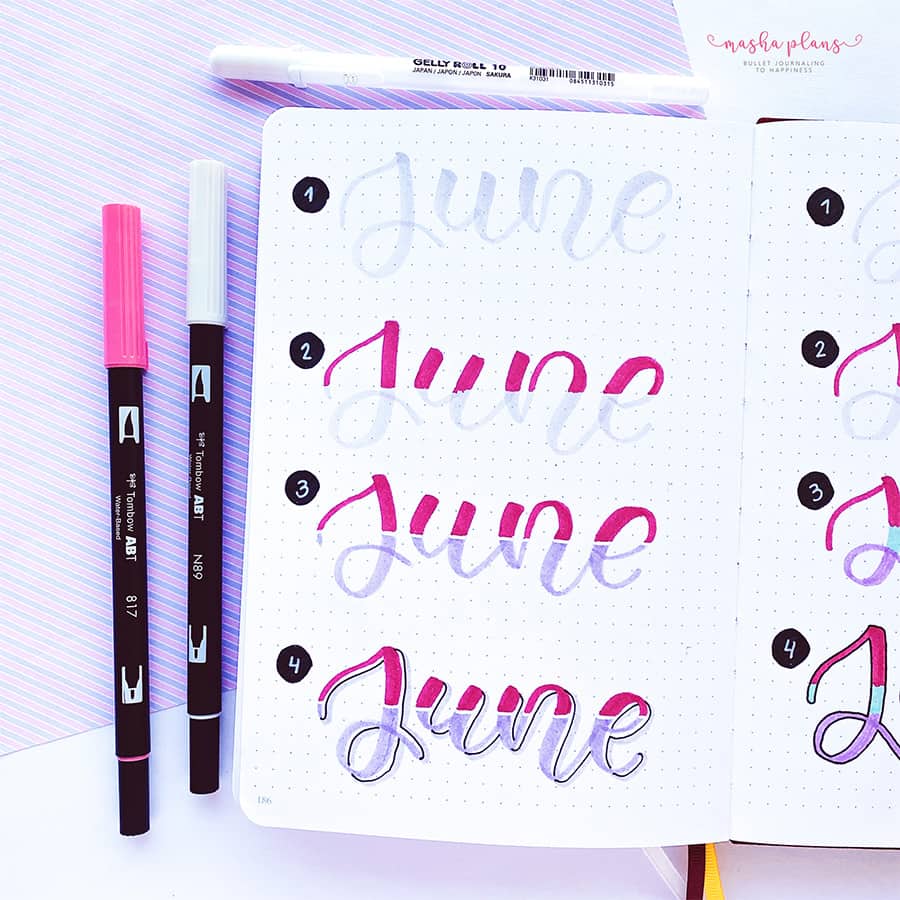
Start by writing the word; again, you can use a lighter color pen or just a pencil.
The next step is you add colors. Divide all letters by half and try to have some space between the colors.
It doesn’t have to be very straight, don’t worry – the next step will cover any imperfections.
Again you can use a ruler or washi tapes to keep the lines even.
After that, take your white pen and add a line between the colors.
For the final step, we’ll add a shadow effect since I think most lettering looks better with any kind of shadow.
Draw an offset black line, and for extra effect, you can add a grey shadow to it.
Decorated Letters
My only recommendation here is for you to use a darker-colored brush pen.
But if you only have light colors, you can add decorating with a black pen instead of a white one.
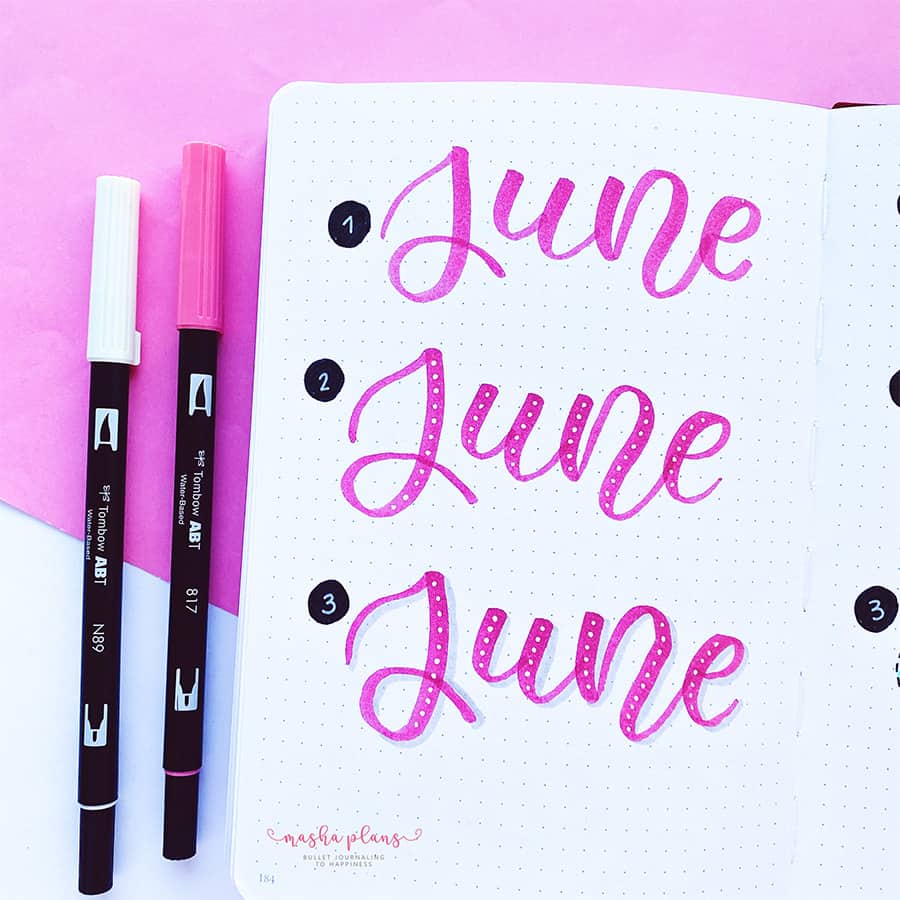
Start by writing the word and then add any pattern to each letter.
For this example, we went for pretty basic white dots. But you can make it as elaborate as you want.
And, of course, the final touch is adding a shadow with a grey marker.
Ribbon Letters
It sounds complex, but it’s actually very easy to create,
And all you need is one brush pen and a black fineliner.
Start by writing your word and then outlining the downstrokes.
Downstrokes are the parts of the ribbon that are closer to you.
The next step is outlining your upstrokes and adding one more layer of color to them. They are behind, so they should be darker.
The final step is to add a bit more color to the back sides of the ribbons closer to the front ones since there is usually a shadow there if it is made of ribbon.
And there you have it. Here are some little tricks you can use to make your brush lettering stand out even more.
If you’re still looking for ways to improve your lettering, check out these Free Brush Lettering Worksheets and Free Online Calligraphy Courses.
Free Brush Lettering Resources
If you want to master brush lettering, it’s all about practice, and I’ve created several free worksheets to help you just with that.
Sign up in the form below, and once you confirm your subscription, you’ll get 4 free exclusive worksheets and get tons of lettering resources delivered straight to your inbox.
I hope this post was helpful; if you find it so, please share! If you enjoy my content and want to show your appreciation, please consider supporting me with a cup of coffee.
And remember: Keep Bullet Journaling, and Don’t Be A Blob!


