How To Start Doodling For Beginners
If you’re a complete beginner and want to learn how to doodle, you’re in the right place. Even if you think you’re not creative enough to draw.
Doodling is more than just scribbling on the margins of your notebook; it’s a fun and accessible form of expression that anyone can master. Whether you’re looking to add pizzazz to your Bullet Journal or simply want to explore a new hobby, this guide will show you how to start doodling for beginners.
Get ready to transform blank pages into vibrant canvases filled with your unique touch. Let’s embark on this artistic journey together.

Starting to doodle can feel a bit daunting, especially if you’ve never seen yourself as the “creative type.” But here’s the secret: doodling is not about being Picasso or Van Gogh. It’s about having fun, experimenting, and letting your pen dance across the page without judgment.
Even if your past attempts at drawing were limited to stick figures or squiggly lines, don’t worry—doodling is for everyone, including those who’ve never picked up a pen with the intention to create!
Doodling is like a mini-vacation for your brain. It’s relaxing and therapeutic and allows you to unleash your inner artist without any pressure. In this post, we’ll dive into everything you need to know to kickstart your doodling journey, transforming you from a clueless beginner into a confident doodling master. You’ll discover tips, tricks, and techniques that make doodling not only accessible but incredibly enjoyable.
I never saw myself as creative. In fact, the thought of doodling used to make me anxious because I believed I couldn’t draw anything recognizable.
But when I started Bullet Journaling, I decided to embark on an adventure to teach myself how to doodle. It took some practice and patience, but I was amazed at how quickly my skills improved. If I could overcome my initial hesitation and learn to doodle, I promise you can too!
And if this blog post is not enough, and you want to learn more, check out the FREE course on doodling for beginners that I’ve created, which has even more information and step-by-step instructions. You can check the end of the post to join.
Benefits Of Doodling
Doodling can provide a surprising amount of benefits for both your mental and creative life. One of the most notable advantages is its ability to improve memory.
When you doodle, you engage multiple areas of the brain, which can help with information retention. Picture yourself in a meeting, or a lecture—jotting down lines and shapes might seem like a distraction, but it actually aids in the processing and remembering key points.
Considering my mind is always wandering; doodling was really a great help to concentrate and remember the information better.

Beyond boosting memory, doodling serves as a wonderful relaxation technique. It’s a simple, yet effective way to reduce stress and unwind after a long day. The repetitive motion of drawing can calm the mind, much like meditation.
Allowing yourself to get lost in the flow of doodling can provide a mental escape, offering a quiet moment of peace in an otherwise hectic world.
For those who love Bullet Journaling, doodling is a delightful way to add personal flair to your pages. It can help make your journal not just a powerful planning system but also something that reflects your style and creativity.
Moreover, doodling is a gateway to unlocking your creativity and enhancing your creative thinking. When you doodle, you free your mind from rigid structures and allow it to explore new ideas. This spontaneous creativity can spark innovative solutions to problems and inspire fresh perspectives.
Whether you’re brainstorming for a project or simply daydreaming, doodling can lead to unexpected insights and ignite your imagination.
Ok, that’s enough; I’m sure I already convinced you to try doodling and use it for more than just adding flair to your Bullet Journal pages. Let’s get to the good part and start doodling!
What You Need For Doodling
First things first, you’ll need some supplies for doodling. But don’t take it as you have to buy tons of stationery just to start doodling.
In fact, you can start with whatever you already have and have fun with it.
But if you want to assemble the right supplies that will make it a bit easier and more fun, I have a few recommendations. get these, or maybe you can find some among the things already lying around your house.
Here are some recommendations to know where to start:
- Pilot Dr. Grip Pencil – starting with a pencil is the best trick to ensure your doodles look their best. This pencil is definitely the most comfortable one I’ve ever used.
- Sakura Foam Eraser – you’ll need a good eraser that won’t leave any streaks of color behind. These erasers are definitely the best.
- Sakura Pigma Micron – a good fineliner is the best pen to doodle, and these come in many different nib sizes so that you can add variety to your doodles.
- Rhodia Notepad – you’ll need a good place to practice doodling, and a notepad like this will help you with that. Plus, this paper won’t damage any of your markers if you decide to use color.
- Crayola Super Tips – if you decide to use some colors, you can use any pens you want, but I recommend these. They come in 100 colors and are super affordable! Plus, you can use them for coloring, highlighting, and brush lettering as well.
I can talk about pens for hours, but this is not what this post is about. So. these are the basic supplies and if you want some more recommendations, be sure to check more resources section at the end of the post.
Now that you have your supplies ready, let’s start looking at how you can actually doodle.
How To Start Doodling
To kick off your doodling journey, remember this vital principle: consistency is key. Just like you wouldn’t dive into a marathon without putting in the legwork, developing your doodling skills takes time and dedication.
And here’s a little nugget of wisdom for you to keep in mind as you doodle: mistakes are not only acceptable, they’re invaluable. Some of my most imaginative doodles emerged from what initially seemed like slip-ups.
That smear could evolve into a whimsical cloud, or that uneven line might just become the backbone of a quirky abstract design. So, don’t shy away from making a mess. In the realm of doodling, there are no mistakes, only fortuitous surprises.
Ready to dive into this doodling escapade? Keep it breezy, keep it enjoyable, and most importantly, keep those doodles coming!
Here is how you start doodling in just a few simple steps.
Step 1: See The Basic Shapes
Want to know the big secret of doodling? Every doodle, no matter how elaborate, consists of basic shapes.
As long as you can see the squares, rectangles, circles, and triangles in the doodle, you’ll be able to draw anything you want.
So, when you sit down and choose what to doodle, it’s always good for you to find an image of that item and look at it as an accumulation of basic shapes.
For example, an ice cream is definitely a circle and a triangle.

The moment you master the skill of seeing doodles as a set of basic shapes, there will be nothing to stop you from being a doodling master.
If you want to practice, you can print some doodles, take a red pen, and start dividing them into basic shapes.
But enough, this is just the first step, and once you decide what you want to doodle and what shapes it consists of, it’s time to draw.
Step 2: Sketch Your Doodle
Now that you know what your doodle consists of, it’s time to sketch those basic shapes together.
In this step, I recommend you use a pencil, especially if you’re a beginner. This will allow you to play around with sizes and placements of the basic shapes until you’re sure you’ve created that perfect match that resembles the most doodle itself.
The next step of your doodling is refining this sketch, so you definitely want the lines on this step to be easily erasable.
At the moment, your doodle probably looks pretty far away from what you want to draw, but trust the process!
Step 3: Refining Your Doodle
This is probably my favorite step, this is where the magic happens, because this strange set of shapes will actually become a cutre doodle!
You already have your base, now it’s time to give it shape. I recommend you also start this process with pencil and use pen only at the end when you’re 100% happy with your doodle.
How do you refine your doodle? Easy! Use your pencil and eraser and mold the lines. Curve the corners if that’s what you go for, or maybe use the ruler to ensure that all the lines are straight and parallel – it really depends on what you’re drawing and how you want it to look.
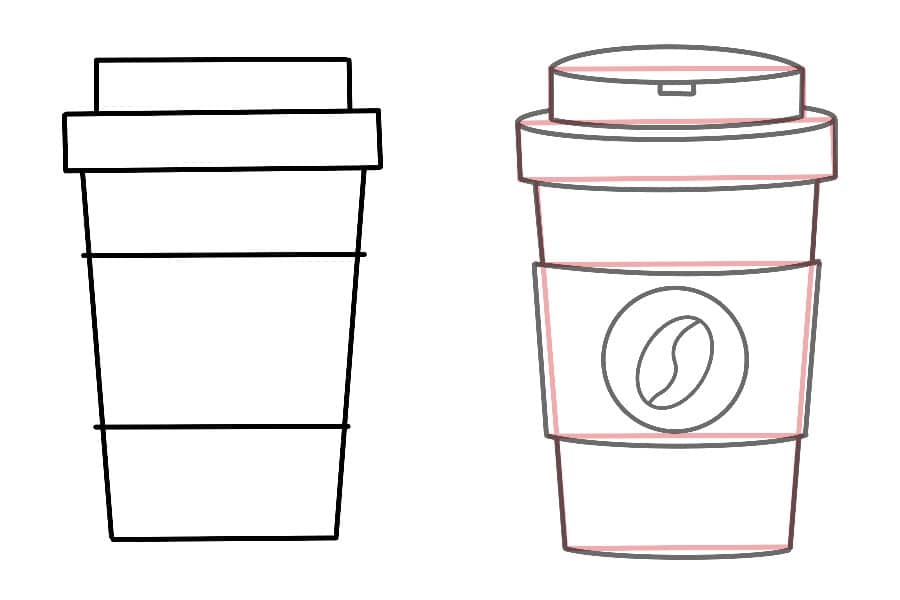
It is best to start practicing with something easy, so here is an example of the process for a coffee cup doodle.

And just like that, you’ve got yourself a pretty cute little doodle!
Step 4: Styling Your Doodle
This step is more optional, to be honest, but I think it’s always good to know that there are a few extra things you can do to make your doodles look a bit different.
Plus, using styling elements is often what helps you create your own unique approach to doodling.
There are plenty of ways to do it, but here are a few of my favorite techniques to create doodles that stand out:
- Use lines with different thicknesses. For example, you can use thicker lines on the outline of your doodle and thinner lines for elements inside it. It really helps to create a visual variety. And if you have a set of fineliners that already come with different nib sizes, it’s easier than ever to try this styling.
- Add shading to your doodles. Pick what area the light is coming from and make the opposite area a bit darker. Use hatching or maybe stippling, or just use thicker pen on that side of your doodle to create that shadow effect and make your doodle pop. You can also outline this part of the doodle in grey marker so get a similar shade effect.
- Add color. This is no doubt my favorite way to make my doodles pop, and I learned pretty early that actually adding color helps sometimes distract from any imperfections your doodle might have.

As you can see, there are many more fun ways you can make your doodles look different, so play around and see what style fits better with your aesthetics.
That’s pretty much it when it comes to learning the basics of doodling for beginners; the rest is up to you to practice and watch yourself get better and better with each doodle.
But I wanted to also leave you with a few useful titbits of information.
Tip On How To Doodle
I discovered a few tips on my journey. I feel like if you followed these, your doodling adventures would be easier and more fun.
These are several tips to follow when you sit down and start doodling so it can go smoother and easier for you:
- Get Ready: Before you start exercising those hand muscles, spend a few moments warming up. Don’t overcomplicate it; grab a piece of paper and let your pen roam freely.
- Find Your Cozy Corner: Creating art is more enjoyable and inspiring when you’re in a space that puts you at ease. A comfortable environment can work wonders for the creativity reflected in your Bullet Journal.
- Embrace Uniqueness: Everyone perceives and illustrates the world uniquely, so if your doodles differ from others, like mine, that’s perfectly fine. It’s a testament to our individuality, not a measure of right or wrong.
- Let Go of Perfection: Remember, doodling is about creativity and self-expression rather than flawless accuracy. Focus on where your creativity leads you, and enjoy the journey!
Now, you truly know everything there is to know, so let’s dive into a free course I’ve created for you!
Free Doodling Course
There was a point when my doodling skills were practically non-existent. My stick figures looked like they’d been squashed flat, and my attempts at drawing flowers resembled squished insects. Yet, like you, I had a strong urge to infuse my Bullet Journal with some creative flair.
So, I embarked on a mission to build my own method for mastering this art. It was a path paved with ink smears, crumpled sheets, and an endless supply of caffeine. But guess what? I transformed from a doodling novice to a doodling whiz, and I’m confident you can make that transition too!
That’s why I’ve crafted this FREE course just for you. It’s a comprehensive, step-by-step guide designed to take you from “I can’t even manage a straight line” to “Wow, I actually made that!” It’s filled with all the insights and strategies I wish I had when I first started.
Simply sign up using the form below, and once you confirm your subscription, all the details on how to join will be delivered straight to your inbox.
More Resources
Do you want to learn more about doodling and how to practice to become a complete master? I’ve got you covered.
Check out these blog posts next:
>>> What things would you like to learn how to doodle? Share with us in the comments!
Hope this post was interesting. If you find it so, please share! If you enjoy my content and want to show your appreciation, please consider supporting me with a cup of coffee.
And remember: Keep Bullet Journaling, and Don’t Be A Blob!


