Archer and Olive Acrylograph Pens Review
Welcome to my detailed review of pretty popular Bullet Journal supplies – Acrylograph pens by Archer and Olive.
They are not the cheapest pens for your Bullet Journal, so I’m here to help you decide if they are a good match for you.
Today we will look at everything you need to know before getting yourself some of these pens.

This post may contain affiliate links. They will be of no extra expense for you, but I receive a small commission. Please see my Disclosure for more details. Thank you for supporting Masha Plans!
Before we look into the pens, I have to disclose that since I was a part of the Archer and Olive design team, I got some of these pens free of charge.
There are a few things I want to mention here. First of all – I’m always honest with my reviews disregarding any associations I have with the brand.
And most importantly – I choose brands I work with based on my opinion of the brand and their product. I chose to be a part of the Archer and Olive design team because I love the products they create and I stand behind their core philosophies and work ethics.
With that out of the way, let’s get to the review.
Acrylograph Pens Review
With the amount of stationery available online, it feels like you need to buy it all and probably sell a kidney to do it.
But I assure you – you don’t really need it all, just the things you love and enjoy.
Today I’ll look in detail into all the characteristics and features of acrylograph pens (and will share some ideas on how to use them) because I want you to be sure when you decide to get some for yourself.
I’ll be honest here, it took me a while to get used to them (since they are pain-based pens and are nothing like the other pens I have in my collection), but now that I did – I’m a huge fan!
I really hope that by the end of the post you’ll love these pens just as much.
There is also a video review at the end of the post, so be sure to scroll down to give it a look.
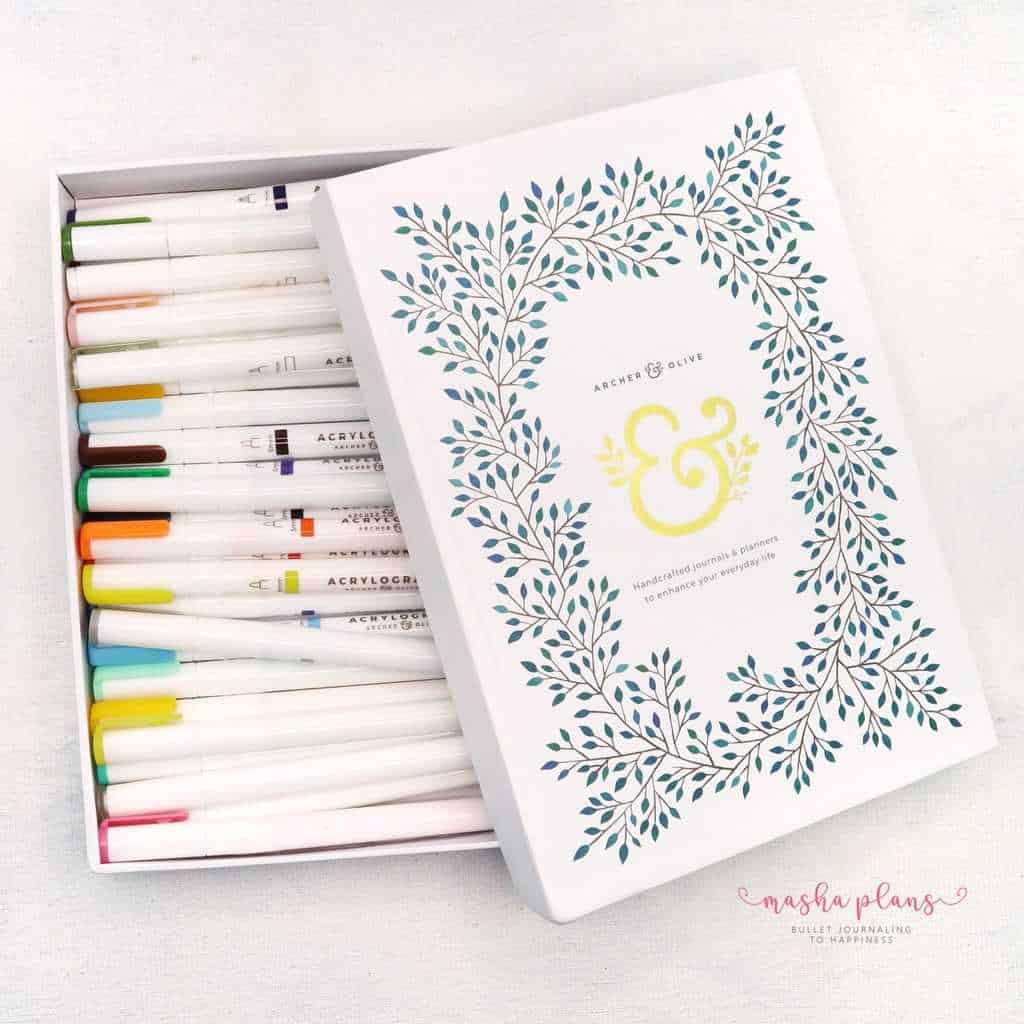
Packaging
First, let’s talk about the packaging.
Here I’ll only cover packaging for sets because this is how I get them. I’m not sure how they are packed if you buy them individually.
Every set comes in a thin box that allows us to easily store pens horizontally. I intend to actually keep the box and store my pens that way.
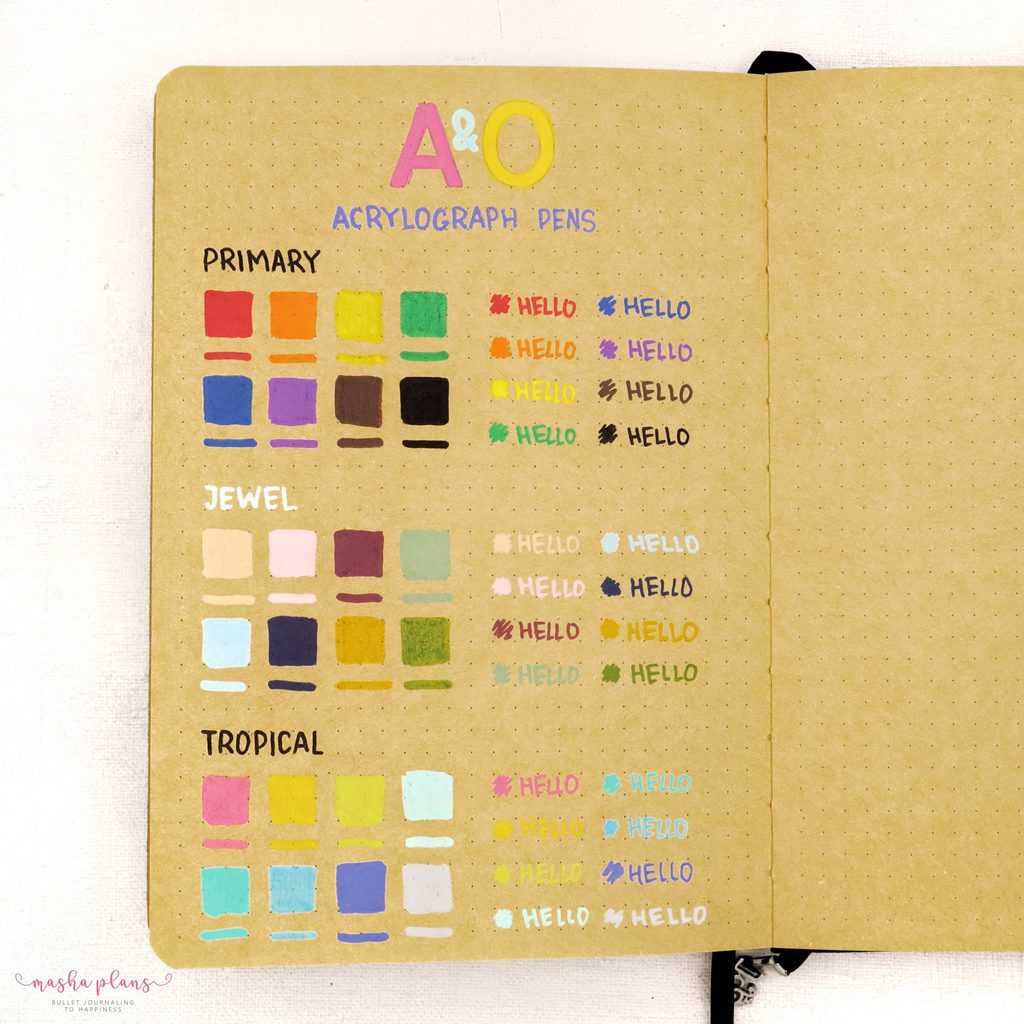
On the box, you’ll see the colors and the size of the tip. As you open it, you’ll get some instructions on how to store, take care of, and blend these pens.
The pens snap to place and hold very well, even after traveling to me through half the world they came in perfect condition.
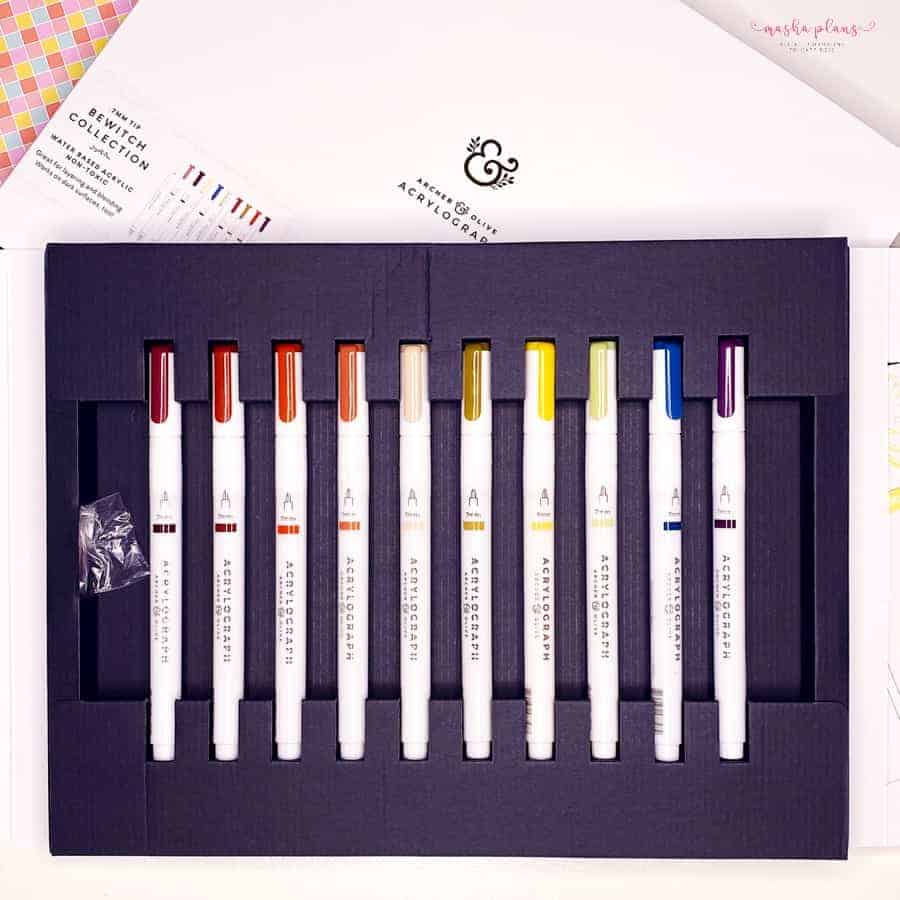
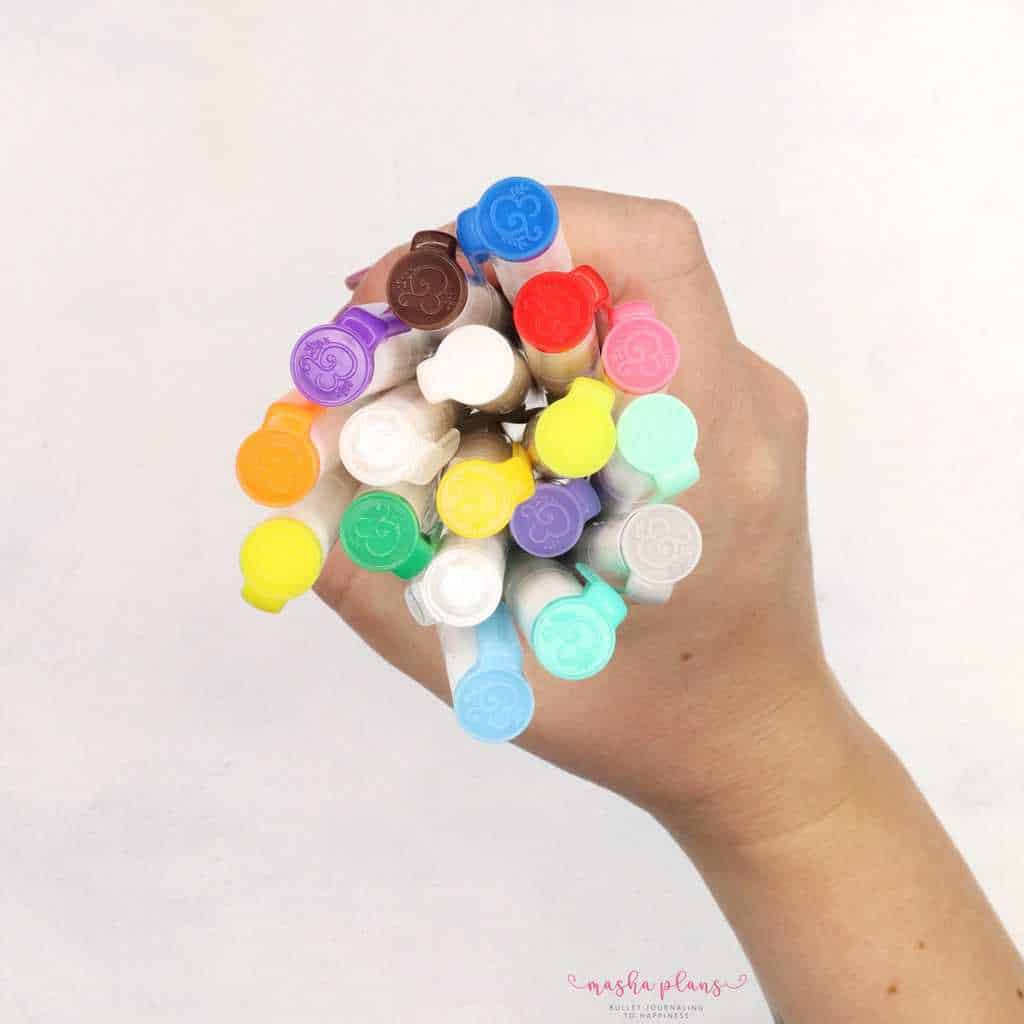
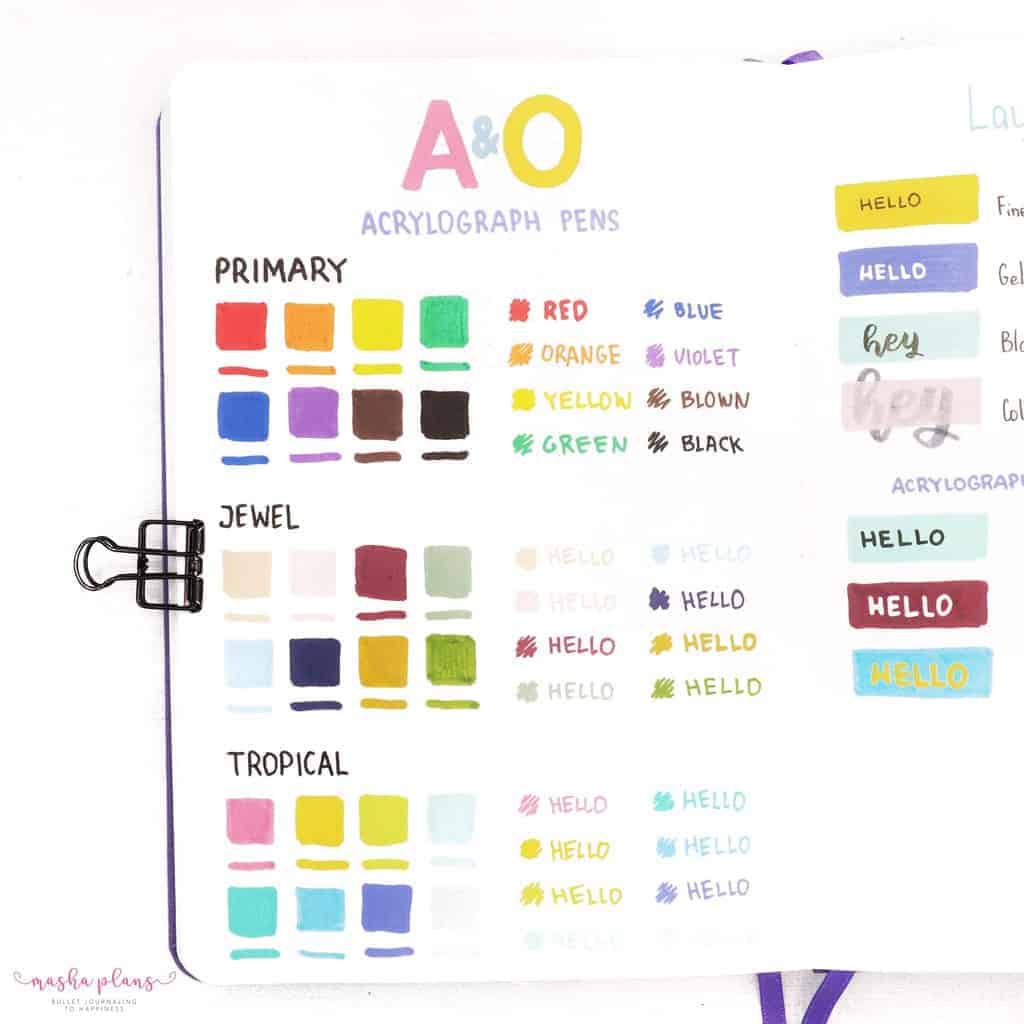
Inside each set, you’ll get 10 colors and two spare tips.
It used to be 8 colors a white pen and a blending pen, but now you can actually get a white and blending pen (just like all the other pens) individually if you actually need one.
A much better way, since you’ll ve getting more colors and no need to have a lot of duplicates.
I almost forgot to mention probably the most important part of the packaging – the blending palette! It’s of course great for blending, but also is amazing for opening up pens for the first time.
Pens Outside
Now let’s talk about pens.
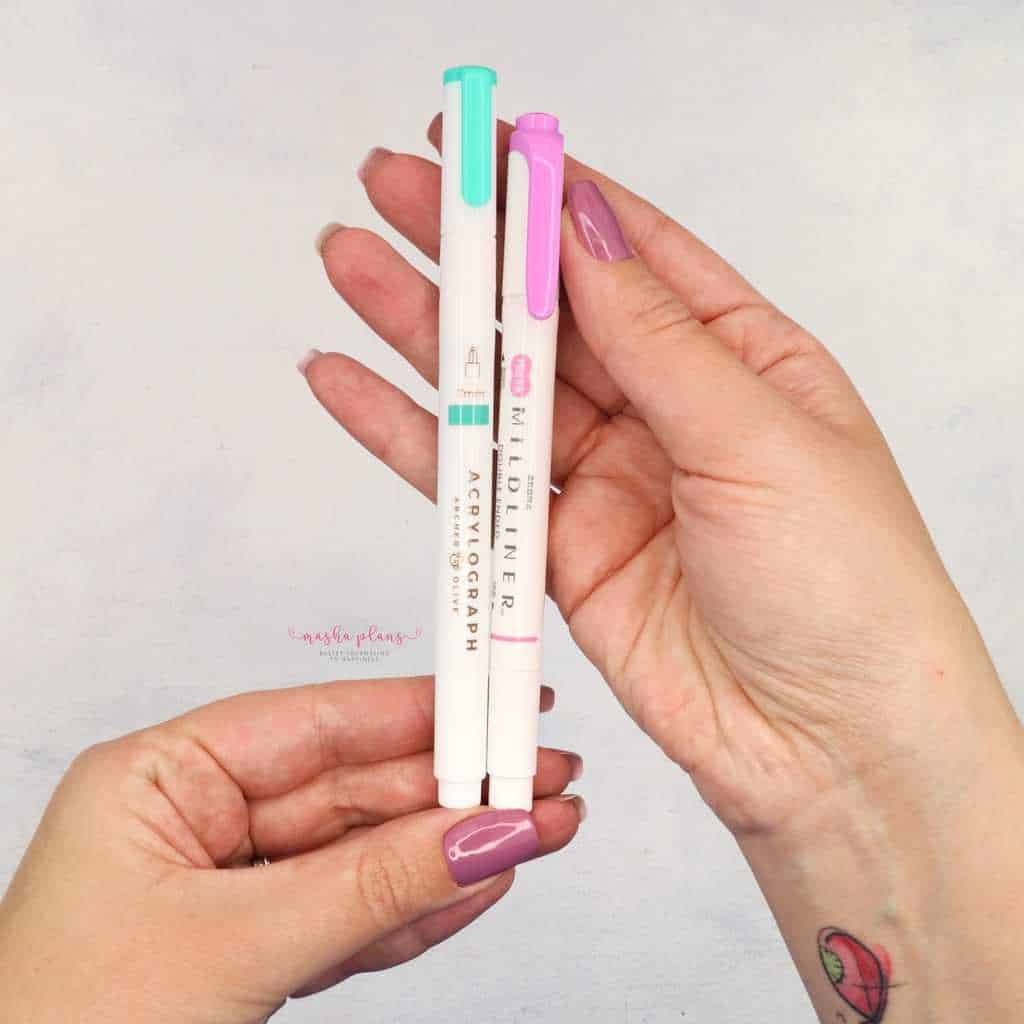
The pens are very similar to Zebra Mildliners in size, so it’s a very comfortable and familiar way to hold them.
They do, however, come with just one tip, I know I got asked if they were double-sided – they are not.
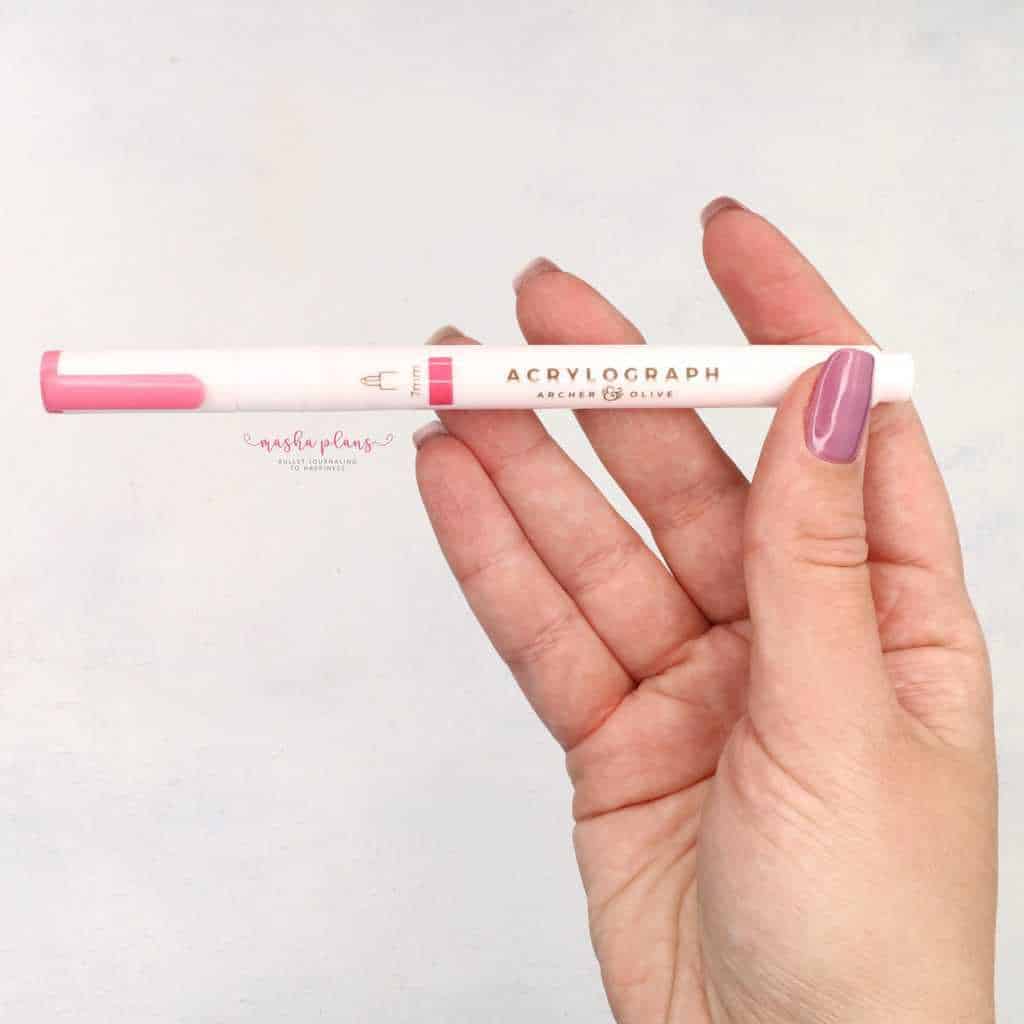
Each pen has on it written the tip size, the little picture of the tip, and finally a sticker with the color.
I feel like the sticker with the color will probably be worn off easily, that’s why the newer pens actually come with color printed on the pen.
One more improvement! It’s really fun to see how they change little things depending on the feedback and needs of the buyers.
Finally, I have to mention the cap!
It has first of all the color of the ink, and secondly – it has a little Archer and Olive logo on top, which I found is super cute!
Acrylograph Pens Inside And How To Open Them
At first, they were available in three sets with two tip sizes – 3mm and 0.7 mm. At the moment there are so many more color combinations! But they are available only in 0.7 mm tip.
Let’s take a look at the tips.
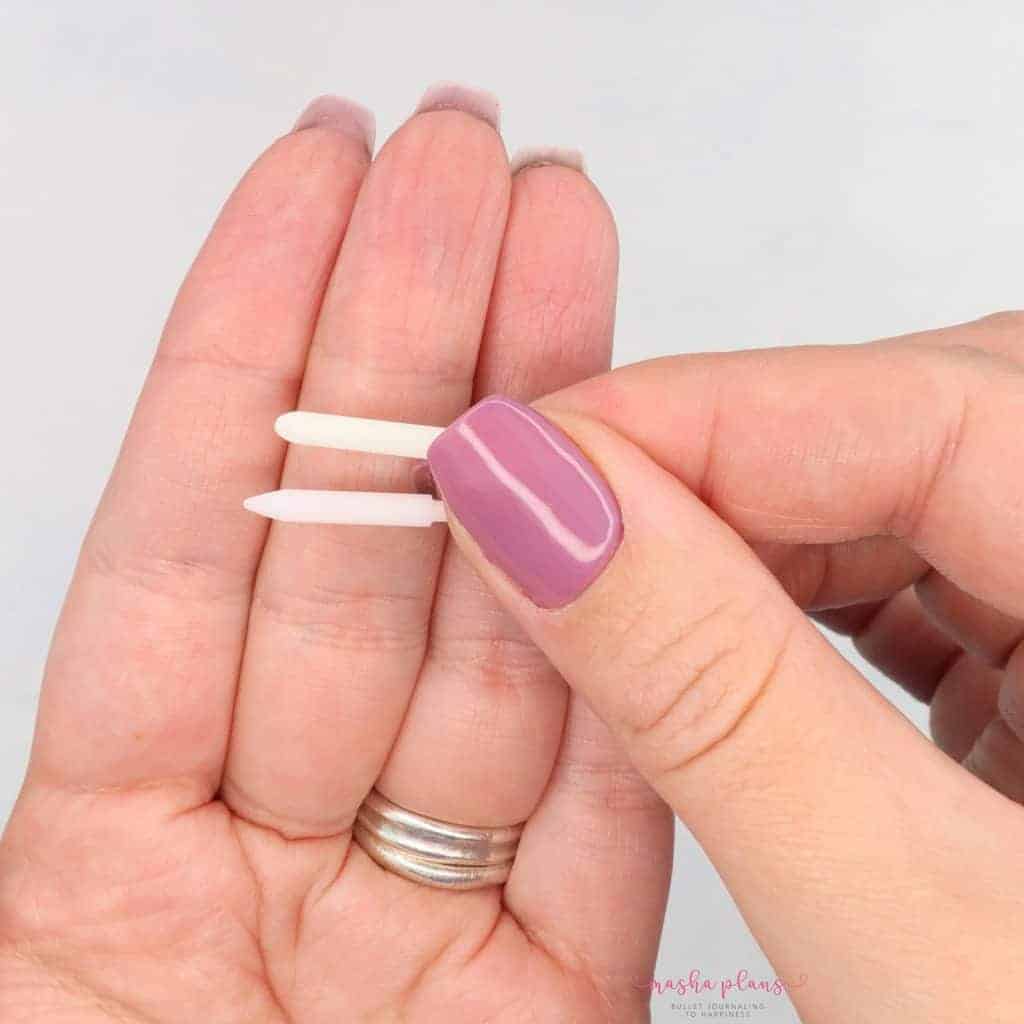
The 3mm tip is made of fiber and is perfect for coloring large areas because the lines it creates are pretty thick.
The 0.7mm tip is made of plastic and it’s almost like a little ink dispenser. Because this tip is made of plastic, it does make a little scratchy noise when you use it, but as far as I tested it, it doesn’t actually damage the paper in any way.
When you open the pen the tip is white, but don’t be confused by that.
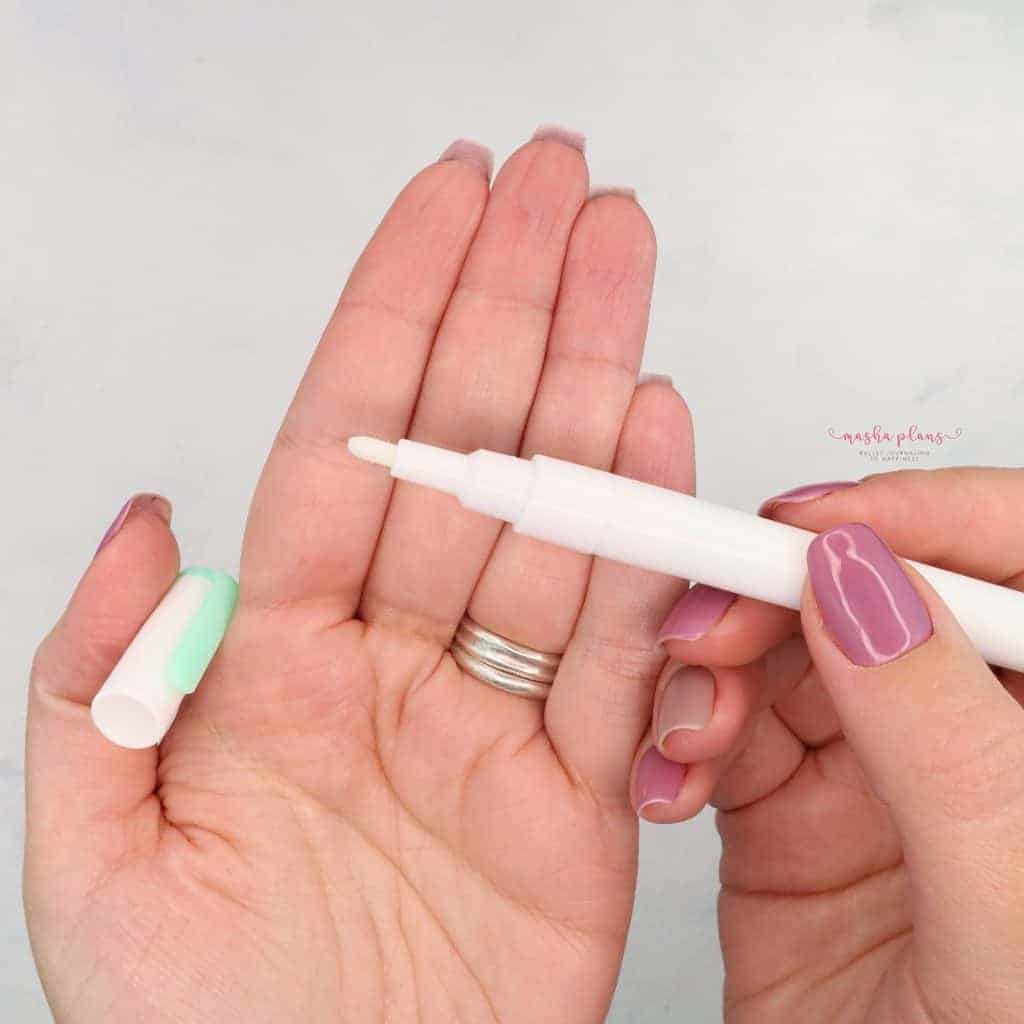
The thing is, the ink is hidden inside the pen, and you need to open it. What to do? First – shake your pen. Like, a lot. Be sure that you have your cap on though, that’s important!
After that, place it 90 degrees to your blending palette and push it a little bit.
If the ink is still not completely covering the tip, just close the cap and shake it some more.
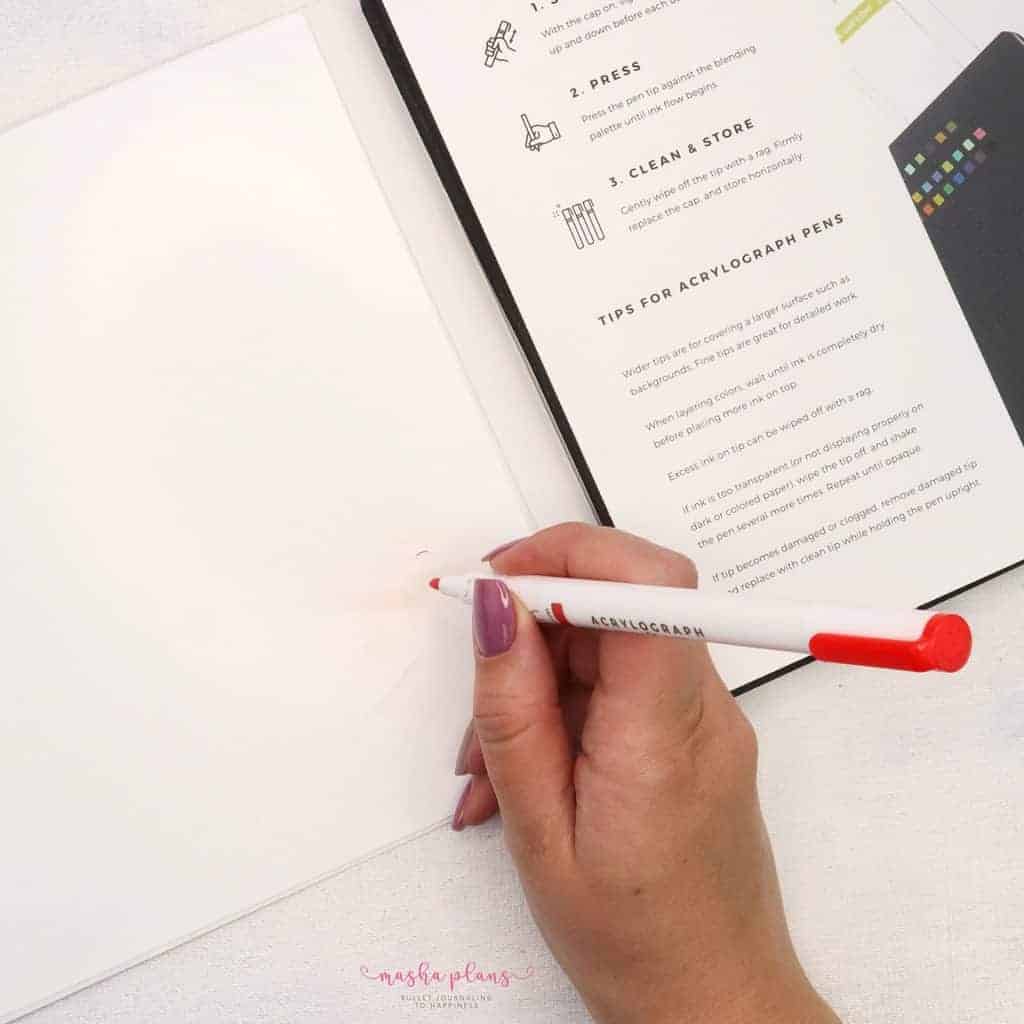
I recommend you not to do it in your notebook but use your blending palette instead. First of all, when you push it, sometimes too much ink can come out, especially in 0.7mm tips since they’re plastic and don’t soak the ink like the fiber tip.
Secondly, because the 0.7mm tip is made of plastic, and when you forcefully push it against a surface to open – it can actually create a small dent. On the blending palette, it’s barely noticeable, but if you use your notebook, you might be able to see the dents, and nobody wants that.
Ok by now, the pens are ready to use so let’s move to the pen test!
Pen Writing
We will be starting from using a white paper Archer and Olive journal, but don’t worry – later on, we will look into other journals and other types of paper as well.
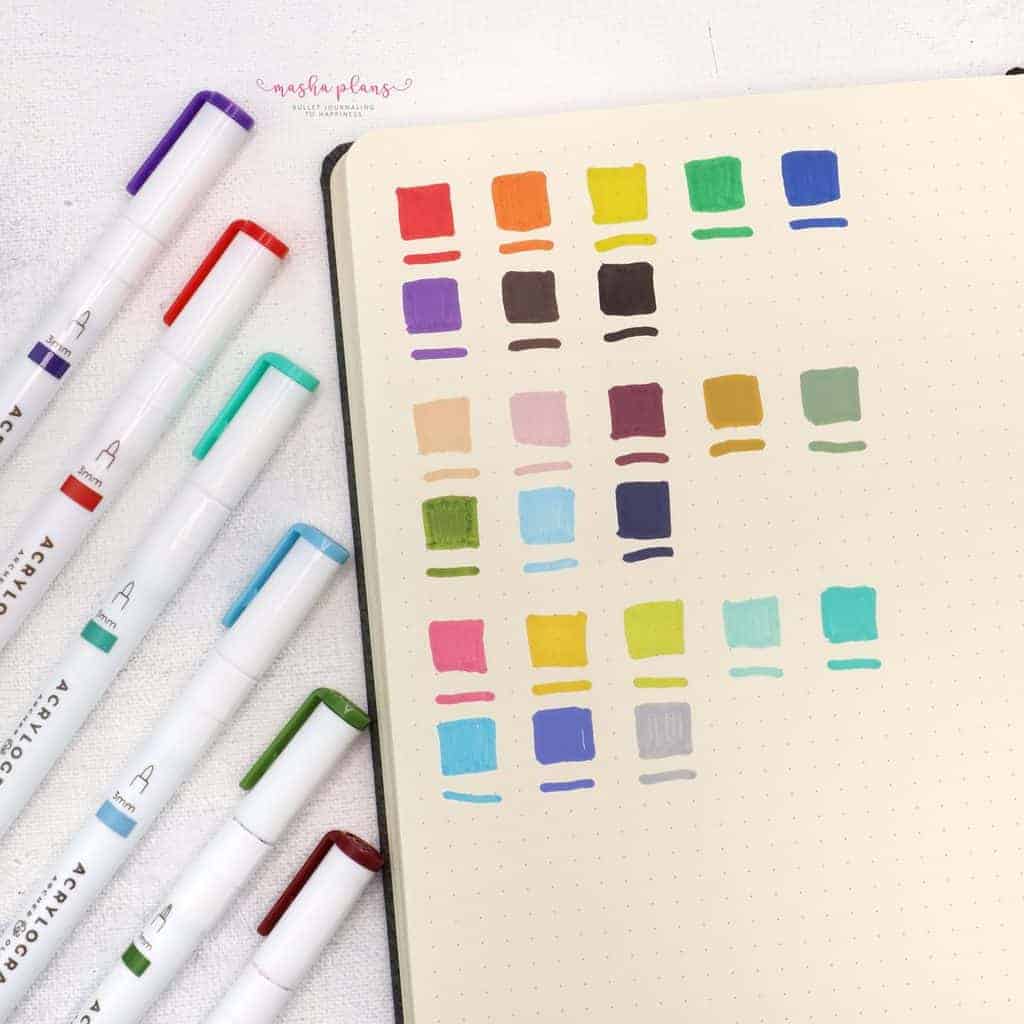
A few notes on the writing experience – the pens write very smoothly and don’t have any specific odor to them (this is something I’ve been asked about).
The colors are bright and so vivid!
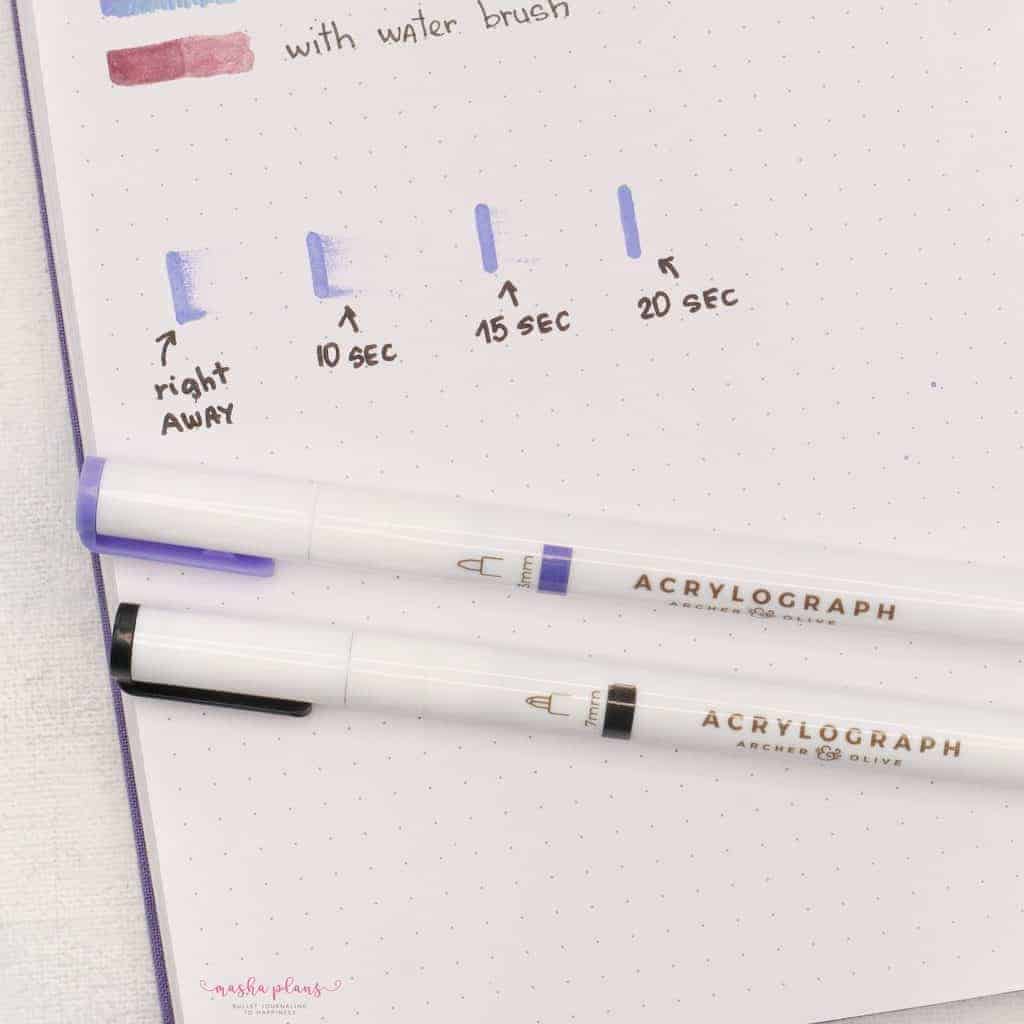
Note that this ink is the kind that you need to wait a bit to dry. Otherwise, it will smudge. The drying time really depends on how much ink comes out from your pen – if you shake it more – more ink will come out and of course, the longer it’ll take to dry.
On average, I did a dry test and it seems like 20 seconds was enough time for the ink to dry.
The special thing about these pens is that the ink doesn’t sink into the page but stays on top.
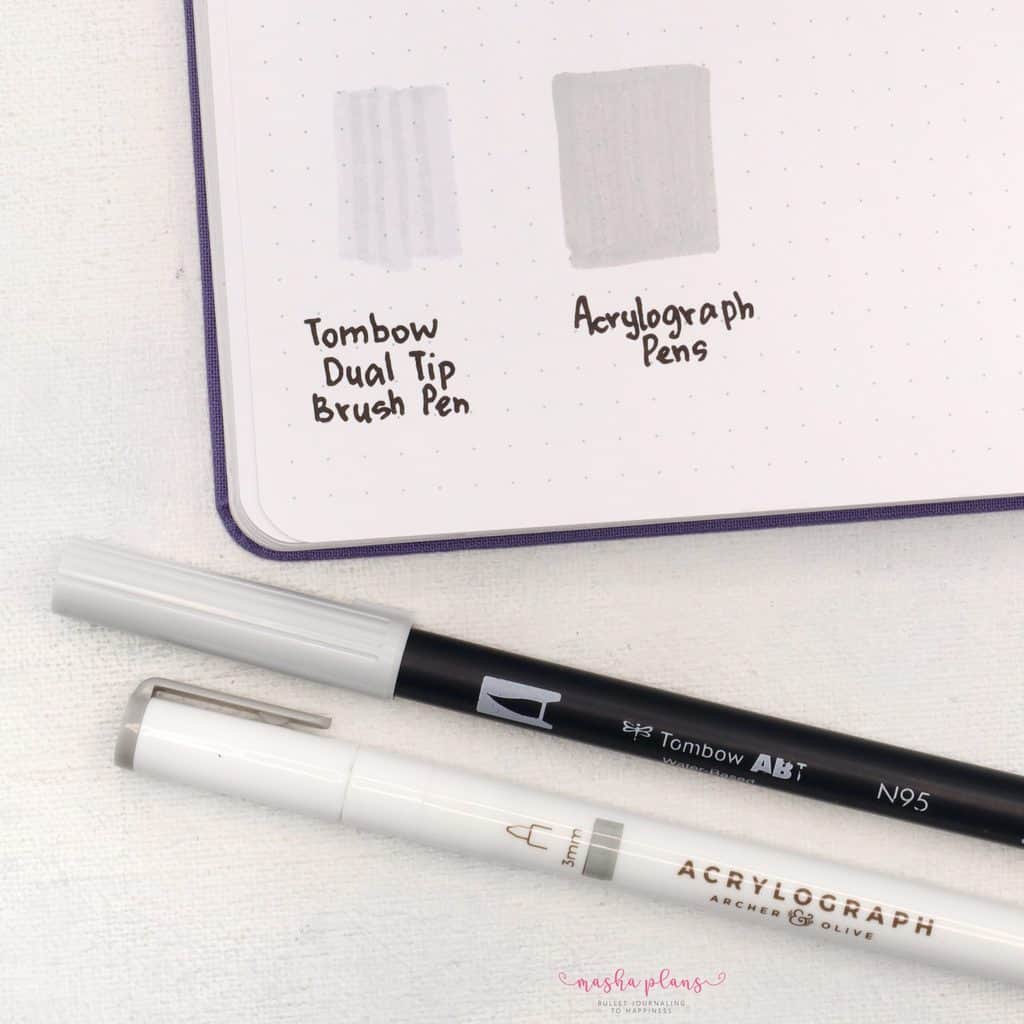
This means that first of all – you don’t get streaks when you try to color large areas, just check the comparison below between the acrylograph pen and a Tombow Dual Brush pen.
Another advantage of this is that it doesn’t damage paper in any way.
Let’s again look at Tombow Dual Brush Pens; when you layer them too much in your journal the pen starts picking up little bits of paper as well, but this never happens with the acrylograph pens.
This also means that they will not bleed through any kind of paper; it will sit on top of it instead. You’ll see what I mean when I do a pen test in other journals.
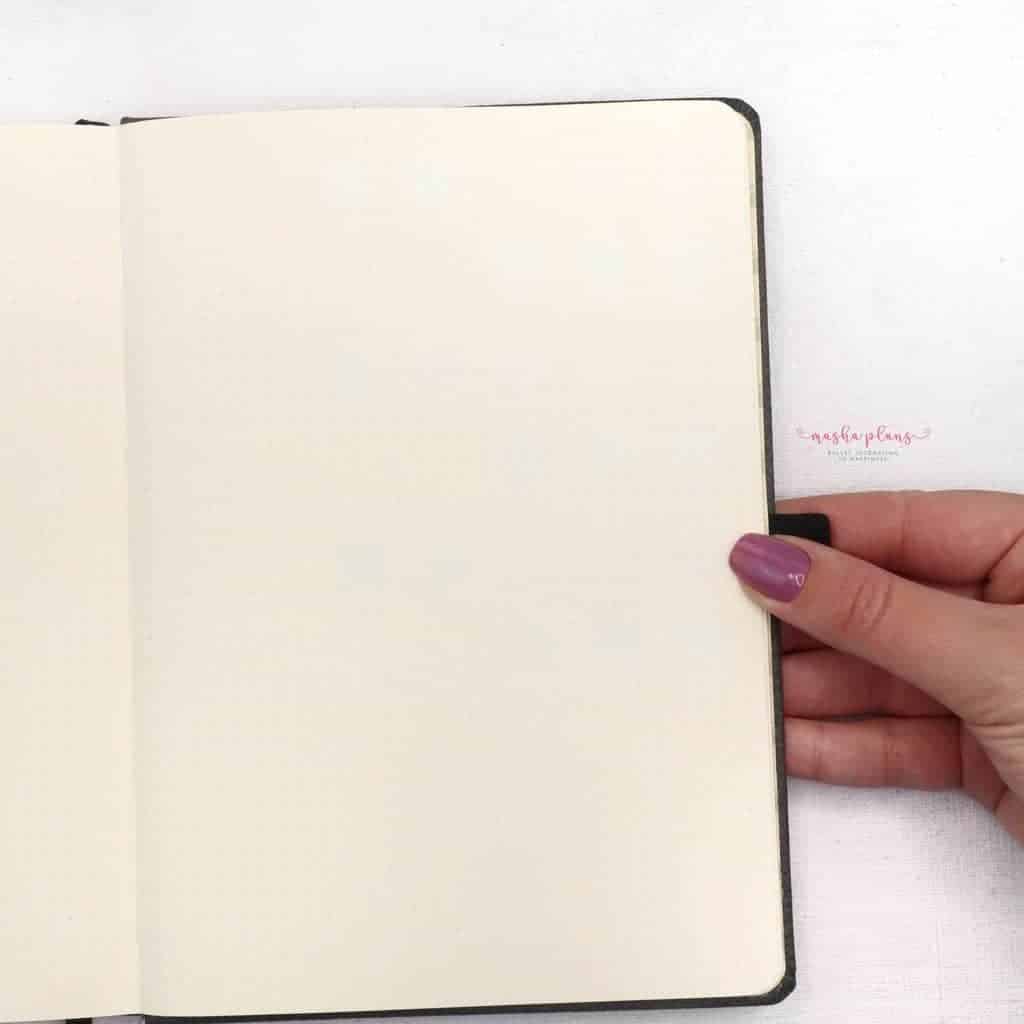
Just take a look at the back of the pen test page.
The final note I’d like to mention here is that the 0.7mm tip is plastic so when you write with it, you shouldn’t put too much pressure on it.
I’m usually putting my entire body weight behind my pens and this leads to some feathering. So if you’re like me and push too hard on your pens – be sure not to do it here.
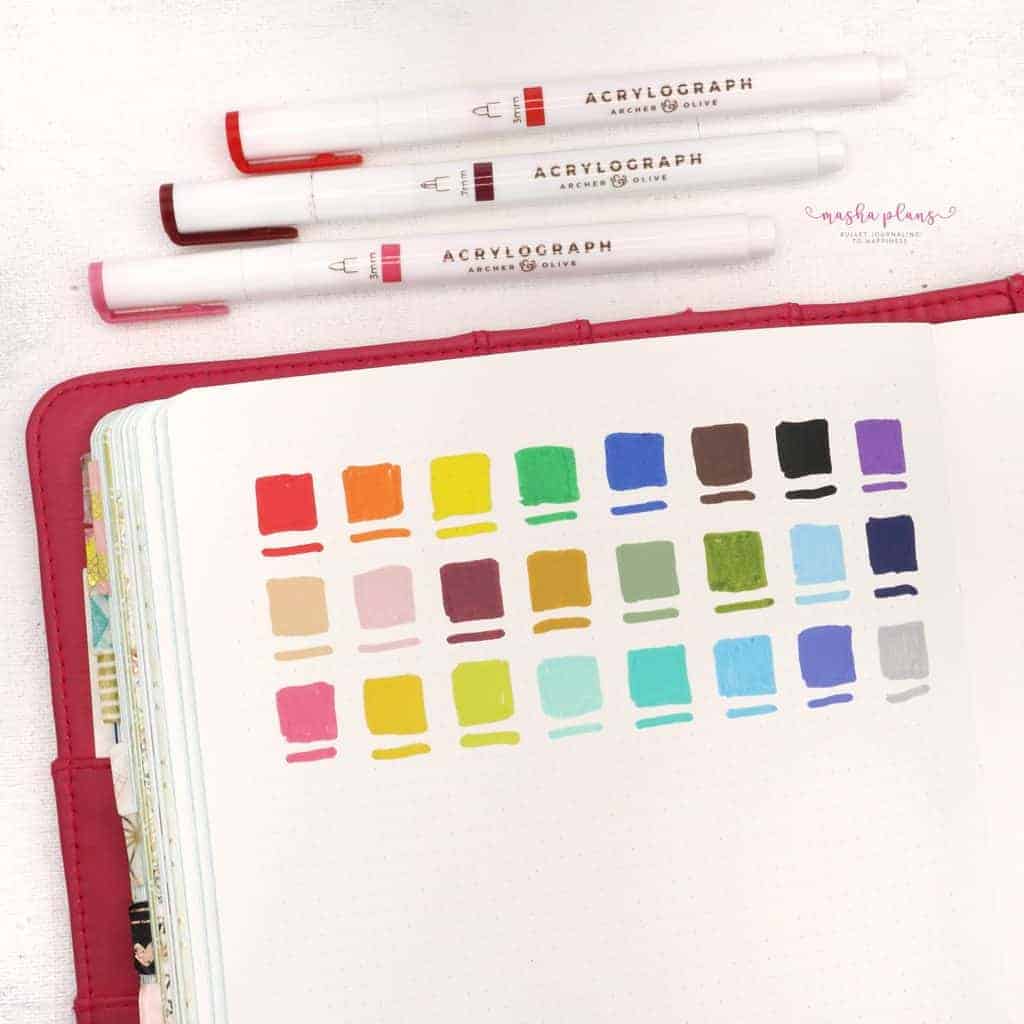
Pen Test
Time to test acrylograph pens on other types of paper.
First here is how it looks in the Blackout Book (check my review) and Kraft Paper journal (check my review).

Pretty much all the colors look great on the black paper since they don’t sink into the page and just lay on top.
The only thing I’d say is that the darker shapes kind of disappear on the black paper, but that’s pretty logical to expect.
As you can see, the colors still look amazing and bright disregarding what kind of paper it’s writing on top. If you’re looking for pens to bring some more bright colors to your Blackout book – these might be the best.
Now I also wanted to test these pens on other brand notebooks, since obviously, not everyone uses an Archer and Olive notebook.
Turns out. I don’t actually have that many notebooks from other brands, but I had a few so here it is.
The first notebook I’ll be testing it on is a Dingbats Journal.
I have a full review on the blog, but for this pen test, all we need to know is their paper density – 100 GSM.
The colors still look bright and beautiful, even though it’s not a pure white paper.
Dingbats use ivory paper and that sometimes can affect the way colors look, but not with acrylograph pens.
As you can see, it didn’t bleed or even ghost!
The next test is in my Nuuna.
Nuuna journals have a special place in my heart (check out my Nuuna Notebook Review), but I’ll be the first one to admit – their paper is pretty bad. I usually don’t layer and use very gentle pens in my journal and still, ghosting and even bleeding is often an issue.
Nuuna supposedly has 120GSM paper but I really think it’s closer to 80-90 GSM. So for me, this will be the real test – if Nuuna can handle it, any other journal can as well.

And again, acrylograph pens for the win – there is no bleeding or ghosting, and the colors look absolutely amazing!
Writing On Top
It’s all well, but can you write on top of these pens? Let me answer your question.
You can!
The only trick here is to make sure your first layer is completely dry before you decide to draw on top of it.
Below are some tests I made with fineliners, gel pens, brush pens, and more to show you how many possibilities these pens have.
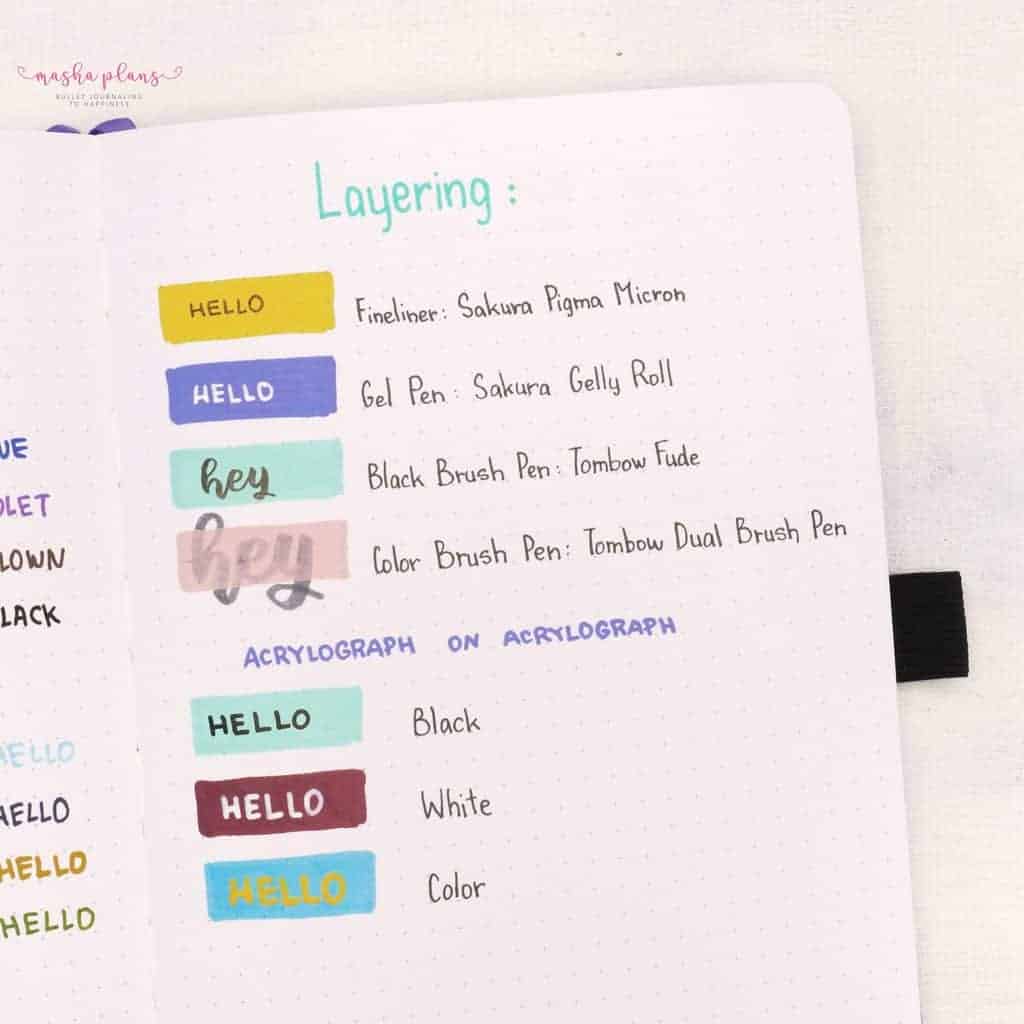
This makes them pretty useful for creative headers in your BuJo! You can play around with colors so much.
I figured that actually, the best way to layer acrylographs is if you use acrylographs and not other pens. Since they sit on top instead of merging in like Tombow Dual Brush pens did for example.
Blending
A little disclaimer here – I don’t usually blend anything, I love my colors to be separated and on their own.
But I did my best to try blending acrylograph pens and it seems pretty simple super fun, and it all came out so pretty!
There are a few ways you can blend your color:
- With the color pen
Choose a pen with a lighter color and one with a darker color. Put some ink from a darker pen into the blending palette. Then pick up that dark color with your lighter color pen.
Once you start writing or drawing you’ll see the colors blending from darker to lighter.
You can use any tip for this, but I’d say that the 0.7mm plastic tip is probably easier to clean later.
Oh right, and to clean you can either keep on writing until you exhaust all the dark ink or just take the nib out and clean it with a rug or some water.
- With water brush
These pens are not watercolors, but they are water-based, so if you use a water bush you will be able to manipulate them.
Add the two colors you want to blend next to each other and use your water brush to blend them.
Be careful here though, once the ink is dry there will be no reviving it like in watercolor – it will stay dry where it is.
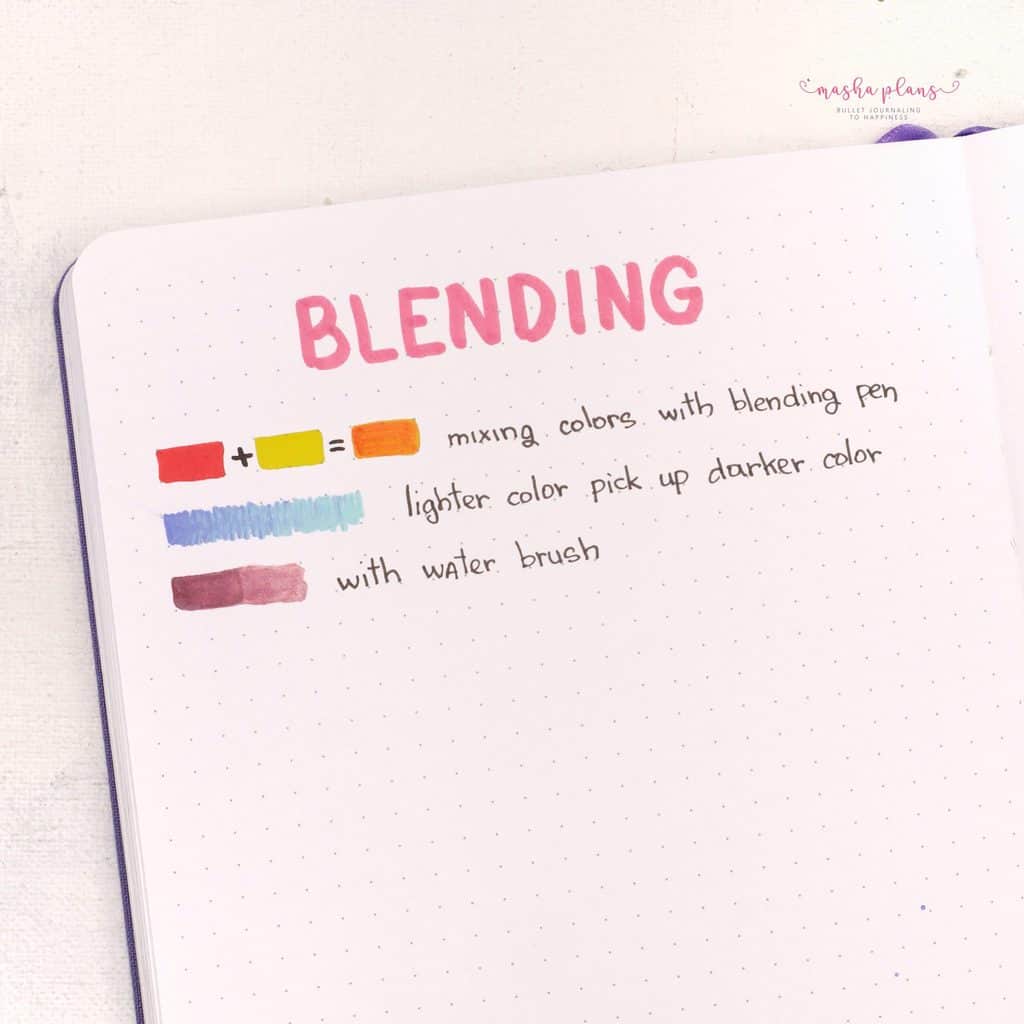
What do we have the blending pen for then?
Well, the blending pen is there to create new colors!
Use the ink from the two colors you want to mix and add it to the blending palette. Then use the blending pen to mix the colors and pick up the final result to draw in your journal.

Cleaning and Storage Ideas For Acrylograph Pens
Finally, let’s talk about cleaning and storing your pens.
Usually, after using your pen all you need to do is simply use a rag to clean the excess of the ink before you put it away.
For the blending pen, it’s recommended to take the tip out and clean it under water.
As for storing, these pens have to be stored horizontally. The packages they come in are perfect storage.
However, of course, they are pretty large and you can’ clearly see what kind of pens are inside. So if you want some other options – I absolutely feel you.
That’s actually why I eventually switched to a different idea.
Which is to store your acrylograph in your box from an Archer and Olive journal. They fit perfectly into a beautiful box you get with your A5 journal.
And that also gave me an extra reason to use my label maker, since I just labeled the boxes with the name of a collection inside.
For color reference – can always look into a pen test page.
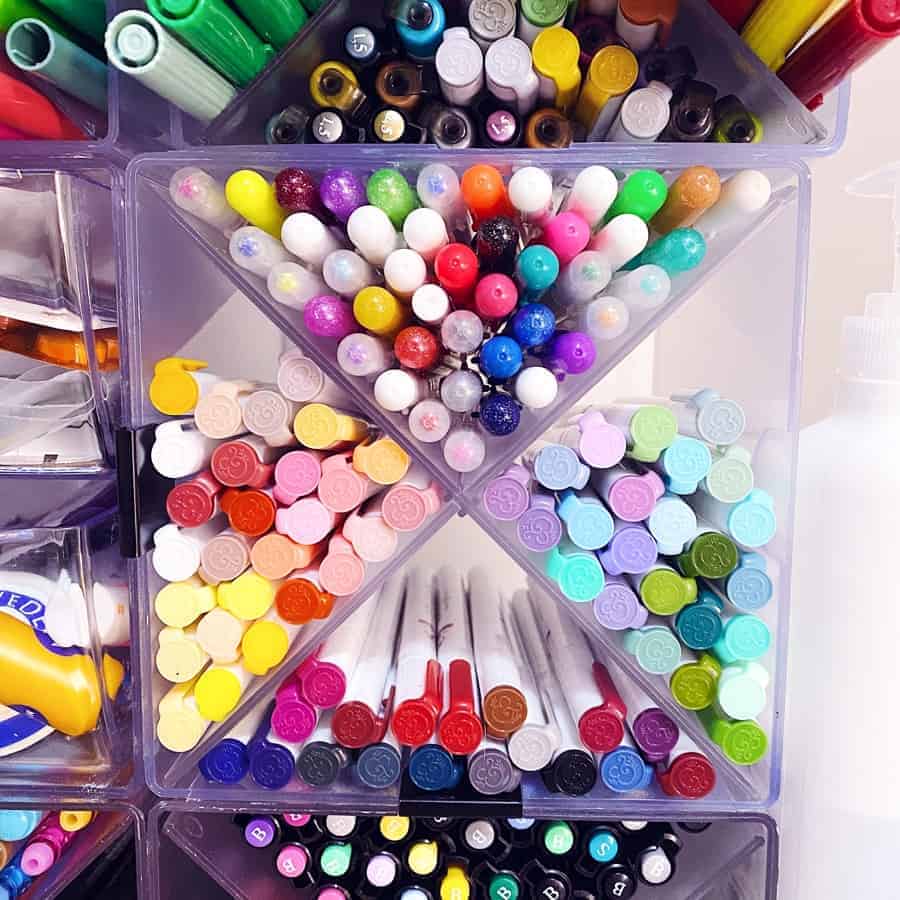
That worked very well for me, but once I got a larger desk I wanted a way to display all my pens, so I went looking for a solution.
And I found it in stackable cubes.
I use these ones for pretty much all my pens, but they definitely give an extra cute look to acrylograph pens with their pretty cap.
I still use my A5 journal boxes to store some pens that I don’t use much, but the go-to ones are always next to me so prettily displayed.
Another cool storage I saw around for acrylograph pens is the Muji drawers.
They definitely look amazing! But you might run out of space pretty fast if you decide to get more pens.
Review Video
Want to see these pens in action and me talking about them – check out my video review!
But be sure to keep scrolling since after that we have a huge FAQ section where I answer all the questions I ever heard you guys asking about the acryloraph pens.
Ok so you saw the pens in action, let me just take a moment and share with you a few creative ideas on how to put your acrylograph pens into use.
If you buy them, you might as well know all your options, and believe me these pens are pretty versatile.
How To Use Archer and Olive Acrylograph Pens
Ok, these pens are obviously great for your journal, but I definitely never expected how many different ways there are to use them.
So let’s just check some ideas here.
Lettering
This is definitely my favorite way to use the acrylograph pens – to create quote pages in my Bullet Journal.
Acrylographs have beautiful colors, and they are perfect for creating faux calligraphy.
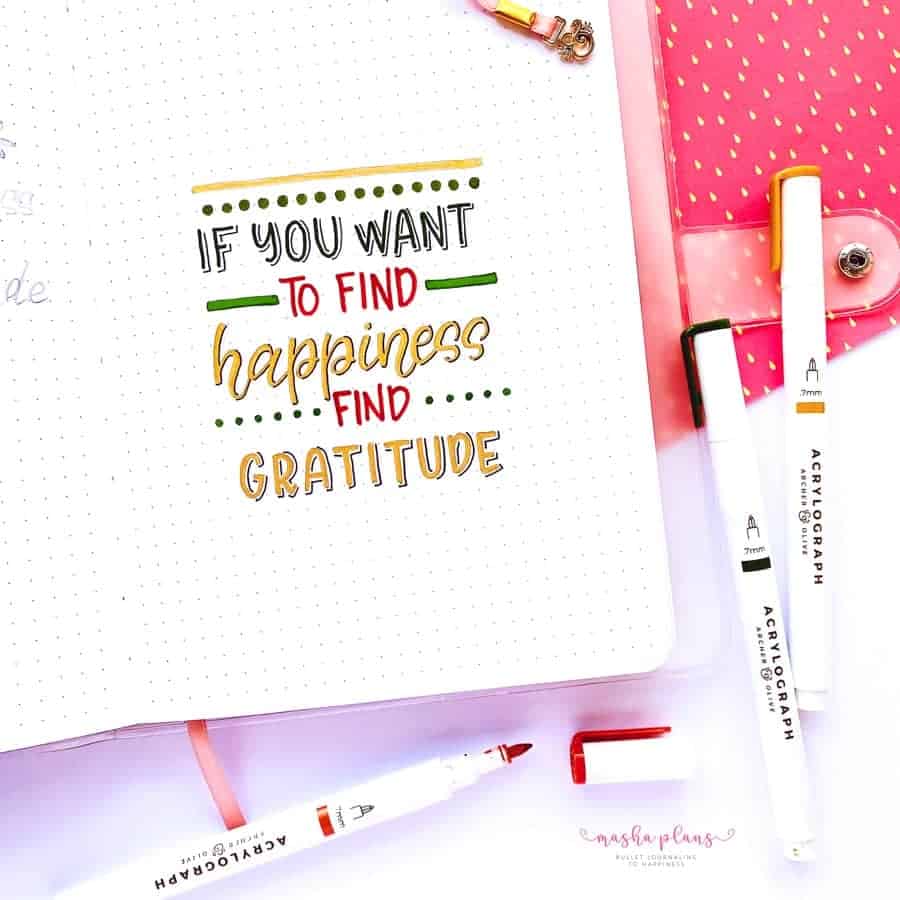
Quote pages are a fun way to be creative, add positivity to your journal, and also fill out the empty pages.
If you don’t know how to create quote pages – check my post on How To Create Beautiful Quote Pages in Your Bullet Journal.
Decorate Your Journal
Acrylograph pens are pain-based, meaning that once they are dry, they are permanent. And they can write on any surface!
This opens the world of possibilities, and the first thing I could think of was decorating a journal cover.
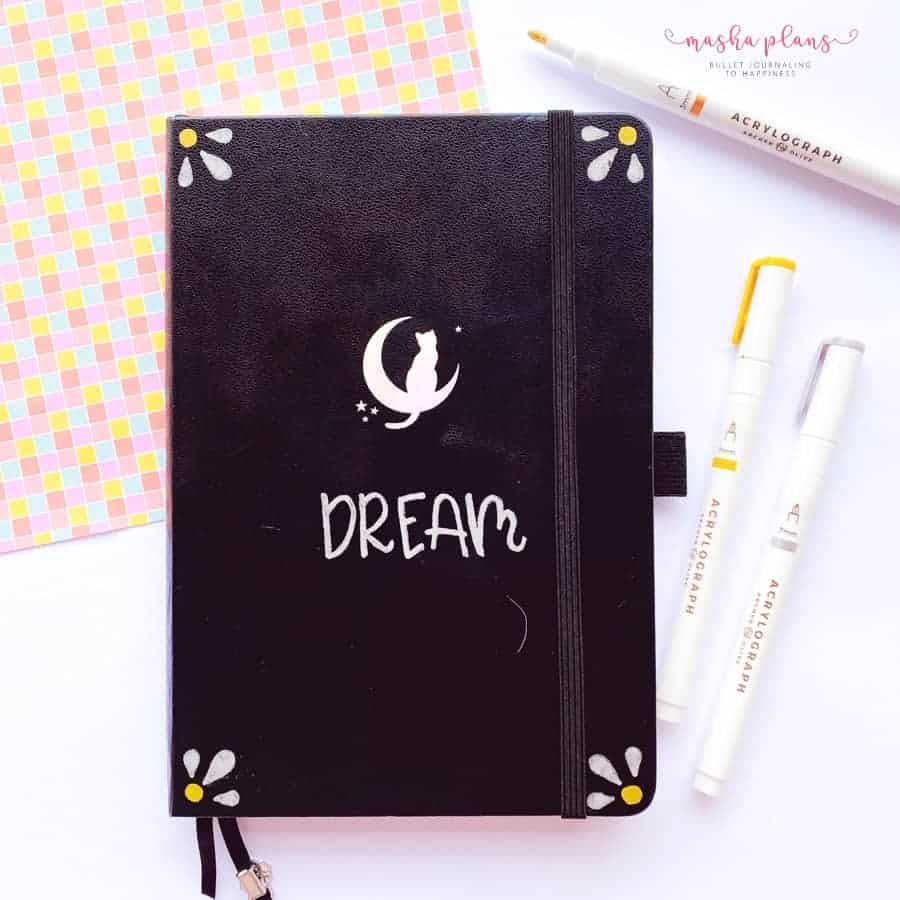
Archer and Olive actually have plain journals, and it might be such a wonderful gift idea to get one and decorate the cover.
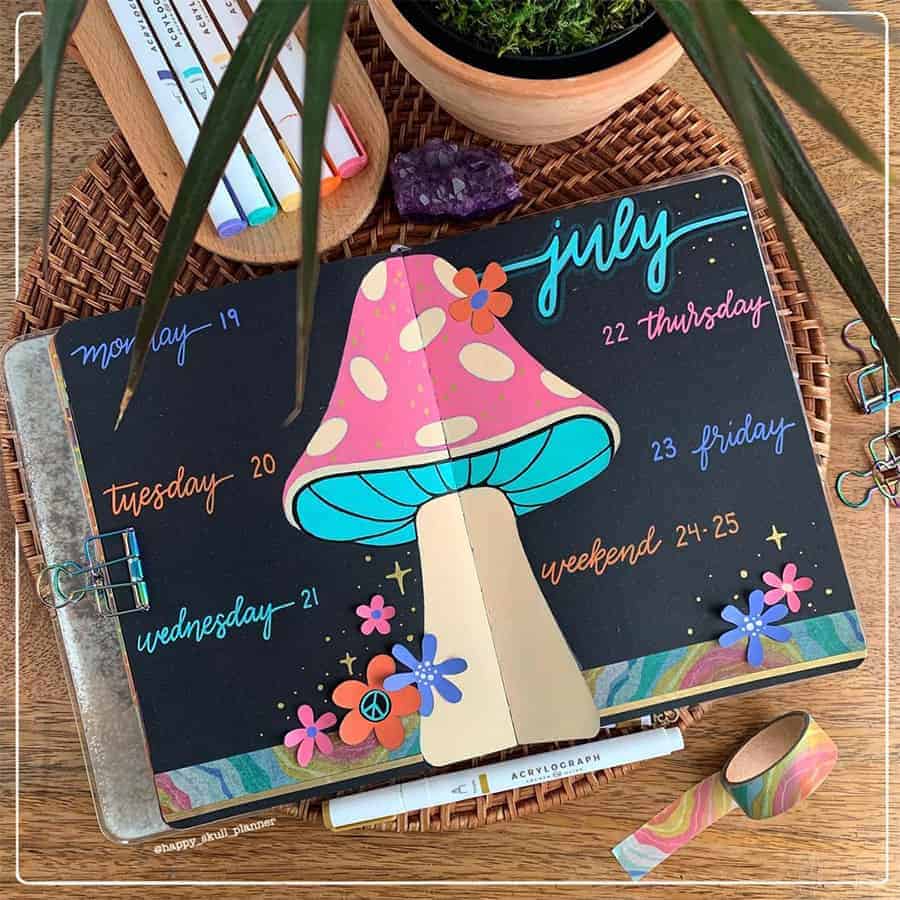
Illustrations
Acryloghraph pens can create some amazing illustrations with all the effects you can get.
They layer well, cover the paper smoothly and of course – look gorgeous on any color of paper, making them also perfect for a Blackout book.
Fixing Mistakes
My usual go-to for fixing small mistakes is a white gel pen, however, once I found a white acrylograph pen it absolutely changed the game for me!
Acrylograph pens have a thicker structure and cover mistakes better, plus they stay on paper for good.
Of course, I’m not saying get this pen for fixing your mistakes, but if you already have one – this is definitely a fun way to use it.
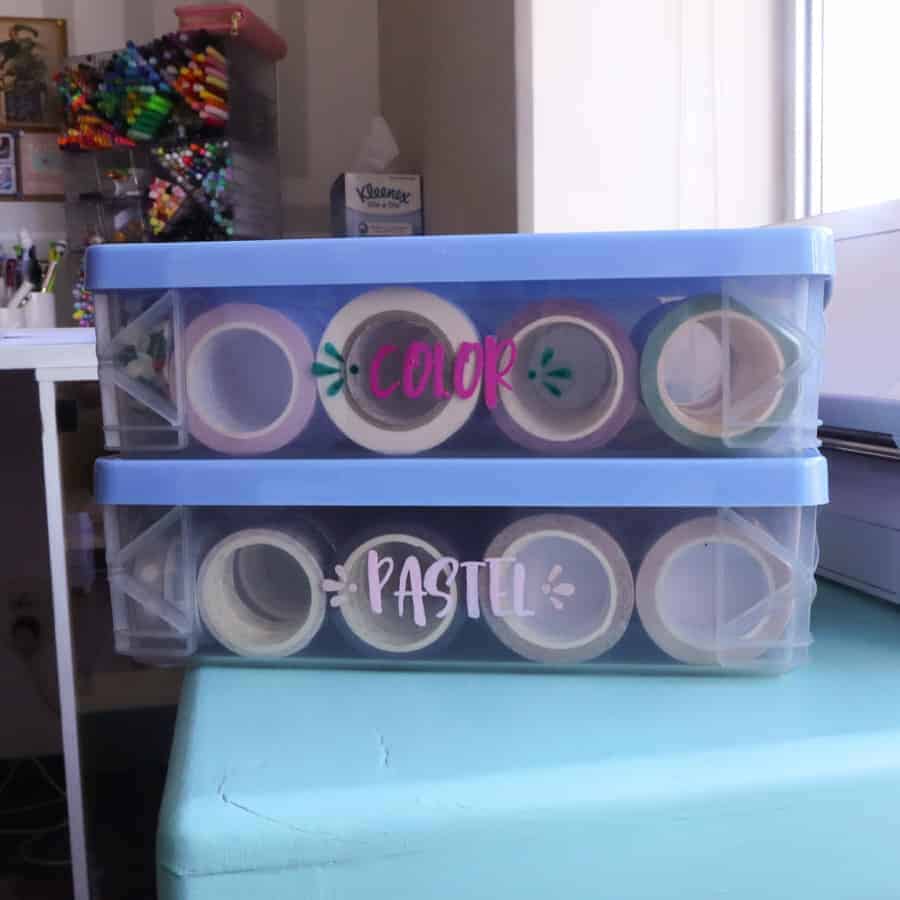
Labeling
Since these pens write and permanently stay on anything – they are perfect for creating labels.
I used mine to label the boxes I use to store my washi tapes.
Another cool thing I’m considering is to start labeling my previous journals, so I can always see the year when they are on my bookshelf.
Creating Home Decor
Want to add some spice to your home? Acrylograph pens definitely can help you with that.
Use them to decorate your favorite glass, or maybe to add some warm words to your Christmas decorations.
You also absolutely can use them to decorate your ceramics or even your tote bag!
FAQ
One more thing I decided to include here is the FAQ section because I get tons of questions from you guys and I wanted to make sure you have all the information before getting your set.
Do they smell?
No, these pens have no odor whatsoever.
How smooth is the ink?
Inckflow is pretty smooth with both tips. The big tip here is with 0.7 mm tip to not push it too hard.
How fast do they dry?
This depends on how much ink is coming from your pen. Depending on how hard you shake it the pen might be juicier or less.
On average, I would say that 20 seconds is enough.
How do they look when they dry?
The pens dry with the matte finish. With the darker colors, they usually cover the page so that you can’t even see the dots on your grid. With lighter colors, you might need to add a few layers to hide the dots if you want to.
On touch, they feel very smooth, but more like paint than a brush pen, because it doesn’t sink into the paper, but stays on top of it.
Do they bleed or smudge?
No, they don’t bleed, but they definitely can smudge. You need to take your time and wait for a bit for them to dry.
How do they show up on black paper, how many layers do you need?
They show up pretty well on black paper and for most colors, I think just one layer is enough.
However, if it’s a lighter color, like white or yellow, you might want to add another layer, or maybe shake the pen a bit more so it gives more ink when you use it.
How different are they from Posca?
Personally, I never used Posca. But I did my research and it seems like they are pretty similar. The only significant difference is that Archer and Olive pens have more colors available.
Are they blendable?
Yes, these pens are blendable. The only thing to look out for is that you have to be quick with your blending because once the ink is dry it stays there forever.
Are they dual-tipped?
No, they aren’t. Each pen has just one tip and you can choose to get them in 3mm tip or 0.7mm tip.
Can you write with them on top of other mediums?
Yes, you can. They look great on tons of other mediums such as gouache or watercolor.
What to choose 3mm or 0.7mm?
This really is up to you to decide, depending on how you want to use these pens.
0.7mm are great for writing and doing detailed work. While 3mm is great for drawing and coloring larger areas, creating some fun headers and such.
Which set is the best?
That, of course, depends on you and what colors you like. And they always come out with new incredible colors.
How do they look used as fineliners?
You absolutely can use the 0.7mm pens as fineliners. They are very rich in color and can create thin fineliner like lines.
But of course, the tip is 0.7mm, so you won’t get lines as fine as 0.05 fineliners for example.
They sound scratchy, do they damage the paper, or are difficult to use?
No, they aren’t. They are paint pens and have a different kind of tip from any other pens. But this doesn’t lead to any paper difficulties and it’s pretty easy and smooth to use them.
How do they compare with Tomdows / Crayola Super Tips?
These pens are paint pens, so they are completely different from both Tombow and Crayolas.
They sit differently on paper so they create a more page effect, they don’t bleed or ghost, they have a matte finish and they don’t damage the paper however many layers you add.
However you can’t do with them any brush calligraphy, they are available in fewer colors than Tombows or Crayolas and they do require a bit more effort when using (you need to wait for them to dry and slightly clean them after using).
But acrylographs are amazing at using faux calligraphy.
Are these pens worth the money?
Well, this really is a hard question to ask.
Each set comes at 34$ and it has 8 colors, 1 white pen, and a blending pen. This brings the cost at 4$ per pen.
We all have different financial situations, and we also have different Bullet Journal needs.
If paint pens are what you will use a lot this might be worth it.
Personally, I love them because the colors are bright and they don’t bleed, which is a very important factor for me and my Nuuna.
I tried to give you all the information in this post so you can make this decision for yourself.
If you decide to get acrylograph pens, or any other Archer and Olive product, I have a special code for you. If you use MASHA10 you’ll be able to get 10% off your order!
Have you ever used these pens? What do you think? Let us know in the comment!
Hope this post was interesting if you find it so, please share! If you enjoy my content and want to show your appreciation, please consider supporting me with a cup of coffee.
And remember: Keep Bullet Journaling, and Don’t Be A Blob.


Thanks for this review. What size did you use in the above examples? Did you use the finer point for the writing and the larger for coloring in the blocks?
Glad you liked it! And yes exactly that, 3mm for blocks and 0.7mm for text