Bullet Journal Grid Spacing Guide: All You Need To Know
Looking for fresh Bullet Journal page ideas that can save you time? A grid spacing guide might just become your new favorite tool.
This simple yet incredibly effective spread helps you divide your journal pages evenly, removing the guesswork from your layouts. With all the dimensions laid out in one go, setting up your pages becomes faster and less stressful.
Whether you’re designing weekly spreads, habit trackers, or any other layout, this guide ensures consistency and precision with ease. Plus, it’s quick to set up, making it a must-have for any Bullet Journal user who wants to stay organized efficiently.
So welcome to your ultimate guide – a post where we learn everything about this page and how to create and start using it in your Bullet Journal.

There are so many different Bullet Journal pages that a lot of them pass by without even registering what you saw.
But the grid spacing guide is something I’ve heard about a lot, enough to make me curious, and I decided to try it out for myself.
In my 2021 Bullet Journal setup, I finally created a grid spacing guide, and I must say it’s been very, very helpful.
This was a pretty new concept for me, and it took me a while to figure it out myself, so I thought I’d save you time and create this little guide to help you create a perfect tool for yourself.
The Whats and Whys Of Bullet Journal Grid Spacing Page
Ok, think about setting up your Bullet Journal pages. What’s that one annoying thing you always have to keep in mind?
Spacing!
Every time I open my journal I need a ruler (and sometimes a calculator) to figure out how I can divide the page equally by certain parts.
This takes some time, and it absolutely drives me nuts when I actually get it wrong and mess up the whole balance of the page.
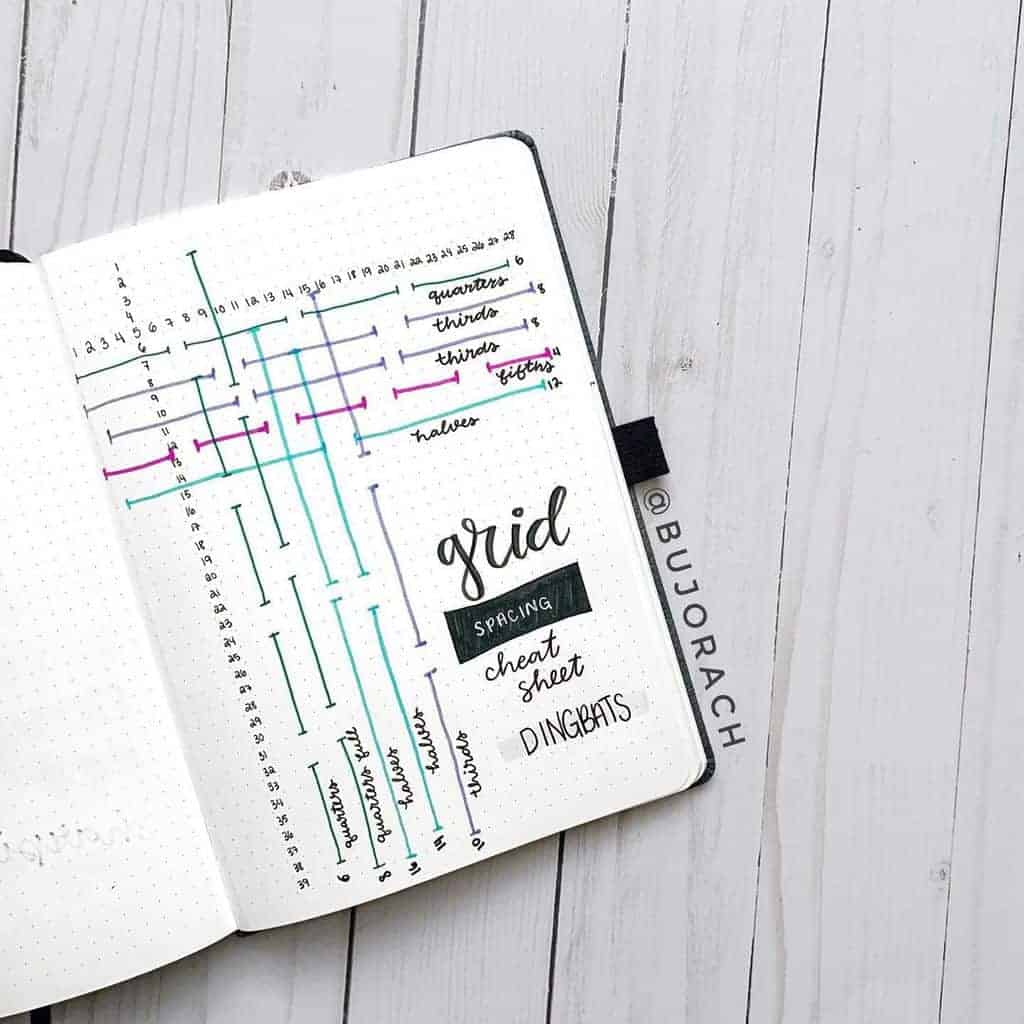
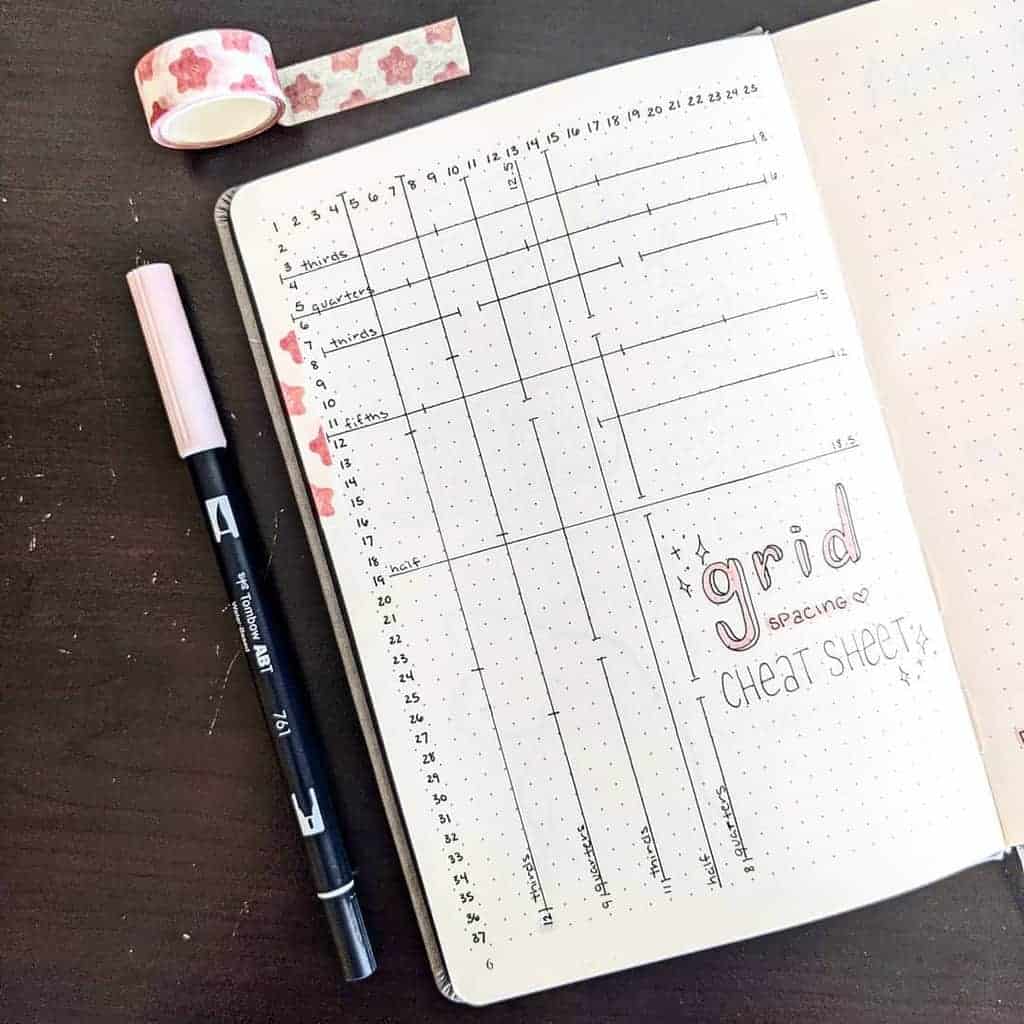
The grid spacing guide spread is created to help you with that. This is basically your cheat sheet on how many squares you need to count to divide your page by equal parts.
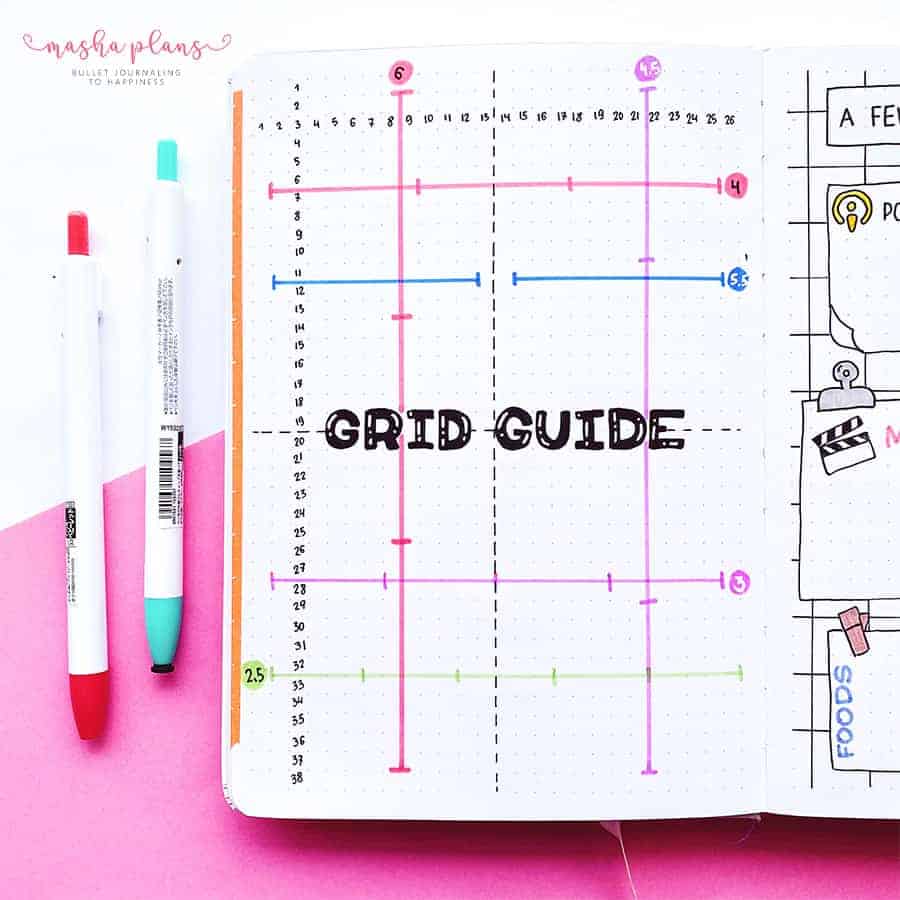
The grid spacing guide helps you to keep track of your notebook dimensions and makes it easy to divide your pages by the most common divisions.
If you have a grid spacing guide spread you won’t need to do calculations each time you set up a weekly spread; for example, all the numbers will already be there!
How To Create Grid Spacing Guide Spread
The best part about this hack is that it’s very easy to set up and takes just a few minutes!
First, I recommend you count how many squares you have vertically and horizontally. This will help you with your calculations, and it’s always nice to know what your journal dimensions are.
Even though most popular notebooks for Bullet Journal come in A5 size and the dot grid is usually 0.5 cm, you still can be surprised by how different dot amounts can be! So I recommend creating this spread for every new brand of the journal you have.
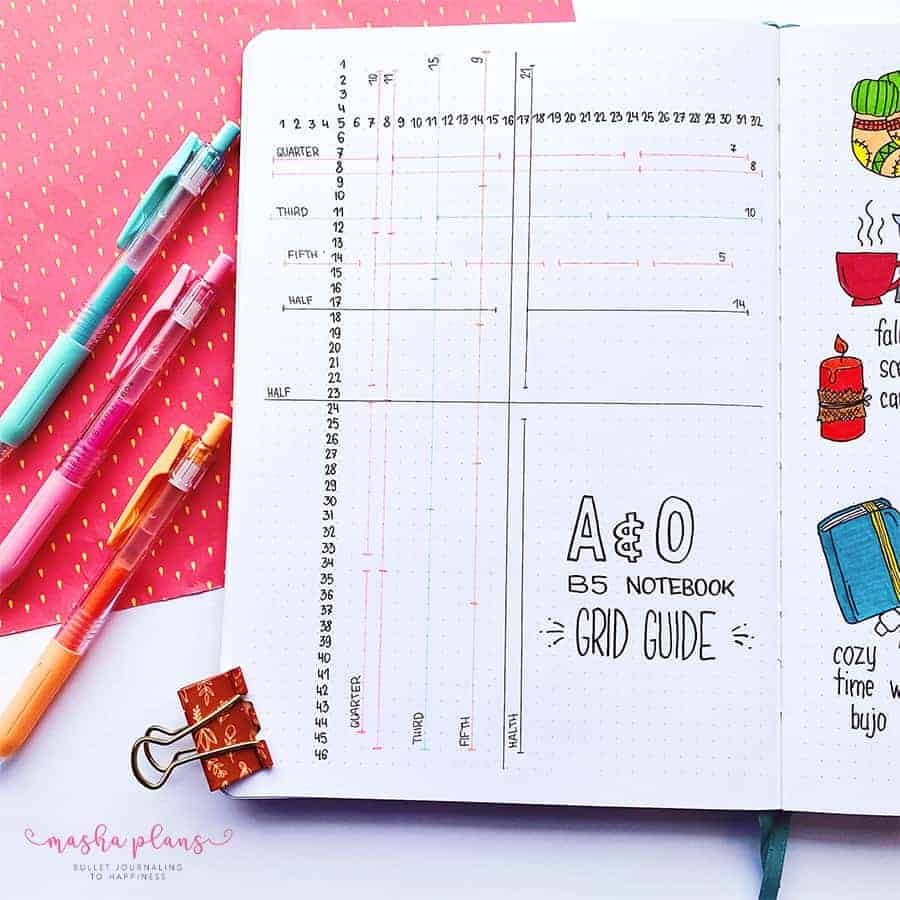
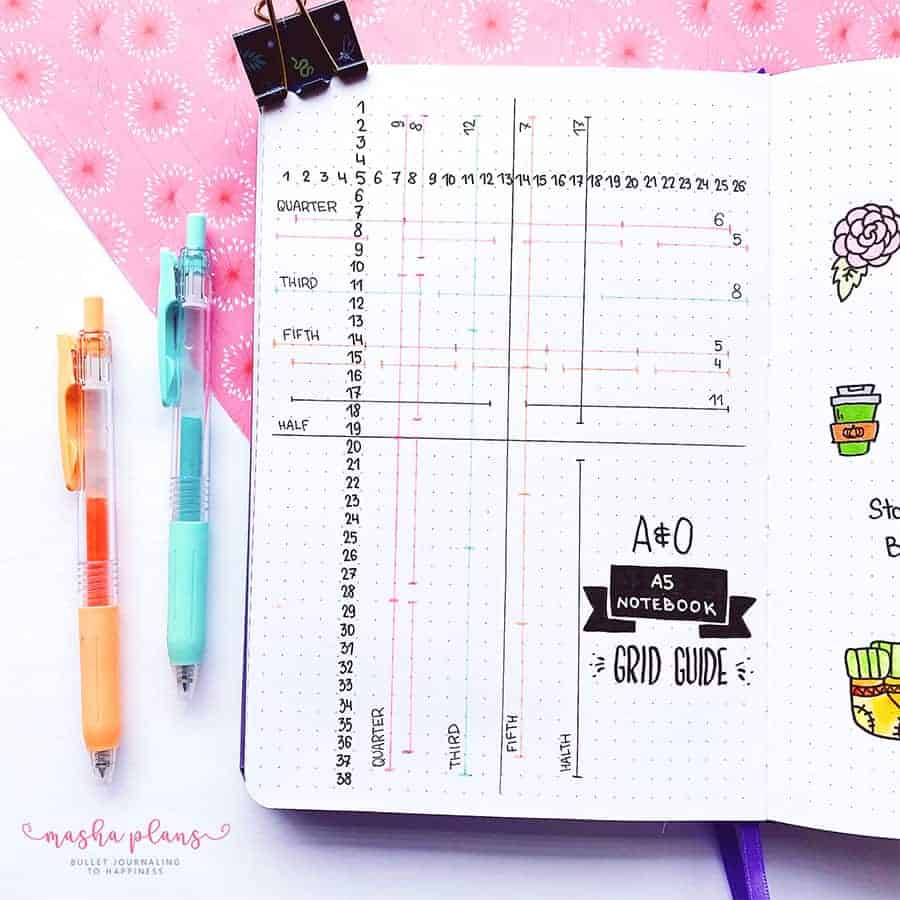
And to be clear, all my grid guide pages in this post are from my Archer and Olive journals, be it A5 or B5. If you also use an Archer and Olive journal, you can copy my page.
The next step is to divide the page in half, both vertically and horizontally. I feel like this is the dimension we all need and use.
The numbers on top and the side will help you see how many squares you need to count to find the middle of your page.
What kind of dimensions you add later depends on you and what you need from your journal.
You can create vertical and horizontal divisions.
This is what you usually need. For example, when I set up my weekly pages I often need to divide by 3 or by 4 vertically. I might also need to divide the page by 2, 3, or 4 horizontally.
So these are the measurements I added to my journal. But you might need something else, so give it a thought.
Plus, remember you can always add more dimensions later as you go.
I also wanted to include an amazing video by Plant Based Bride, where she sets up a grid guide in her journal and talks about ways she likes to use it.
If you’re more of a video-watching person, this one might be useful.
This post may contain affiliate links. They will be of no extra expense for you, but I receive a small credit. Please see my Disclosure for more details. Thank you for supporting Masha Plans!
Grid Spacing Guide Tips
I thought it might be useful to share with you some tips and different ways to set up your grid guide, so here they are.
Some of these I already tried in my journal, and some are on my to-try list for the next one.
You don’t have to do them all, just see what seems interesting for you!
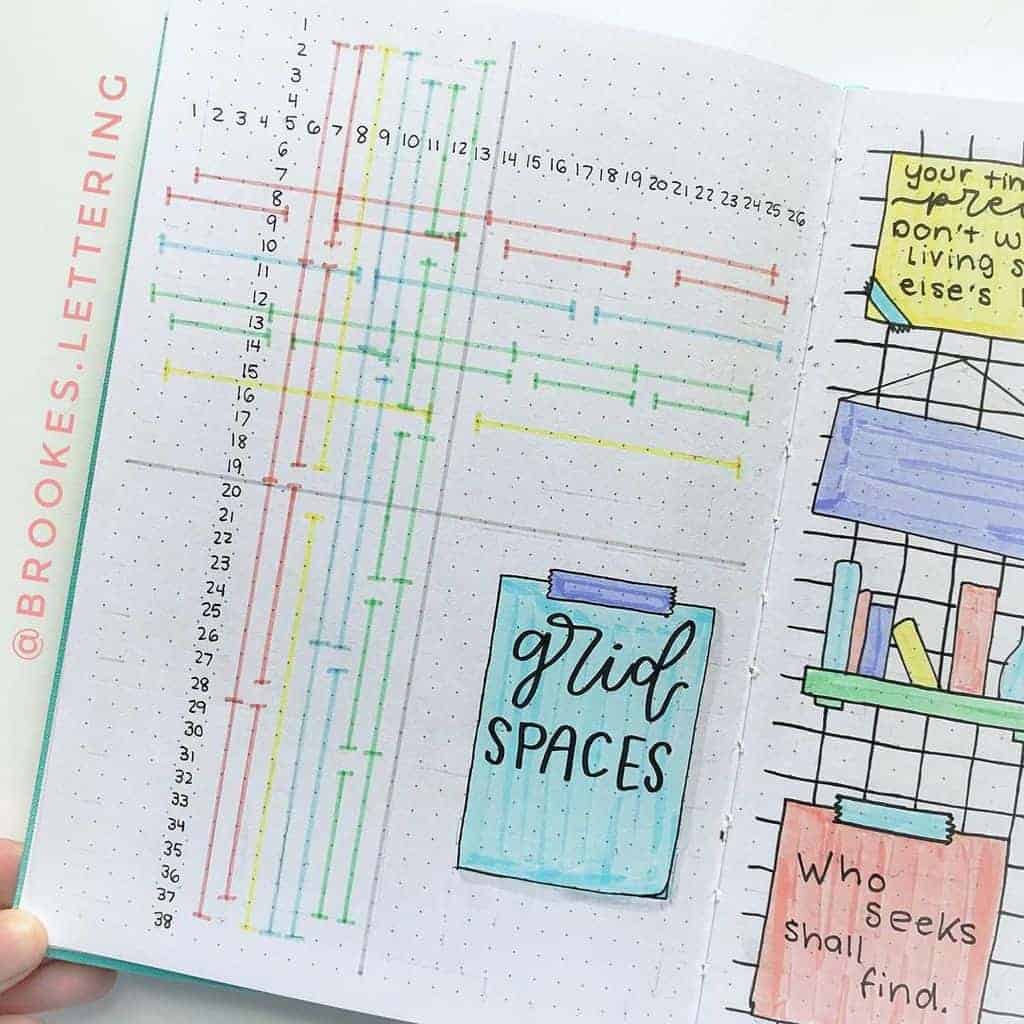
Color Coding
It can be a fun idea to use the same colors for the same divisions.
For example, if you divide the page horizontally by 3, you might use the same pen color to get measurements on diving it by 3 vertically.
Use Blocks Instead Of Lines
Just drawing grids and lines might not be that easy to understand from one glance.
What you can do instead is draw blocks. You can add colors and write numbers for necessary squares inside the blocks.
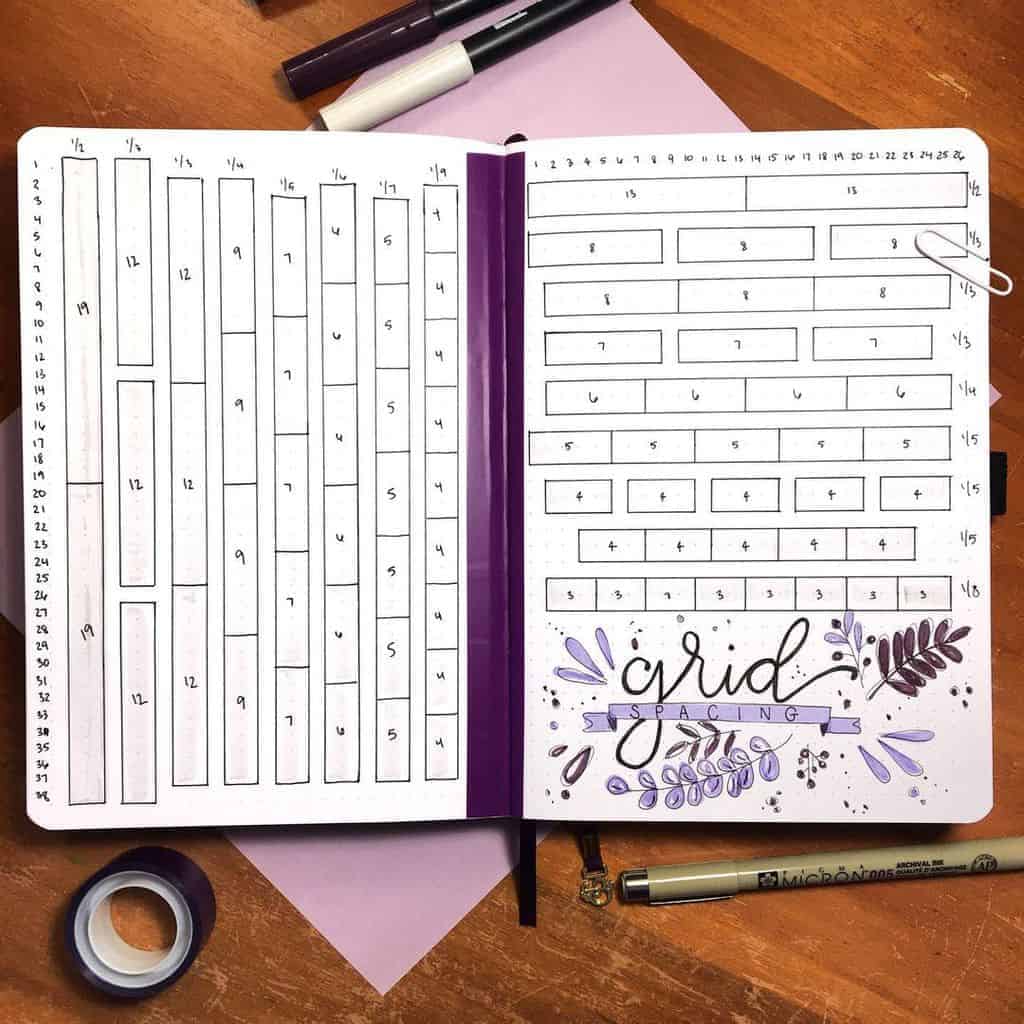
It doesn’t have to be a huge two-page spread thought, you can easily fit all the blocks on just one page.
It might look a bit crowded at first, but it will do the work and will definitely help you with your setups!
Use The Left Side Of Your Page
Your grid spacing guide is the page you’ll be looking at pretty often while working on your Bullet Journal.
Believe me when I say it’s easier and more convenient to reference the page that is on the left side.

Add Square Numbers
Actually, if you just draw your divider and look at the number of squares you added, you’ll be able to see how many you need for each part.
But it can be easier if you also add how many squares are in each section to your grid.
The whole point of the grid guide is to help you simplify things, so why not use this little trick to save a little bit more time?
Use Washi Tape On The Edge
You’ll be looking back at your grid guide pretty often, so it can be a great idea to make it easier to find.
You can do it with a simple washi tape trick!
You can create a little tab, or maybe just add some wash to the border of your page, so it always stands out.
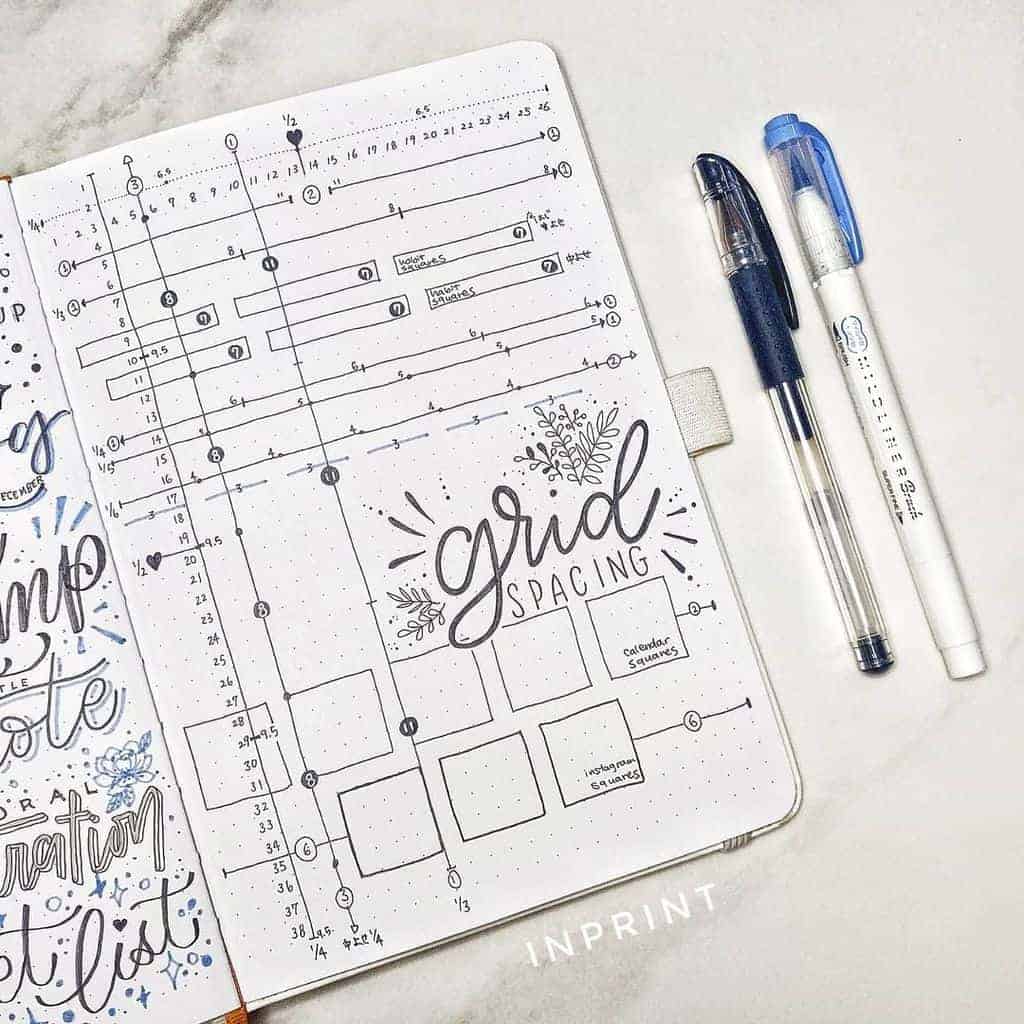
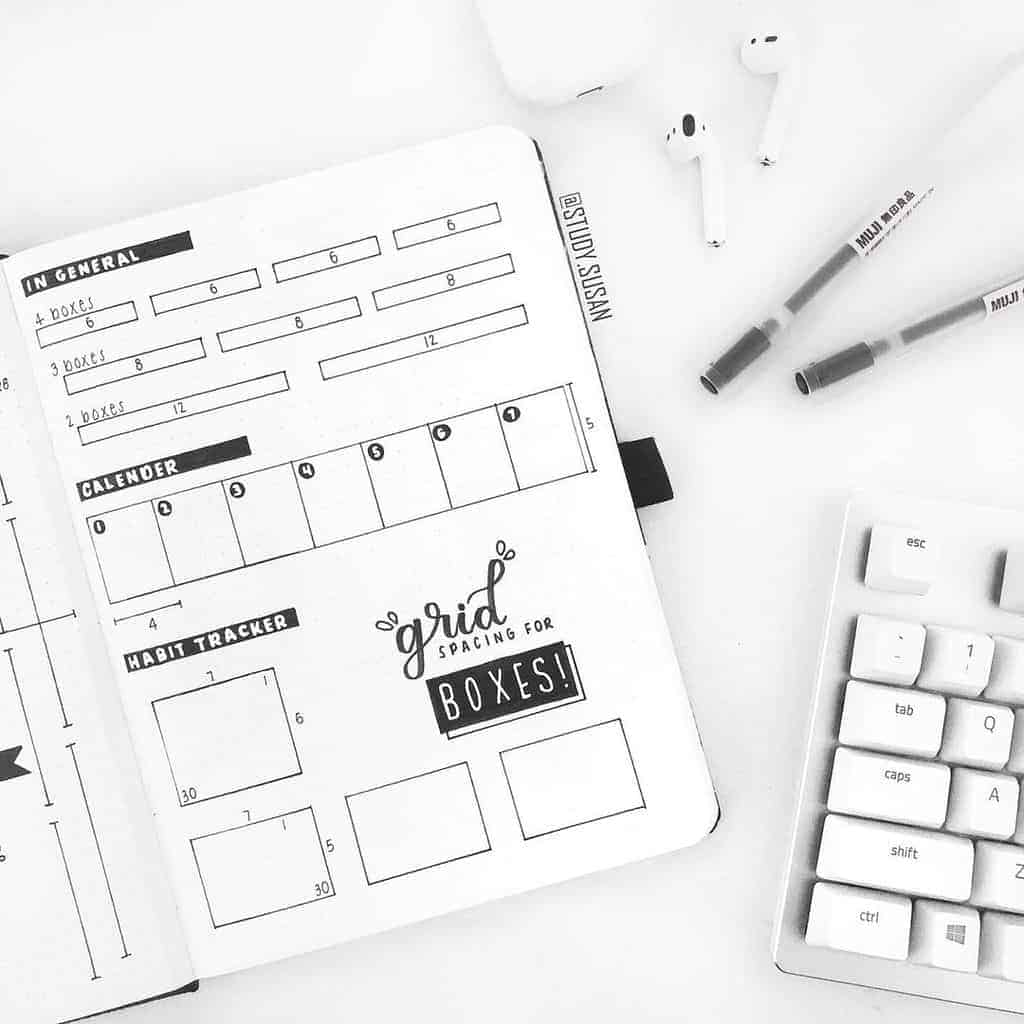
Add Other Dimensions
I like the idea below to add more than just page division.
Here are also some more detailed measurements for things she uses a lot in her Bullet Journal, such as small calendar boxes, and habit tracker boxes.
This is a great idea, and I think I might try something like that in my next journal.
Separate Guide
One more thing you can do is create a grid guide and cut it out.
You can keep it in the back pocket of your journal and take it out whenever necessary. Kind of like a stencil.
If you use an Archer and Olive journal I can recommend ripping a page from their notepad instead. The size is the same as their notebooks, and that way you won’t need to worry about cutting out a page from your journal.
(psss, in case you want to get a notepad, be sure to use my code MASHA10 to get 10% off any Archer and Olive purchase!)
Alternatively, you can actually just get a stencil. I got one, and it was even more helpful than having a spread.
The one I got is not sold anymore, but I found a few other options that are also fantastic and will work just as well:
- A5 Journal Grid Guide
- Universal Journal Grid Guide Ruler – With Spaces
- Custom Journal Grid Spacing Guide – this one is actually a printable that you can print and make into your own stencil
Grid Spacing Guide For Archer and Olive Journals
I don’t know about you, but I’m a huge fan of Archer and Olive journals, and I’m actually fortunate enough to say I worked with them as part of the Design Team for several years.
I also know many people these days have their Archer and Olive journals, so I decided to share grid guides for every size of notebook available on their site.
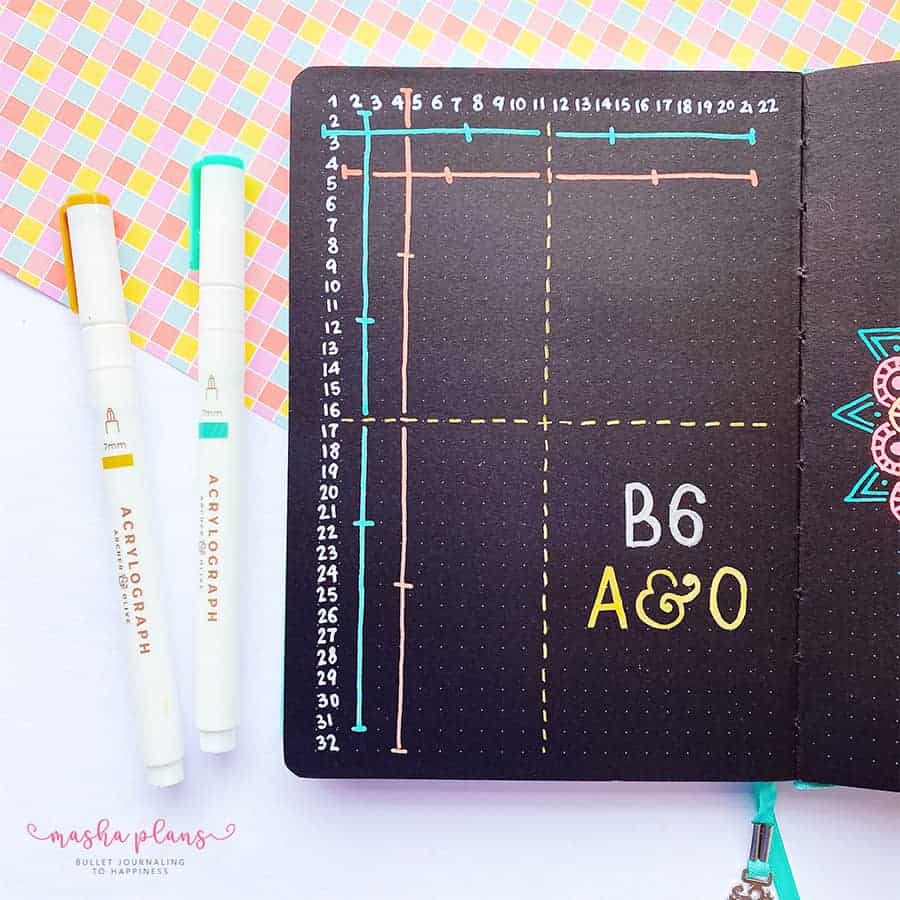
For B6 I decided to use a blackout book to make it look more interesting. Black pages really look so different, and you can play around with the colors and different effects.
Also, can we note how beautiful acrylograph pens look on black paper!
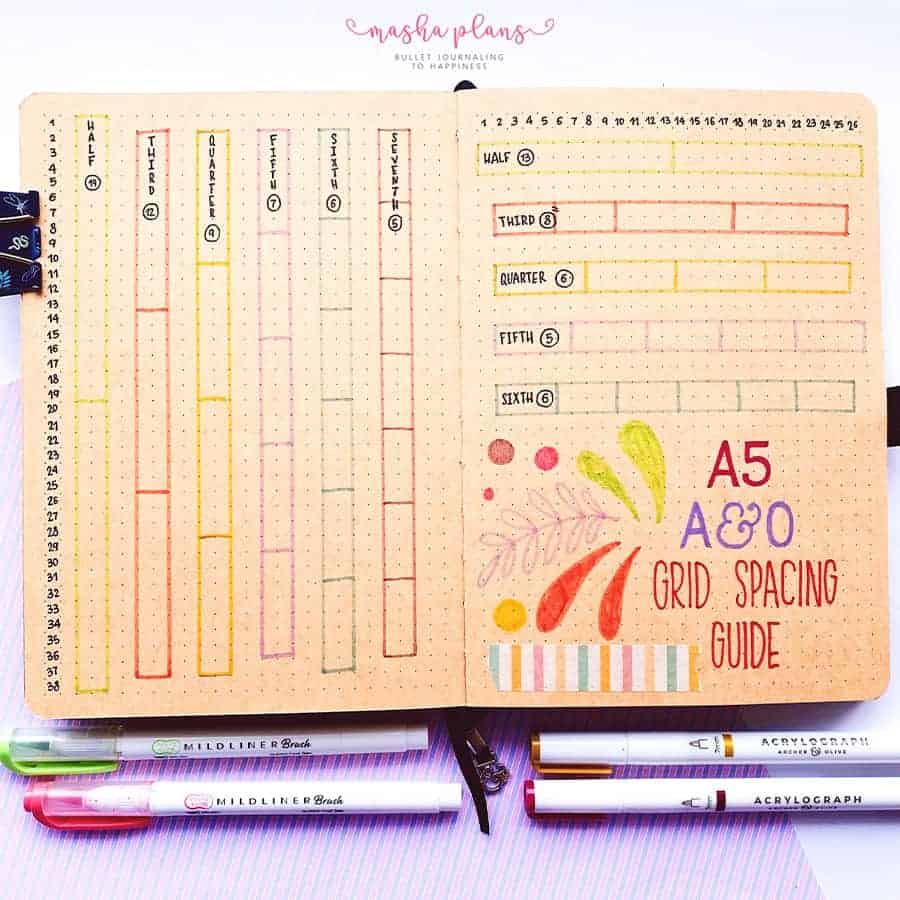
For A5 I went with the kraft journal, which I must admit I don’t use as much as I should. It has this beautiful, cozy effect to it, but I still prefer using white pages long term.
I like how, with this format, it’s so much clearer how many squares are in each division, but it is pretty inconvenient when you plan to have the measurements on two pages.
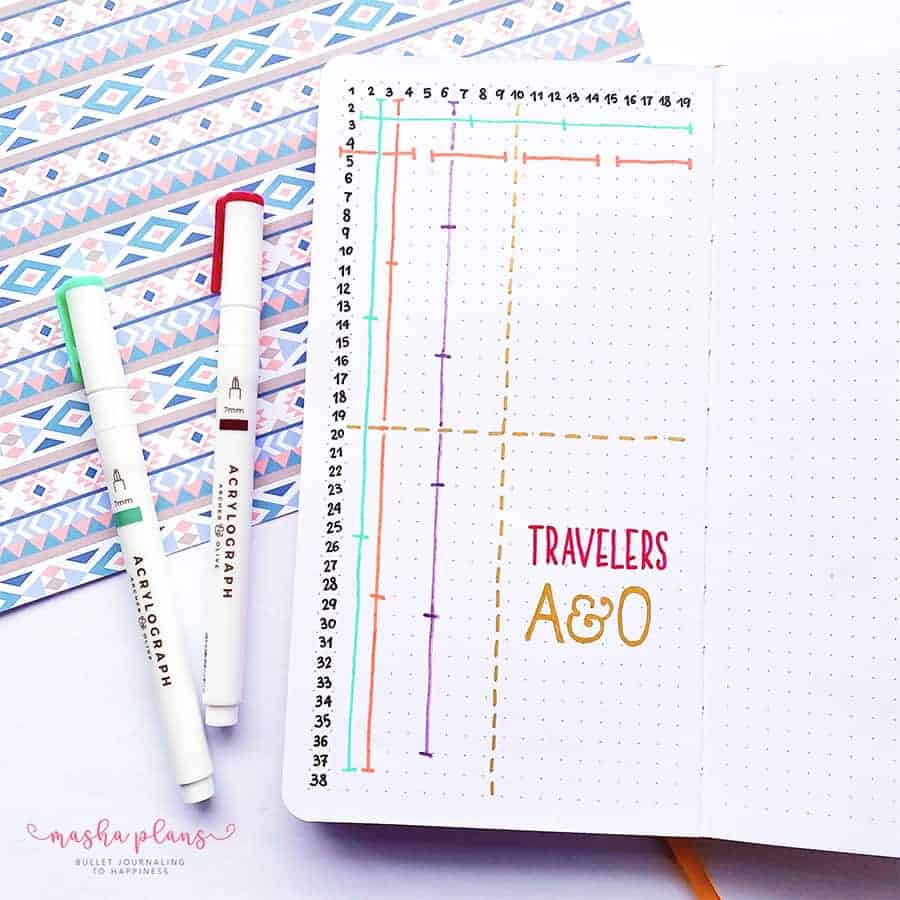
I love my traveler’s notebook, and I use it for many things.
But of course, since it’s a smaller-sized notebook, I don’t need such a detailed grid guide – just a few measurements.
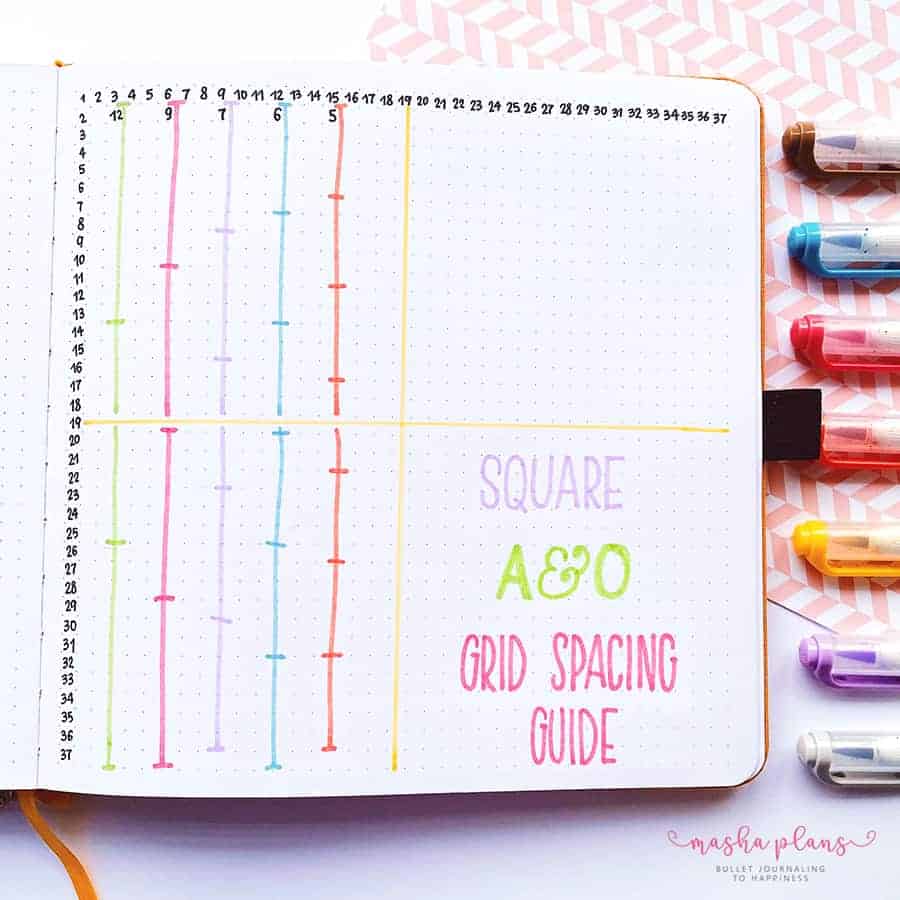
The square journal grid guide is probably my favorite – it’s so neat to just have the measurements on one side!
I went very basic with my grid guide design, but you can get so creative with all the free space you have.
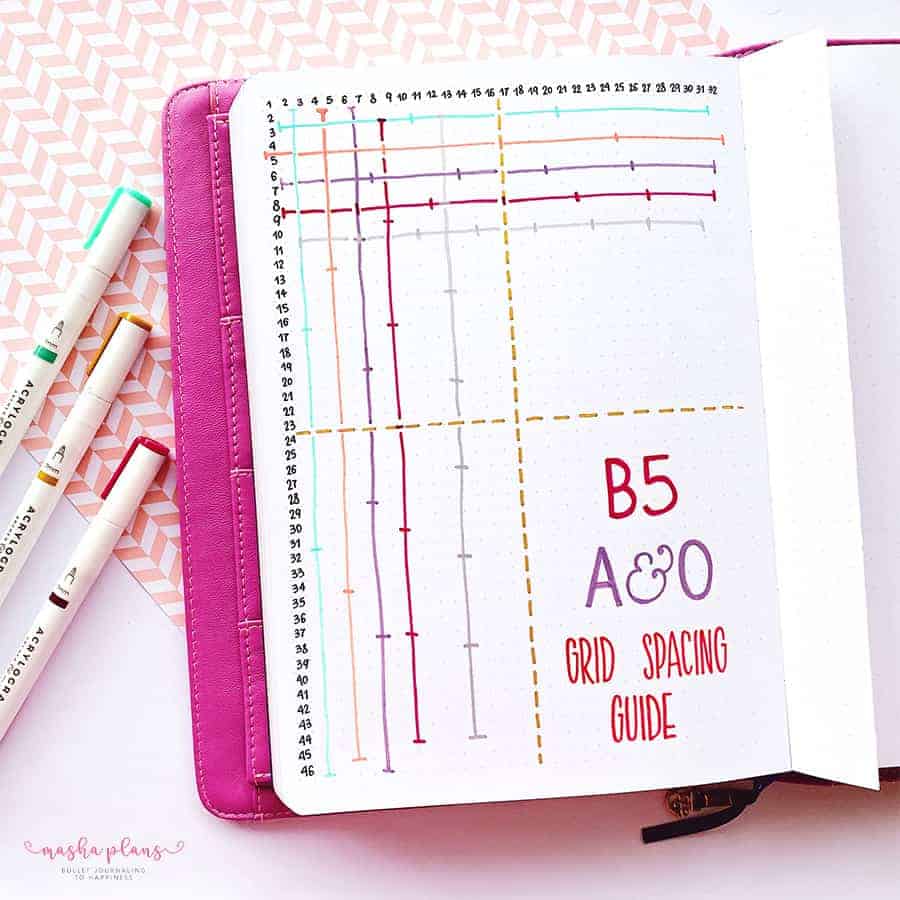
I love my B5 journals, I mostly use them for creative purposes – it has so much space to let yourself go.
They are also great for planning, especially if you’re busy and have lots of things on your to-do list.
Therefore, I divided each side by 7, so it’s perfect for planning.
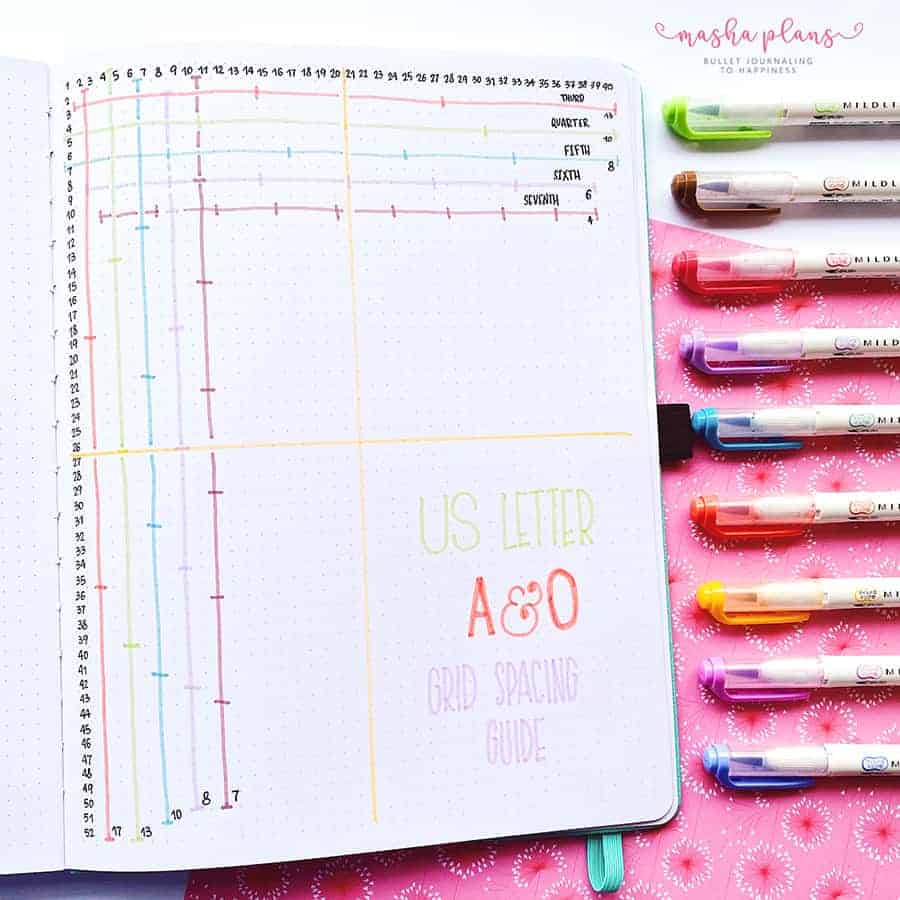
US Letter journal is the one that came in one of the subscription boxes, and I definitely was afraid to break into this one.
I’m happy I decided to start with a grid guide; now, I’m not that afraid to start using it.
There is also a small mistake in this grid guide, particularly in the horizontal division by 7. It should be one square longer, so consider this if you decide to copy it.
And there you go; now you know everything about creating a grid guide in your journal, and you even have a guide and all measurements ready for you if you use an Archer and Olive journal.
More Resources
Are you looking for more resources and page ideas to help you get the most from your Bullet Journal? I want you to build the perfect planning system that works for you and is easy and not overwhelming.
So here are a few blog posts for you to check out next:
- 13 Ridiculously Useful Bullet Journal Tips For Beginners
- 25 Bullet Journal Hacks To Try Right Away
- 15 Inspiring Yearly Bullet Journal Pages
>>> Did you ever use a grid spacing guide in your Bullet Journal? Are you planning to?
Hope this post was interesting. If you find it so, please share! If you enjoy my content and want to show your appreciation, please consider supporting me with a cup of coffee.
And remember: Keep Journaling, and Don’t Be A Blob!


Ooh this is sooo helpful. I always mess up dividing my pages lmao
Absolutely feel you! Glad this post helped.